


- Grind the dried chesnuts as finely as you can, Food processor ( min 750 watt) works great for grinding chestnuts and barks into a coarse powder.
- Pour the crushed horse chestnuts into the olive oil on the stove top and stir well.
- Use a double boiler. Fill your pot 1/4 of the way with water and set the bowl filled with chestnuts and olive oil into the water.
- Then turn on a low-medium heat. Since every stove top is different, you’re going to need to monitor the temperature of your oil-herb mixture to make sure it doesn’t get too hot. The ideal temperature is 40-42 C. ( Be careful; a higher temperature may burn the oil or destroy the medicinal qualities of the chestnuts)
- Keep checking the oil every 15 minutes for the the first hour and then less often. Give the chestnuts a good stir every time you check the temperature. Maintain the olive oil temperature of about 40-42 C for 2 hours.
- When it is done, allow the oil to cool for a while. Then strain through a cheesecloth, discard the spent chestnuts. Transfer oil to a clean bottle. Now it can be massaged gently onto varicose veins and spider veins.
- Preheat the oven to 200°C.
- Slice the spaghetti squash in half lengthwise or four pieces and scoop out the seeds and ribbing.
- Massage the inside of the squash with olive oil and sprinkle with salt and pepper.
- Place the spaghetti squash cut side down on the baking sheet and use a fork to poke holes. Roast for 40 minutes or until lightly browned on the outside, fork tender, but still a litte bit firm. Do not bake too much otherwise you will end with a squash puree!
- Remove from the oven and flip the squash so that it’s cut side up.
- When cool to the touch, use a fork to scrape and fluff the strands from the sides of the squash.
- One of the best ways to eat spaghetti squash is to combine with pesto rosso sauce. It is also great when combined with spicy chickpeas. Mushroom kale and plant based parmesan combo is also great!


To relieve symptoms of chronic venous insufficiency and treat treat varicose veins
Horse chestnut is widely used to improve variocse veins around the world. You may be noticed that many cream and cosmetic products contain horse chestnut extract these days.
Varicose veins are swollen, bulging veins that typically occur in the legs. Horse chestnut seed extract may improve venous tone by improving blood flow in your legs.
What are the other best plants for varicose veins?
Besides Horse Chestnuts, Cayenne, Gingko biloba, Grape Seed Extract, Chromium are great for improving blood flow.
For cleaning purposes
Horse chestnuts are part of the soapberry family which means they contain saponins. These saponins have been utilised for cleaning purposes for centuries. And they are hidden inside the meat of the chestnut.So you need to crack the chestnuts to activate the saponin. Using saponins means to use a natural form of soap. It is slightly bubbled when the saponin is activated, not like we are often used to, but it contains just as much cleaning powers.You can use chestnuts for any cleaning job around the house such as laundry, for the floors, and the dishes.
HOW TO MAKE HORSE CHESTNUT OIL ?


Ingredients:
200 g horse chestnuts
1000 ml olive oil
Instructions:
At the end you will have an soothing horse chestnut oil that can be applied 1-2 times a day. If you’d like to make salve, you’ll just need to add a veganwax– check the instructions to make an herbal salve below.
HOW TO MAKE HORSE CHESTNUT SALVE?


Ingredients:
350 g Chestnut Oil
100 g Carnauba Wax
Lavender Essential Oil
Instructions:
1.In a pot over low heat, warm the olive oil. Add the caranuba wax you measured. Continue to heat gently, stirring from time to time, until the wax is completely melted.
2.Once it is melted, test your blend to see if you like the consistency. Dip a spoon in the melted mixture and leave a coating on it. Put the coated spoon in the refrigerator for about 10 minutes and then check the spread-ability.
3. If it’s too runny / oily, add more carnauba wax , if it’s too hard, you can add more olive oil. (about half tablespoon at a time.)
4.Once you’re done with the consistency, you can add essential oils.
5.Add 2-3 drops lavender essential oil and thoroughly stir the oils into the mixture, then pour the salve into the clean jars . Let the salve to cool, and then lid your containers. Waxes is a great preservative, they last for many years.
What is Carnabua Wax?
Carnauba wax is vegan and is often seen as a good alternative to beeswax. Carnauba wax is obtained from the leaves of the Carnauba palm of Brazil. It is used in many polishes and personal care products as it imparts excellent shine and hardness.
Brazil wax production begins by harvesting the fronds, usually only 6 to 8 leaves at a time, which are then dried and either beaten by workers or processed mechanically to release the waxy flakes.
Once collected, the wax is then placed into boiling water and filtered for purification purposes. From there, it is dried once again and sorted into levels of purity. Some will be powdered down, while the rest will remain in its natural, flakey state.
Is Carnauba Wax edible?
Yes, it is. In fact, carnauba wax is widely used throughout the food industry: from candy through to the waxy coating found on fruit and vegetables.
Obviously, when you buy an apple from the store it doesn’t come with an ingredient list, but it’s highly likely to have carnauba wax as a coating.
In other foods, such as gummy candies, you may see the wax listed as either 903 or E903, depending on whereabouts in the world you live. ( Source: https://happyhappyvegan.com/carnauba-wax/)
Is Carnauba Wax Good for Skin?
It is hypoallergenic, very emollient and has a high melting point — perfect for thickening skin care products (Source: Wiki). When used in cosmetics, Carnauba Wax gives the product a smooth application and glossy finish. It also helps to keep the product in pliable, yet solid.

Pumpkin is steamed until soft, chilled and then frozen. When you blend frozen pumpkin chunks with the other smoothie ingredients, you get this lovely silky and refreshing spoonable shake.
Ingredients:
130g Cooked Pumpkin
200g Frozen Banana
25g Almond Butter
1 tbsp Maple Syrup
1/2 cup Plant Milk
1/4 tsp All Spice
Raw Dark Chocolate optional to drizzle
Instructions:
1. Cut the pumpkin into small pieces and steam until soft. Let chill. Freeze pieces in the freezer until the next day or at least 3-4 hours. You can also use pumpkin raw if you prefer.
2. Blend all ingredients until smooth and creamy. Add maple and plant milk until the perfect consistency is reached. We love our smoothies thick and spoonable.
3. Melt raw dark chocolate and drizzle it inside the smoothie jars.
4. Pour smoothie mixture. Serve immediately.

Spaghetti squash is a nutritious winter vegetable that offers lots of fiber, beta-carotene, folate and more. It offers a really fun, spaghetti-like texture and built-in bowl shape
Ingredients:
1 kg spaghetti squash
1 tbsp extra-virgin olive oil
Sea salt
Freshly ground black pepper
Instructions:


Ingredients:
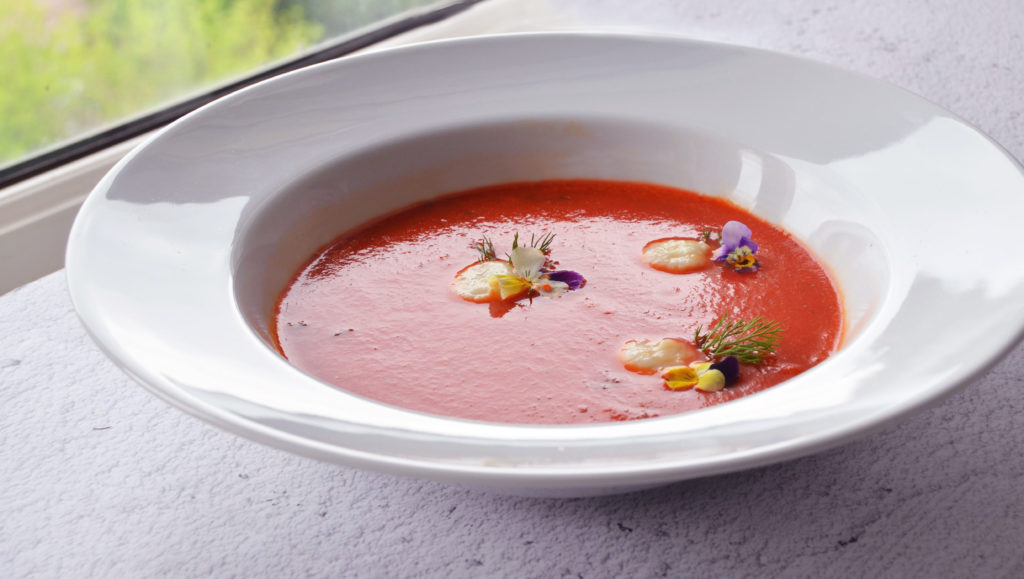
400 g red bell peppers
200 g san marzano tomatoes
600 ml water or veg stock + more if you need
2 tbsp fresh dill
1 tbsp roasted garlic puree
A pinch red chili flakes
2-3 tbsp onion cream to serve
Viola to decorate
Instructions:
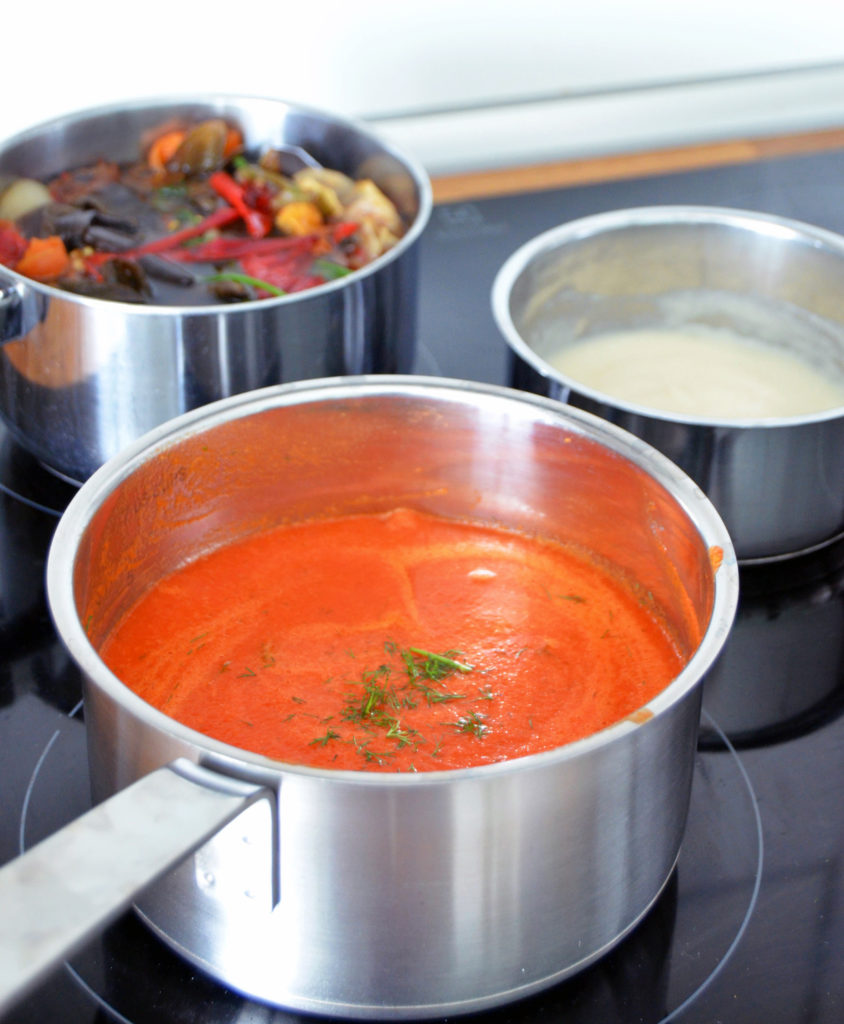
1. Roast red peppers and garlic at 200 C for 15-20 minutes in the oven on a foil-lined baking sheet until tender and charred on all sides.
2. Then remove red peppers and garlic from the oven, let cool to the touch, and remove charred outer skin seeds and stems. Transfer to a high speed blender and add water to purée soup.
3. Then transfer back to pot and bring to a simmer over medium-low heat. Taste and adjust seasonings as needed.
4. Let simmer on low for at least 10 more minutes. The longer it simmers, the deeper the flavor develops.
5. Serve as is or top with desired toppings, we used fresh dill, chili flakes, viola and onion cream.


Notes:
Veg stock recipe: https://www.gurmevegan.com/vegetable-stocks/
Onion cream: https://www.gurmevegan.com/how-to-make-onion-cream-2-ways/
Vegetable stocks are used as the essential of many dishes to improve their depth of flavour.
They are tend to be healthier, when no fat is used to cook the vegetables.
There are two basic types of vegetable stock; white and brown.
White vegetable stocks are typically colourless and milder and fresher in taste, adding a subtle flavour to dishes. These are made by simply adding the vegetables raw into a pot with water and simmering.
Brown vegetable stocks are richer and deeper in colour, adding a more robust flavour to dishes. This is achieved by roasting the vegetables until caramelised, before simmering them in water.
Which vegetables work best?
For a base, start with onion, garlic, celery, leek, carrot and peppers. The standard aromatics are bay leaves, peppercorns, thyme, dill and parsley stalks. You can then add other vegetables, herbs or spices to flavour your stock however you want.
Use sunchokes or celeriac for an earthier taste, butternut squash peel or apple for sweeter notes or fennel, star anise, cardamom and some tarragon for a stock with a pleasant aniseed flavour.
For a light stock, use a white stock base and add pea pods, artichoke leaves, woody asparagus ends or bean pods.
Ginger, tangerine and lemon grass in white stock give you a nice aromatic flavour.
For an intense stock, use a brown stock base and add umami-rich ingredients such as dried mushrooms, tomato and carrot purée and seaweeds.
Which vegetables don’t work ?
Avoid adding of any member of the brassica family; broccoli, cauliflower, kale and cabbage among others.
They will ruin your stock with a sulphurous and bitter flavour. Softer vegetables such as potatoes or pumpkin are no good as they break down too easily, creating a cloudy stock.
Preparation:
Preparing the vegetables
The fresher the vegetables you add for stock, the better the flavour will be. Collect peels, ends and trimmings to add to the pot for extra flavour while cooking and set aside to use in veg stock. It is also important to ensure they have been cleaned well.
All the vegetables should be chopped very finely. This is important because more of the vegetable will be exposed to water while simmering and also creates a larger surface area for caramelisation in the oven.
As a rule, always add an equal amount of water to the weight of the vegetables, or pour water into the pan until the vegetables are fully submerged but covered by no more than a few centimetres.
Instructions:
1. In a large pot, add the vegetables of your preference and sweat down until just starting to colour – around 10 minutes.
2. If using wine, add now and reduce by half. Then top up with water until the vegetables are just covered by a few centimetres. Bring to the boil.
3. Turn down to a simmer then add the spices such as bay leaves, rosemary, peppercorns or aromatics such as ginger or lemongrass.Continue cooking for at least 30 minutes, preferably 45 minutes to 1 hour. The flavor will deepen the longer it cooks.
4. Strain through or a strainer so you are left with a nice clear stock. Divide between storage vessels. Let cool completely before sealing. Use immediately or chill it.
Storage: The stock will keep for 3–5 days in the fridge or will freeze for up to 2 months


Aronia berries a.k.a chokeberries are dark purple, almost black berries that visually look similar to blueberries.
Fresh ones are very astringent and sour, with a hint of sweetness that’s brought out through cooking. Dried aronia berries express mild sweetness along with a tart with a tannic aftertaste. All of it will make your mouth pucker. It is hard to consume them raw. Of course you can make some nice smoothies with a combination of bananas, aronias etc. But in dessert recipes, be sure to taste for proper sweetness and add natural sweeteners if needed.
In my recipe, which you will find below, I made a slightly juicy aronia jam in its most natural form, avoiding adding any additives such as pectin. You can prepare it in advance and store it in your fridge and use it for sweetening by pouring it on the porridge you will make in the morning.
Ingredients:
250g aronia berries
1 cup water
Zest of 1 lime
Juice of 1 lime
1 tsp grated ginger
150g coconut sugar
Instructions:
1. Grate your ginger, lemon zest and place in the lime juice, add the coconut sugar, stir well.
2. In a deep pot, add the aronia berries, cover with 1 cup water. Cook on medium-low heat until they are soften and absorbs the water.
3. Then add the ginger lime mixture over the aroniaberries. Stir well.
4. Place your jam in a clean jar, close the lid.
5. Place the jar in a deep pot, cover with water, cook on low heat for 30 minutes.


Whole-grain sorghum contains more fiber and protein compared rice and is higher in just about every other nutrient. It takes a little longer to cook than regular rice and requires more liquid. You can also soak for 1 hour before cooking or overnight to make this process easier.
Ingredients
1 + 1/4 cup sorghum cooked ( cook for about 70-85 minutes, in some cases it may take longer, use pressure cooker if you prefer)
1 red onion finely chopped
1/4 cup dried chanterelle mushrooms ( soak in warm water for 10 minutes them cut into small pieces)
1 tsp salt
2 tbsp olive oil
1 large tomato chopped
1 small jalapeño chopped
2 garlic cloves minced
1 tbsp concentrated almond milk + 4 tbsp water ( or almond milk)
1 tsp oregano
Instructions
1. Cook your sorghum, set aside.
2. Place chopped jalapeño, tomato, olive oil, chanterelles and garlic, saute on medium-high heat, add 2-3 tbsp water and continue to cook until mushrooms are soften well.
3. Once done, add concentrated almond milk and water, stir well.
4. Add the cooked sorghum in the pan, toss well with the chanterelle mixture. Cook on medium heat for about 2-3 minutes or until sorghum absorbs all the water and tender.
5. Season with salt and pepper. Enjoy!

If you are having cold symptoms, make this drink and drink 2 times everyday. Plus, it is truly invigorating and a great way to start your day with. You will get a strong but good taste and I believe you will love it. One of my favorite medicine I am used to make this everyday and wanted to share with you.
Tip: People usually add black pepper as piperine, an active compound in black pepper, can improve the bioavailability of turmeric. But according to Medical Medium, there is no benefit of this. I skip adding blackpepper. You can use if you prefer.
Ingredients:
100 g fresh ginger,
100 g fresh turmeric,
3 large garlic cloves,
3 kg orange
Method:
1. Grate the turmeric and ginger (wear gloves, otherwise your hands and nails will turn yellow!)
2. Juice everything in a slow juicer.
3. Transfer to glass or bottle. Shake and drink immediately.
Storage: Stays fresh in the fridge up to 3 days but it is best when drink in the same day.
This mixture may have antibacterial and antiviral properties, which can help to protect against flu’s and colds. Also, this drink may support your immune system as it’s rich in antioxidants and may also have anti-inflammatory activities!

Pea sprouts are related to the sugar pea, making it a good substitute for peas in recipes. Its sweet taste does well in combinations with bitter and tangy dishes.
They grow fast, taste delicious and are rich in Vitamin C, A and protein. Growing pea shoots is easy.
The fruits of your work in just in two weeks is rewarding and motivating. They only need two hours sun a day. So prefect to grow them in nordic climates in winter.
How to make your own pea sprouts at home?
1. Soak the peas in water for 24 hours.
2. Chose one 2 inches 7-8cm deep pot.
3. Fill your container with compost, about 1/2 to 3/4 inch below the top.
4. Sow the seeds on top of the compost
5. Cover the seeds with a layer of compost .
6. Water the surface lightly.
7. All you need to do now is keep the compost moist. Check it everyday. If you are in summer, you will see sprouts within 2-3 days, in winter it may take longer.
8. They will have grown 3 – 4 inches tall. Then crop and enjoy your harvest!