


- Boil the potatoes until soft, then cut into small pieces and transfer to the food processor. Add cornstarch, salt, psyllium powder and olive oil and mix well at high speed. Remove the dough from the food processor and divide it into small balls and set aside.
- Cut the onions, carrots and garlic and transfer into the pan. Saute with a tablespoon of olive oil. When softened, add the tomatoes cut into cubes and cook a little more. Add the latest capers and freshly chopped rosemary and stir, remove from heat.
- Roll small balls using a rolling pin. And place a tablespoon filling. Close the ends and make a moon shape. Repeat the process for the rest of the dough.
- Fry each side in a pan with a little olive oil. Serve with BBQ if desired.
In October I made a new trip to Copenhagen again. This one was a long-term business trip. I tried new things as much as possible when I find the time. In this article I share with you my good and bad experiences.
In my opinion, the best time for copenhagen is autumn; that the colorful leaves fly on the air and the weather is cool but soft enough to make traveling impossible. The weather is felt between 3-5 degrees, but it is not an intolerable cold.
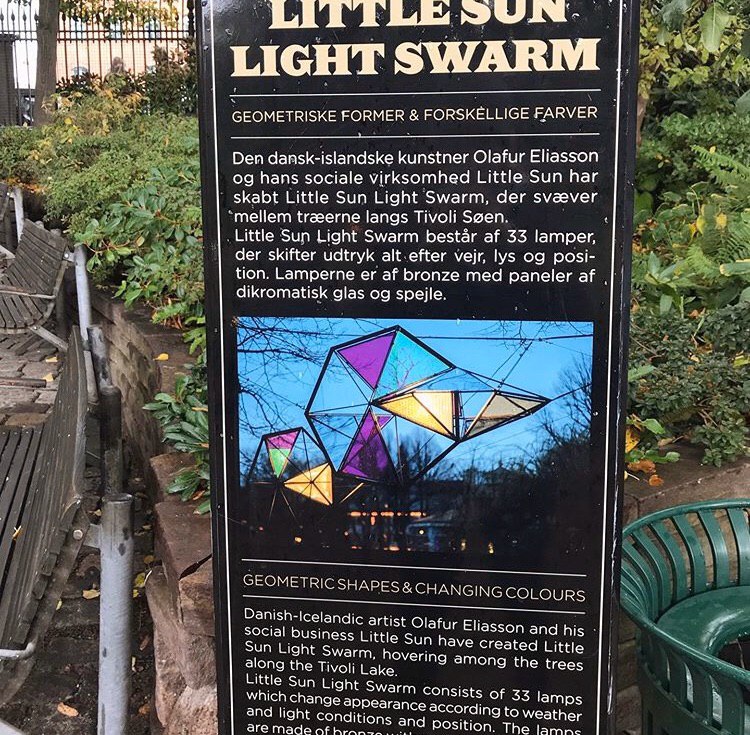
In October, due to Halloween it turns into a fairy-tale place during the month. Tivoli welcomes you when you first land to the central train station.


This is also where the center of the city begins. Almost everywhere walking distance.
This is also where the center of the city begins. Almost everywhere walking distance. Nørrebro, a multicultural neighborhood, welcomes you when you cross the bridge. While some might be interesting, it gives Middle Eastern feeling to me, one of the areas I didn’t find very clean. Indreby is in the heart of the city and within walking distance of everything, an good area to stay. Prices are higher than other regions. Frederiksberg is a region where prices are a little more reasonable and there are more varieties, resembling kadikoy bostancı in Istanbul. It was one of my favorite areas.
I stayed in one part of my trip in Indreby and the other part in Nørrebro. In my previous travels, I always stayed in Malmö and made daily trips to Copenhagen. It is not a sensible alternative for long-term stays.
In Copenhagen you can see 7 eleven shops almost at the beginning of the step. There are many vegan options such as sandwiches, salads, coffee, croissants, raw balls, chia puddings, which you can quickly grab and go. Some may even have a 50% discount on those whose expiration date expires; keep your eyes open.
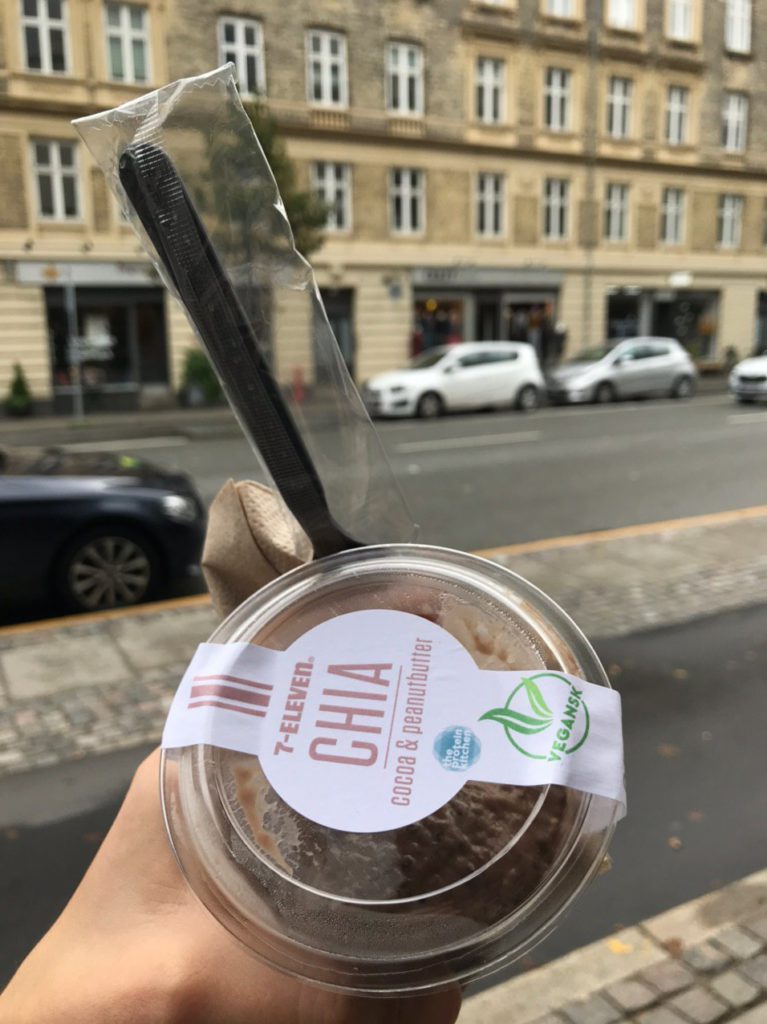


The pink wrap with beet and seitan was one of the first meal I had when I landed at the airport. It was very tasteless. But the most beautiful food in the world, when you ar hungry. It’s all about the needs of that person. I ate this wrap again in the following days when I didn’t have the opportunity to sit and eat during the walking a long way.
Of course, I have to admit that I’ve tried too many new things and ruined my stomach.

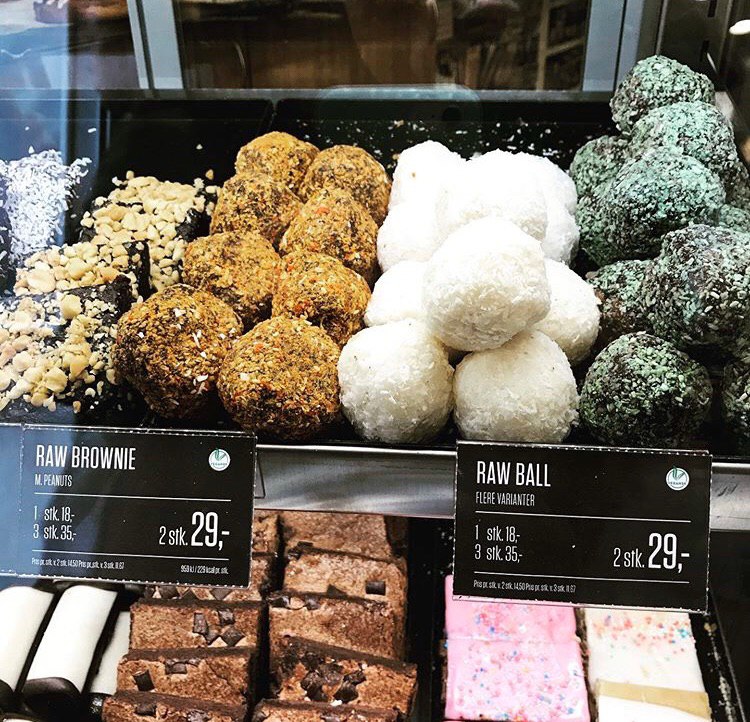
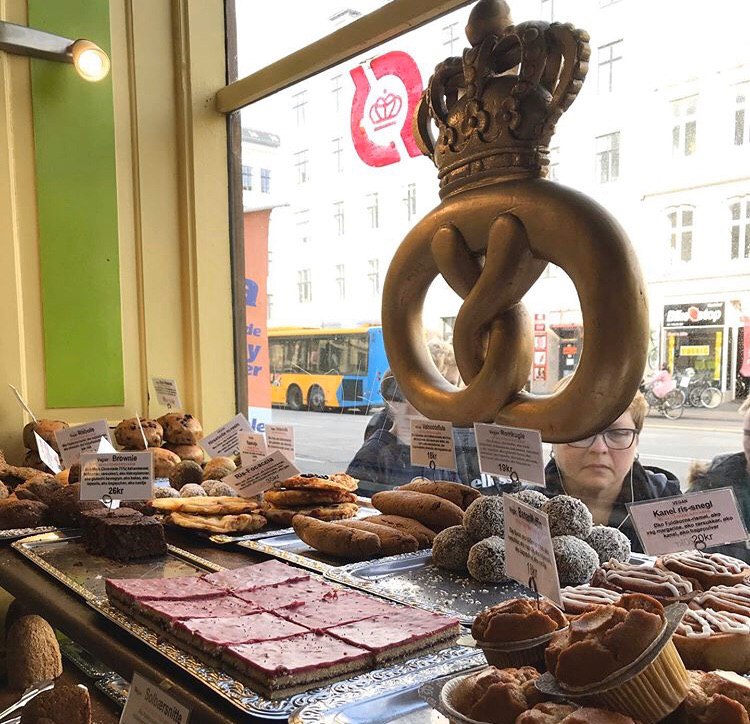
When you continue and finish the Tivoli gardens on the left, Rådhuspladsen (town hall) welcomes you. I took a break here and had a look at Starbucks. There are many vegan varieties ranging from sandwiches to desserts and plant-based milks. The raw bar I tried was too sugary and I felt my blood pressure. After a long diet of raw vegan food, I decided to stretch it a little while traveling and tasted cooked food as well. I should also say that what I tried in CPH made me unpleasant in general. As in Finland, there are too many oily and sugary products.


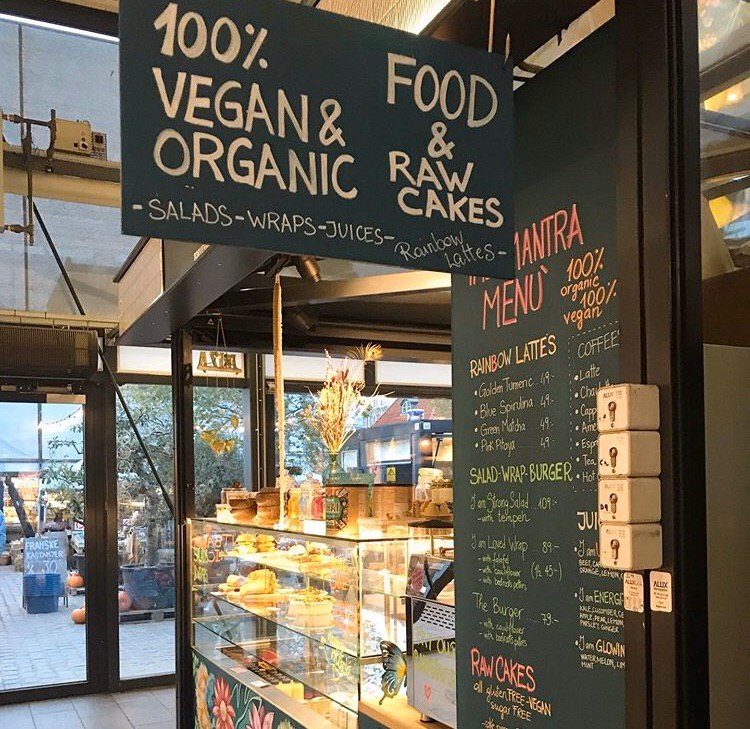
When you cross the road, you come to Nørreport St where the vegan restaurants start. Right on the left is the Torvehallerne city market. Here you can find gourmet food, African fruits, cold pressed juice shops, desserts and shopping stores. It was one of my favorite places. Especially the Fresh Market Copenhagen here made me feel like I was refreshed.
Some fruit juices do not have names on the bottle. Prices of the same color may be different. It is good to say which one you bought at the checkout, otherwise they can get different prices.


Organic Boho is located in the same area. Mantra menu has many healthy vegan options.


There is also a shop with various tropical fruits from Africa. You can buy fruits by tasting. I’ve tasted bananas of various colors here, There were many different bananas that tastes like cheese. If you come across, I highly recommend to give these fruits a try.


I have learned that the Banana in Torvehallerne is closed. Alternatively, there was an ice cream shop called Isa Bella, which had a lot of vegan options. Especially the strawberry was very good.


When I left Torvehallerne and went a little further, I went to Souls, where I had been thinking about going by for a long time. There are many branches of this restaurant in Copenhagen, I chose this place because it came to my ease, which is only a few steps away from Torvehallerne.


I’ve tasted my first beyond meat burger at Souls. He bothered me because his texture looks like meat. Sweet potatoes were sucked in oil and were very heavy to eat. I couldn’t eat more than half of my stomach feeling uncomfortable and had a take away. When I went to the hotel in the evening, unfortunately I had to throw in the trash.
Some things are really nice from afar.
Next to the Souls is the Naturbageriet bakery on the bridge connecting Nørrebro. This bakery also has a branch with a similar name. They veganized a lots of traditonal desserts. They are not healthy due to the excess sugar and fat content, but it was exciting to see a complete vegan bakery.


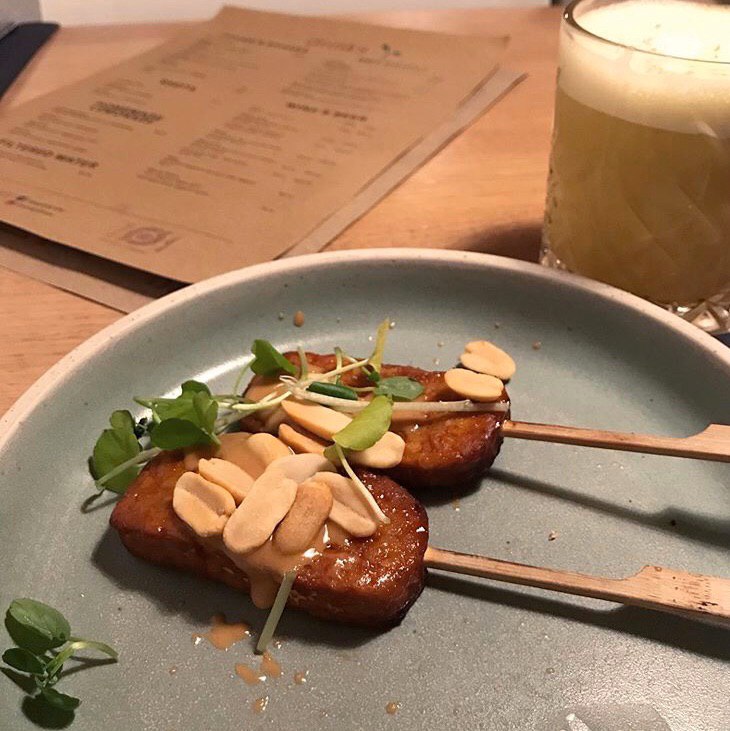
The next day, I stopped at Torvehallerne and had a juice, after refreshing, went to Simple Raw in Indreby.
I ordered little tempeh platter and golden latte in the concern of breaking my stomach. The peanut sauce was delicious. It was one of my favorite places.


Magasin Du Nord is a multi-storey shopping center in the Indre By district. There are many restaurants and grocery stores inside. Vegan options are also quite numerous.


When you continue straight from Nyhavn and finish the road and cross the bridge, a square with street delicacies welcomes you. There is also a branch of GRØD, the most popular oatmeal porridge brand in Copenhagen, where all products are not vegan but there are vegan options.
Another is in the center of the city and in Nørrebro. Quite crowded place. It can be an alternative for those who love trendy places.

Located in Nørrebro, close to my home, Pow Vegan Pizzeria hooked me with the thinness of the crust and the combination of sauce and vegetables. They make delicious pizzas, you can buy them as slices, and the prices are very reasonable. I went twice, when I went third it was closed because it was early hours 🙂 They open at noon. There is another vegan pizzeria called Made In Italy near Nyhavn, but the crust was quite thick so I left without eating. For those who like fluffy dough, Made In Italy DK may be the reason of choice. At certain times they organize vegan cheese workshops. They also sell my favorite Italian Gondino cheeses in their shops.


Irma, Superbrugsen and Kvickly (coop) are one of the most beautiful markets in Copenhagen. Netto, Rema1000, Lidl and Fotex are the markets with more reasonable prices but low quality products. Of course not all products, but good things can come out in between.


Helsam, one of the health stores, has many vegan products.


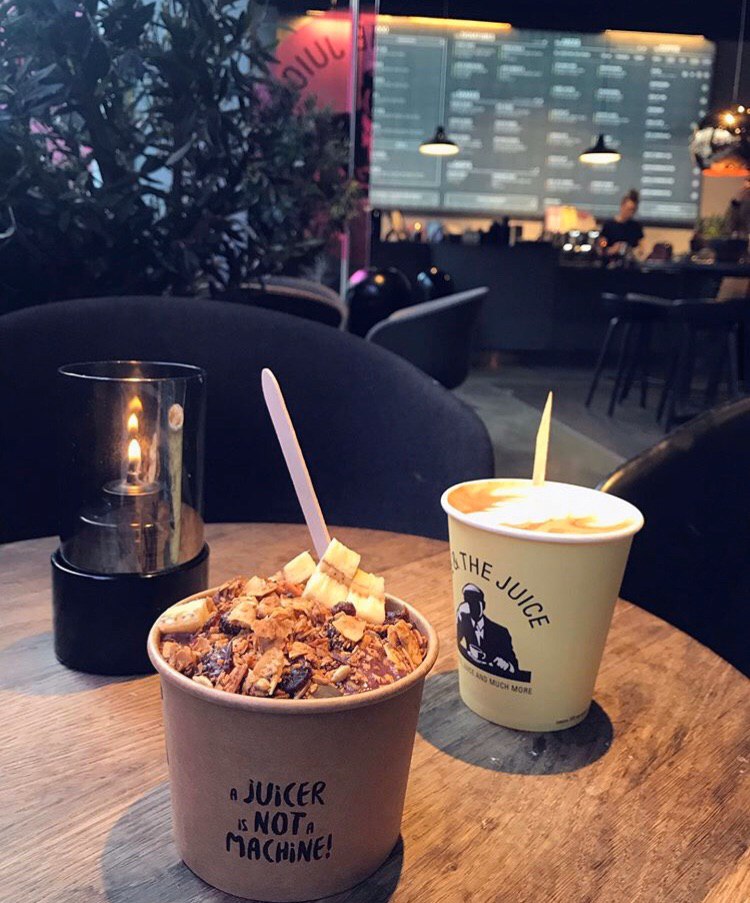
Joe & the Juice is a chain of juice bars and cafes around the world. Very common in Denmark. As of 2019, it has more than 300 locations in North America, Europe, Asia and Australia.
I waited at this cafe for my airbnb host. In the morning I got an acai bowl and latte. The cafe serving the worst acai bowl I’ve ever eaten. The amount of 95DKK certainly does not deserve. The mixture was in water and tasteless.

The shopping center in the Frederiksberg area also has many vegan options. Hotel Chocolat is a very vegan friendly brand but the flavor was very ordinary.


Plant Power Food CPH is a place opened by Neel who is alumni from MKC. It was one of the places I was most excited about before I visited.
The presentations are very nice but it is not possible to eat everything in the plate. It should be seen as a gastronomic experience;
I ordered a power bowl; with mashed potatoes in 3 colors, greens, avocado, buckwheat, activated and dehydrated, red onion pickles and dehydrated crackers. Also, ordered cold press veggie juice and rice paper rolls.


Ingredients:
250 gr. lasagna sheets
Butternut Cheese Sauce:
3 cups butternut squash cutted into cubes,
2 tbsp nutritional yeast,
1 medium onion chopped,
2 tbsp olive oil,
4-5 tbsp water,
4 garlic cloves,
1 tsp salt,
1/4 tsp black pepper
Cauliflower Bechamel Sauce:
250 gr. cauliflower florets,
1 garlic cloves minced,
100 ml. water,
2 tbsp olive oil,
1 tsp fresh lemon juice,
2 tbsp GF nutritional yeast,
1 tsp sea salt
1/4 tsp black pepper
Mushroom Filling:
50 gr. dried porcini or your favorite mushroom mix,
2 tbsp olive oil,
1 medium onion chopped,
4 garlic cloves,
2 fresh bay leaves
1 tbsp gluten free soy sauce
optional – feel free to add a couple of handfuls baby spinach or greens and wilt them.

Method:
1. Preheat oven to 200 C. Cut butternut squash into cubes, scoop out the seeds and place open side down on a parchment paper. Place sliced onion and garlic next to it and drizzle it with a little olive oil. Roast until fork tender, about 30-40 minutes. Let cool. You could do this a day before.
When it is done, transfer mixture into the blender, add rest of the ingredients for the butternut cheese sauce, blend until smooth. Transfer to a bowl.
2. Wash and boil the cauliflower in a large pot with water for 10 minutes until fork tender. Drain well before proceeding. Transfer the cauliflower to a high speed blender. Add the remaining ingredients and blend again. Transfer in a bowl, set aside.
3.In a large skillet, heat the oil . Add mushrooms and shallots and salt, and saute over medium heat, until the mushrooms release their liquid and begin to brown. Add the garlic, bay leaves and pepper. Cook until garlic is fragrant, about 2-3 more minutes, turn heat off. You could toss in some spinach at the end and wilt for extra nutrients. Taste and make sure the filling has enough salt and pepper.
4. Assemble the lasagna: Add 1 cup of the butternut puree and spread out into a thin layer over the pan. Top with 3 lasagna noodles. Add ½ of the cauliflower cheese sauce. and spread out evenly. Top with half of the cook mushrooms. Sprinkle with ½ cup grated vegan mozarella if you prefer.
Add 3 more lasagna sheets. Spread out the rest of the cauliflower cheese mixture as evenly as possible. Spoon half of the remaining butternut puree, erring on the side of less than half, so you have enough to cover the top (save at least 1 ¼ cups for the top.) Add the remaining mushrooms and all the good bits ( onions, garlic) and sprinkle some more vegan cheese. Place the final three sheets over the top. Lather with the remaining butternut puree and sprinkle with the rest of the cauliflower cheese You could assmeble this 1-2 days before baking.
Cover tightly with foil and bake in 200 C oven for 35 minutes. Then uncover and continue baking 15-20 minutes until golden and bubbly. Cut into 6 servings. Garnish with optional fresh herbs ( sage or rosemary).
Enjoy!
Here are step by step photos to make it easier:


Ingredients:
1 bag of cauliflower rice (250 gr.)
1 piece of lemon, grated peel and lemon juice
2 green onions, shredded
1 bunch of leaf parsley, chopped
1 bundle of mint, chopped
7-8 kumquat sliced thinly,
3 tablespoons olive oil
1 teaspoon turmeric, ground
1 teaspoon salt
1 teaspoon pepper
Method:
1. Tear the cauliflower coarsely and thinly slice the stem. Put in a large bowl along with lemon juice and a teaspoon of salt.
2.Allow to marinate for about 30 minutes.
3.Add remaining ingredients and mix well, taste with salt and pepper.


Ingredients:
40 g. dried mushrooms,
Mushroom stock ( 200ml from dried mushrooms, soak mushrooms in warm water for one hour then strain use the water in soup)
3 tbsp olive oil,
1 medium leek chopped,
1 medium onion chopped,
3 garlic cloves minced,
1/8 ground black pepper,
1 tsp salt,
200 ml. oat milk,
1/2 tsp fresh rosemary chopped
2 tbsp toasted pine nuts
Method:
1. To a large saucepan, add the olive oil over medium-high heat. Add all the mushrooms, sauté until soft and browned. Remove 1/3 of mushrooms and set aside to add to top of the soup later.
2. Add the leeks, onion, garlic salt and pepper. Continue to sauté until they are soft. Add the rosemary, cook for 2 minutes. Add oat milk and mushroom stock. Bring to a boil, reduce heat and simmer for 15 minutes.
3.Transfer mixture in to a high speed blender, mix well until completely smooth. If it is too thick add some water and continue to blender.
4.Put all the soup back into the soup pan, add the mushrooms that were set aside. Reheat and test for seasoning, add salt if needed. Serve with toasted pine nuts.
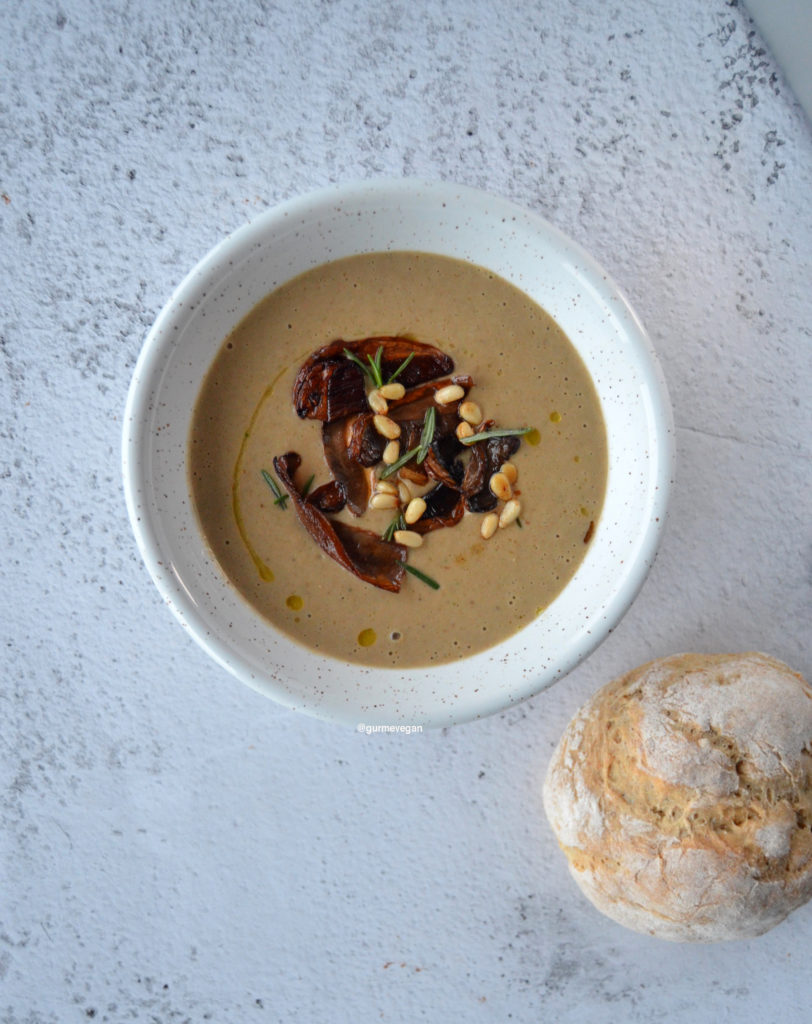

Serves 3-4
Ingredients:
3-4 small beets,
7-8 large swiss chard leaves,
250 gr. sunchokes,
1 cup cooked green lentil,
2 tbsp olive oil,
1 large red onion diced,
2 garlic cloves minced,
1-2 tbsp balsamic vinegar,
4-5 tbsp vegan parmesan ( optional),
Fresh thyme,
Salt and blackpepper to taste
Method:
1. Preheat oven to 200 C. Scrub and trim beets and sunchokes and cut into ½ inch slices or wedges. Place on a foil lined baking sheet. Drizzle with olive oil and roast until tender, about 30 minutes.
2. To cook lentils, place green lentils in a small pot and cover with 3 inches of water and a pinch salt. Bring to a boil, cover and turn heat down to a simmer, cook until tender (it usually takes 20 minutes, should still hold their shape.) Then Drain.
3. In a large skillet, heat 2 tablespoons oil over medium high heat. Add diced onion and saute 3-4 minutes. Turn heat down to medium, add garlic and cook 2 more minutes, until golden and fragrant.
4. Lower heat to medium low. Add chard and gently wilt, just slightly, about 2-3 more minutes. Season with salt and pepper.
5.Add cooked lentils to the skillet, gently folding them in and warming.
6. Add beets and sunchokes then splash with 1-2 tablespoons balsamic vinegar. Let vinegar cook down for just a couple minutes so it’s not so acidic. Sprinkle with vegan parmesan and fresh thyme.
Taste again, if it tastes bland it most likely needs salt. Serve immediately.

Ingredients:
For the dough:
3 large potatoes (approx. 700 g)
3 tablespoons of gluten-free corn starch,
15 g. psyllium powder,
1 tablespoon olive oil,
2 teaspoons of himalayan salt
Filling:
1 tablespoon olive oil,
1 medium red onion,
1 medium carrot,
3 cloves of garlic,
2 tablespoons capers,
2 sprigs of fresh rosemary,
2 medium tomatoes
Method:


Ingredients:
2 cups distilled rice vinegar
Orange peel from 1 fresh orange
A handful of fresh thyme
1 fresh lemon grass
9-10 drops lavender essential oil
Method:
1.Fill a mason jar with thyme, orange peel and lemon grass.
2.Fill the jar with rice vinegar.
3.Screw on the lid (if using a metal lid, place a parchment paper on lid- vinegar eats metal!)
4.Give a thorough shake and let sit for 1-2 days.
5. Strain through a paper towel or cheesecloth-lined strainer.
Important: Keep this full strength or dilute with water (I recommend to use half strength)
Vinegar may etch porous surfaces like marble, some granites and soapstone countertops, so make sure to dilute with water and test first. A 50/50 blend is usually good.

*with the collaboration of @hippiedeluxese
Ingredients:
450 gr. cauliflower florets,
2 garlic cloves minced,
170 ml. water,
2-3 tbsp olive oil,
1 tbsp fresh lemon juice,
3 tbsp GF nutritional yeast,
1 + 1/2 tsp sea salt
1/4 tsp black pepper,
Fresh dill and fruikake for garnish
Method:
1. Wash and boil the cauliflower in a large pot with water for 10 minutes until fork tender. Drain well before proceeding.
2. Transfer the cauliflower to a high speed blender. I use blendtec *wildside jar for pasta sauces and soups. It works perfect.
Add the remaining ingredients and blend again. Taste and add more nutritional yeast and sea salt, if you’d like and blend until silky smooth.
3. Transfer mixture in a pot and heat. If it is too thick then add some more water and cook until bubbled. Combine with cooked pasta according to your preference. ( I used black rice noodles and cooked for 4 minutes. It works any kind of pasta) Serve warm!


Serves 5-6
Ingredients:
For the crust:
140 gr. almond flour,
85 gr. tapioca flour,
1 tbsp flax seed +4 tbsp water,
1.5 tbsp powdered coconut sugar,
2 tbsp coconut oil,
1/4 tsp licorice salt or any kind of salt
2 tbsp plant based milk
For the filling:
3 small red apples cored and very thinly sliced,
1 dl dried raisins,
2 tbsp coconut sugar,
1 tsp lemon juice,
1 tsp cinnamon,
1/2 tsp ground cardamom
Garnish: sliced almonds, coconut flour
Method:
1. Grind flaxseeds using a coffee grinder. In a large bowl, mix ground flaxseeds and water. Set aside.
2. To make dough, in a food processor , combine the almond flour, tapioca flour, coconut sugar and sea salt. Process until well combined. Add the coconut oil and flax seed mixture then mix again, adding in the water bit by bit until the dough comes together.
3. Preheat oven to 190 C. Place a piece of parchment paper on a baking sheet and dust lightly with almond flour.
4. Roll the dough into a 4-5 mm thick circle and place the apple filling in the middle, leaving 2-inches around the edge empty.
5. Gently fold the sides up, creasing the dough as you go. You can use the parchment paper if needed so it doesn’t break.
5. Brush the dough with plant based milk and bake for 30-40 minutes, until browned. Let cool for 10 minutes before cutting. Spread some sliced almonds and dust coconut flour for the decoration.
Drizzle vegan kolatopping if desired.
