


- Place all the ingredients in a food processor. Blend until you get a smooth sticky dough.
- Using your hands make small balls.
- In a small bowl, mix maple and almond butter. Pour into syringe. Then squeeze into the balls.
- Cover them in desiccated coconut cinnamon gold powder mix. Enjoy!


Madeleine and Mafaldine… Although there is no connection between the two, I like these types of names. When I glanced at their meanings, I read that they are the names of princesses in ancient times.
I guess that’s why they have an elegant shape, reminiscent of wrought iron. I recently bought a madeleine mould and a mafaldine pasta cutter. After many trials, I am sharing it with you below as we are most satisfied with its taste. (Mafaldine pasta will be the case of another recipe :))
This recipe makes 4 moulds of mini madeleines, 64 mini madeleines in total. I used mini Madeleine mould from Silikomart.
Ingredients:
120 g. sprouted brown rice flour ( from Planet Organic, alternatively you can find it at iherb. You will need to grind them into flour. )*
50g. blanched almond flour** ( you can also use other nuts, for the nut-free option tiger nut flour works well.)
5 tbsp maple syrup ( alternatively erythritol***, you can also use coconut sugar if you don’t mind it is brown or white)
3 tbsp extra virgin olive oil
100 ml. plant milk ( I used oat and almond milk)****
1 tsp finely chopped lime zest
1/2 tsp baking powder
A pinch of salt
Chocolate shell:
2 tbsp maple (or erythritol)
50g. raw cacao butter
45g. hazelnut butter
4 tbsp freeze dried strawberry powder ( from Nature Restore, alternatively raspberry juice powder. Both works well.)
1/4 tsp maca powder (optional)
A pinch of salt
This chocolate shell recipe is to make pink chocolate with berry flavour from scratch, alternatively you can also use a good tempered raw dark chocolate. ( Sacred, Ombar or Wermlands brands are our favorite)
Instructions:
1. In a large mixing bowl, whisk together the sprouted brown rice flour, blanched almond flour, maple, baking powder, and salt.
2. Then add the maple, plant milk and olive oil. Cover the bowl and refrigerate for 15-20 minutes.
3. Once refrigerated, transfer mixture in a pipping bag. Pipe the cold batter into each cavity, to the 3/4. You can also fill with the help of a teaspoon. Transfer the filled madeleine mould to the freezer for 10 minutes.
4. Place Madeleine mould into food dehydrator. ( We use Excalibur) Start dehydrating at 46 C for 2-3 hours, then flip the mould on the dehydrator sheet. Remove the mould. Then continue to dehydrate for 4-5 hours or overnight until completely dried. If you don’t have a dehydrator or want to experiment baked version in order to compare both, bake at preheated oven at 200°C for 10 minutes.
5. Once madeleines are done, it is time to make chocolate shell. Using bain marie method and temperature control, melt the raw cacao butter maximum at 46 C. Once melted, add the rest of the ingredients. Whisk well. Fill the each cavity to the 2/4, use a spoon to spread it. Top with your madeleine and slightly press it down. Repeat with the remaining chocolate and madeleines and place the Madeleine mould in the freezer for about 15 minutes or until the chocolate has hardened and easy to remove the madeleines.
NOTES:
*Sprouted brown rice also can be made at home, just soak at least 12 hours or up to 20 hours. Wash and rinse the rice well with clean water, shake off excess and place colander over bowl — this allows any water to drip off. Repeat this step 2 or 3 times a day, about every 8 hours or so. Rinse and drain rice in this manner for 1 to 2 days, or until a very tiny sprout emerges from the rice grain.
Important: Do not let the sprout get too long, the taste of the rice will be effected.
Once sprouted and dehydrated ( should be completely dry) , add the rice to a high powered blender, food processor, or in increments in a coffee grinder . Pulse on high for 1 minute until the rice grinds into a very fine powder.
You can also experiment with sprouted buckwheat or oat flour. We’ve tried both, they make a crispy Madeleine if you like.
** To make blanched almond flour, soak almonds for 4-5 hours or in a little warm water for 15-20 minutes then peel its skin. Wash, rinse and dry. Place in the dehydrator and dehydrate overnight or until completely dried.
*** Please check sweetener equivalency chart if you will use other type of sweeteners.
PS: I prefer low sugar, so please taste the final mixture before baking. If you think it needs more sweetener, feel free to add.
**** If you will not use liquid sweetener, then you will probably need extra 20ml plant milk to get the batter consistency. Add extra 20-25ml or as needed if you will go with erythritol or coconut sugar.)
Storage: Madeleines will keep for up to 3 days in an airtight container at room temperature.
We don’t like affiliate marketing and recommending products. Our site is ad-free. We only added links to the products that we use and that we think are useful in the recipe, because we get a lot of questions about the ingredients. We earn nothing from links, be free to do a research and choose yourself where to buy in your country.


These Swedish gingerbread (pepparkaksbollar) balls are sort of the Christmas cousin of the chocolate balls (a.k.a chokladbollar in Swedish) which are very fast to make and is perfect together with a cup of coffee at the swedish fika. Enjoy your raw version with a cup of glögg!
Ingredients:
2 dl sprouted rolled oat flour
1 dl desiccated coconut
3 tbsp almond butter
2 tbsp maple syrup ( or agave, coconut nectar syrup, date syrup etc)
1 tbsp fresh orange juice
1/2 tsp cinnamon
1/8 tsp ginger
1/8 tsp cardamom
A pinch nutmeg
Filling (optional)
2 tbsp almond butter
1 tbsp maple syrup
For covering:
4 tbsp desiccated coconut
1 tsp gold powder
1/ tsp cinnamon powder
Instructions:
A kinda experimental gluten free vegan dish with delicious pear cream, can be served as a main dish or side.


Ingredients
200g brown rice
2 cups filtered water
1 cup okra
1 cup green peas
1 tbsp olive oil
1 tsp garlic powder
1/2 tsp salt
Pear Sauce
1 ripe pear
1 red onion
1 garlic cloves
1 dl oat crème fraiche
1/2 tsp salt
Instructions
1. Wash the brown rice and in a pot cover with water, let it sit for 1 hour while you are preparing other components.
2. Wash the okra under running water, then dry throughly, then remove caps and slice the okra into 1/3″ thick round pieces. Place in a bowl, add the olive oil, salt and garlic powder. Give it a good toss. Then transfer to a baking tray lined parchment paper. Preheat oven to 200 C and bake for 10-12 minutes both side of the okra rounds. Check it. If the pieces are still soggy, put them back for an additional 5-10 minutes. Be sure to move the pieces around frequently so the okra browns on all sides. The okra will be a dark green-brown colour, and will smell a bit nutty when it’s cooked through. The edges should be a bit crisp and the middle should be tender. The longer you leave the okra in the oven, the smaller and darker they will get so be careful not to overcook them.
3. In a parge pan, with little olive oil fry the fresh or defrosted peas on medium-high heat until they are bright green and soft enough. Sprinkle some salt and garlic powder. Set aside.
4. Chop your onion, garlic and pear, place in a large pan. Drizzle a little bit olive oil and cook on mediım heat until they are soften, add 1 tbsp water if you need. Once they are soften, add the oat crème fraiche and salt. Continue to cook for 1-2 minutes. Then transfer mixture into a blender. Blend until you get smooth cream. Then transfer back to the pot. Cook on medium heat until the sauce becomes thick enough. Set aside.
5. Drain your brown rice and rinse then add 2 cups filltered water and bring to boil. Reduce heat and simmer covered for 15 minutes until becomes tender. Let the rice rest, off the heat, for 10 minutes. Fluff, season as desired, and serve.
6. Using a round pastry cutter, shape your rice in the middle of the plate.
7. Cover the top of the rice by lining up the peas and okra in order.
8. Pour 2 tbsp of pear sauce right next to the rice. Sprinkle some rawmesan if desired. Serve immediately.
“Kroppkakor” or potato dumplings is a very traditional Swedish dish. Our potato dumplings are filled with pea mince, the dough is made of potato and quinoa. So it is gluten free. It is not boiled twice as the regular version one is. Just because potatoes tend to form mucus when boiled long enough, also boiling twice completely destroys its nutritional value. Served with chanterelle flavoured oat cream, sautéd dinosaur kale, chanterelles and lingonberries.


Time – 1 hour
Serves – 6 person
Ingredients
Potato Dumplings
400 g potatos peeled and cut into quarters
65 g quinoa flour plus extra for dusting
Salt and pepper to taste
Sides
Fresh lingonberries or lingonberry jam ( aroniaberry jam also goes so well. see our recipe here)
Sautéd dinosaur kale and chanterelles
Filling
1 large onion
2 garlic cloves
1 tbsp olive oil
150 g chopped mushrooms, tofu or pea mince
1 tsp salt
1/2 tsp fresh ground black pepper
Instructions
1. Chop the onion and garlic, in a large pan fry with little olive oil until soften. Then add the chopped mushrooms or tofu or pea mince, continue to cook until the mixture gets golden brown. Transfer to a bowl and set aside.
2. Place the potatos into a pan of boiling water and simmer for about 20 minutes until cooked.
3. Drain the potatos, give them a shake to remove as much of the cooking water as possible, and leave in the sieve to dry and cool.
4. Once dry place in a bowl and chop then mash until smooth, or pass through a potato ricer.
5. Season then add the quinoa flour and work it in using your hands. Add as much flour as you need to make a smooth dough that stick together.
6. Shape the dough into a log with floured hands and cut in small pieces. Make 6 little pocket in each piece and fill with 2 tablespoon of the filling. Close and shape to a ball. Make sure the filling is covered everywhere.
7. Place the dumplings in a pan with little olive oil and fry until they get a golden crispy crust.
8. Serve the crispy dumplings with berries, kale and oat cream.
Sautéd Kale and Chantarelles
¼ cup extra-virgin olive oil
3 cloves garlic, peeled and sliced
1 large bunch kale, stemmed, with leaves coarsely chopped
150 g chanterelles
1/2 cup vegetable stock, white wine or water
Sea salt, freshly ground black pepper and red-pepper flakes to taste
2 tablespoons orange juice
Instructions:
1. To sauté kale leaves, heat little olive oil in a large sauté pan set over medium-high heat until it shimmers.
2. Add garlic, and cook until soft. Add the mushrooms to the pan, turn the heat to high and add the stock. Cook until golden brown. 3. Then add the kale leaves and use a spoon to toss the greens in the oil and stock, then cover and cook for approximately 5 to 7 minutes, until it is soft and wilted, but still quite green.
4. Remove cover and continue to cook, stirring occasionally until all the liquid has evaporated, another 1 to 2 minutes. Season to taste with salt and peppers, add orange juice and toss to combine.
Oat chanterelle Cream
Ingredients:
1 package oatly imat
1 tbsp chanterelle powder
1 tbsp tamari
Instructions:
1. Preheat a large non stick pan.
2. Add the oat cream, chanterelle powder and tamari. Whisk well.
3. Cook until thicken. Serve with your dumplings.

An awesome onion purée that you can swap for cream in any number of savory dishes especially soups.
Ingredients:
3 large vidalia onions*
1 tbsp lemon juice
Instructions:
1. Roast onions with their peels at 400º F in a roasting pan that fits them snugly for about 50 minutes, or until they are very dark on the outside and molten soft on the inside. Let them cool for 15-20 minutes.
2. Once they have cooled, Remove the peels, and add the onions into a high speed blender. Food processor doesn’t give you the same results. Blend until very smooth, about 1 to 2 minutes. Finish by adding freshly squeezed lemon juice, then blend 20 seconds more. Adjust seasoning if necessary. Chipotle, chili or black pepper goes well together.
Use as you would cream to finish a dish.
To store the sauce: Keep in the fridge for up to 2-3 days, or freeze for up to two weeks. In either case, blend in the blender for 20 to 30 seconds to reincorporate just before serving.
Glossary:
*Vidalia Onions are the most common kinds of sweet onions. They are fairly similar to yellow onions in flavor, though their layers are slightly less tender and meaty.
Extremely low in pyruvic acid—which, when exposed to air, makes your eyes tear—Vidalias are among the mildest in the onion kingdom.
How to Shop and Store: Vidalia onion season typically runs from the middle of April through early September. Firm, medium-sized onions without any bruises will taste the best. To store the onions, wrap each onion in a paper towel and store in the fridge; they’ll keep for weeks.
Caramelize onions in the pan without olive oil
You probably heard that caramelizing heats the onion so high that the sugars begin to release fast and create with new depth of flavor you’re looking for. This sounds like it’s going to be complicated. No way! The natural sugar in an onion requires no frying but patience. I may add a sprinkle of nutmeg or black pepper but no salt, sugar or oil.
It’s so incredibly easy I never use oil to sauté any vegetables because veg stock or water always work great.
Instructions:
1. Slice onions into thin shreds.
2. Place slices into a uniform layer on a nonstick pan on medium heat and cover with water or mushroom stock just to the top of the onions. Cook until water is absorbed.
3. When foamy water is boiling out of the onions and they appear dry add water again to the top layer of onions. Don’t stir yet. The idea is to cook out the moisture so you’ll see a color change of your onions as this proceeds.
4. Don’t stir the onions until the second water is absorbed. Then add about 2 tbsp of vegetable or mushroom broth and stir the onions. You will begin to see the caramelization in full effect and gently stir them to loosen up any adherent onions from the bottom keeping heat even. And not turning it up, continue to stir. They will begin to brown and become gooey.
This takes about 15 minutes.
Tips: A pinch of baking soda can bring out a new taste dimension when browning onions. A small addition of baking soda yields onions which taste remarkably sweet with strong caramel notes.

Serves 2
Ingredients:
2 dl gluten free rolled oats
6 dl walnut milk
1 tbsp extra virgin olive oil
1 tsp salt
1 red onion chopped caramelized in the pan
1 tbsp dried rosemary
1 cup pulled oyster mushrooms
1 dl fresh blueberries or lingonberries
Plant based parmesan to serve
Instructions:
1. Pour boiling water into the cup of dried rosemary until they are fully covered. Make sure to cover your rosemary with a visible level of water above them. This will ensure that rosemary absorbs the water well and it becomes very soft. Place a lid on top of the glass bowl to maintain the temperature. You can use fresh rosemary as well.
2. Place rolled oats in a pot. Pour the plant milk over the oats. Add the soften rosemary. Cook until oats absorb the milk and become creamy.
3. Add the caramelized onions into cooked oats. Stir well.
4. Add the salt and olive oil. Taste and adjust the flavour.
5. Divide between two plates.
6. Top with pulled oyster mushrooms.
7. Add some blueberries and micro greens. Serve immediately!


Crepes:
100 g sprouted buckwheat flour
250 ml oat milk
1 tsp baking powder
1 tsp salt
2-3 tbsp olive oil for frying
Instructions:
1. Place sprouted buckwheat, baking powder and salt in a mixing bowl, mix well.
2. Then add the oat milk, stir well. You need to get a thin pancake batter consistency.
3. Preheat a large non-stick pan over medium-high heat, add little bit olive oil.
4. Pour one ladle mixture over the pan. Move the pan around until the batter evenly covers the bottom of the pan.
5. Cook the crêpe until the edges darken and look dry, about 1-2 minutes, use a silicon spatula to help flip it over.
6. Repeat the process until you’ve used up all the remaining batter.
Storage: Best when consumed immediately, they can also be covered and stored in the refrigerator for a few days, then reheated in a pan.
Filling recommendation:
1 red onion chopped
3 garlic cloves
400g spinach
1/4 tsp blackpepper
Salt to taste
1 tbsp olive oil
Place onions, garlic and olive oil in the pan, cook until soften. Then add the washed, drained fresh spinach, toss well. On the medium heat, stirring constantly cook them for 1-2 minutes until bright green Then add salt and black pepper. Serve with crepes.


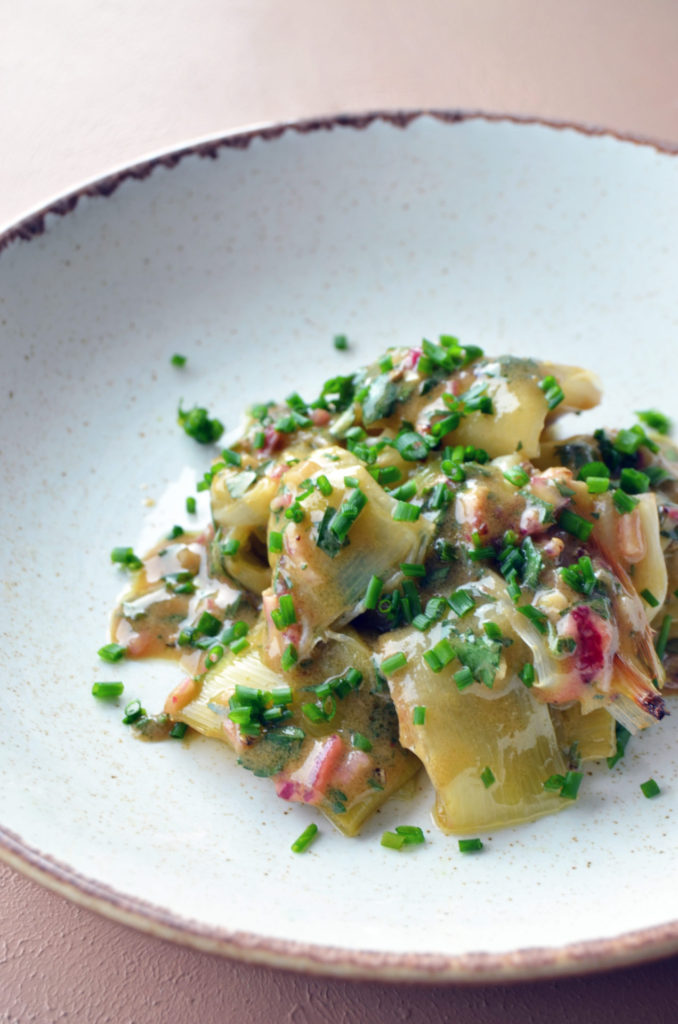
Ingredients:
500g leeks
1/2 tsp salt
1 pot water to boil
Poireaux Vinaigrette:
1 tbsp red wine vinegar or balsamic
5 tbsp extra virgin olive oil
1 small red onion peeled and finely diced
1 tbsp dijon mustard
2 tbsp chopped parsley
2 tbsp chopped chives
1/2 tsp salt
1/8 tsp black pepper
Instructions:
1. Cut off and discard the root ends of the leeks. Wash and place in a pot. Cover with water and sprinkle some salt. Cook on medium heat for 20 minutes until the leeks are fork-tender.
2. To prepare the vinaigrette. Combine the vinegar and salt in a bowl, and whisk with a fork for about 20 seconds until the salt has dissolved. Then add the onion, mustard, parsley, and pepper. Then, slowly drizzle in the oil in a steady stream while constantly whisking. Continue whisking until the dressing thickens to your desired texture.
3. Remove the leek bundles from the water with a slotted spoon and let them cool and drain on a kitchen towel.
4. Using your hands, roll or fold the leeks. Dip in the sauce. Place the leeks on a serving platter, sprinkle some chives. Top generously with the vinaigrette. Serve warm or at room temperature.


Serves 2
Ingredients:
140 g. whole oats
500 g. ripe tomatoes
1 ripe red plum
1.5 cups water + more as needed
Salt and black pepper to taste
1 bay leaf
Plant based parmesan to serve (optional)
A good quality balsamic to serve (optional)
Fresh basil to serve
Instructions:
1. Bring water to a boil in a medium saucepan. Stir in oats, reduce heat to low. Simmer uncovered over low heat, stirring occasionally, for 20 minutes. Then strain and set aside.
2. Chop tomatoes and plum. Place in a wide pan, cook until soften and tomatoes leave their juice.
3. Add the strained oats into the tomato pan. Place the bay leaf in the pan. Close the lid of the pan. Continue to cook on medium heat for about 10 minutes or whole oats absorb the juice.
4. Once absorbed, remove the bay leaf. Taste your risotto, if it is not soften enough, add a little bit more water and cook for 2-3 minutes.
5. Season with black pepper and salt. Serve with parmesan, basil and balsamic if desired.