


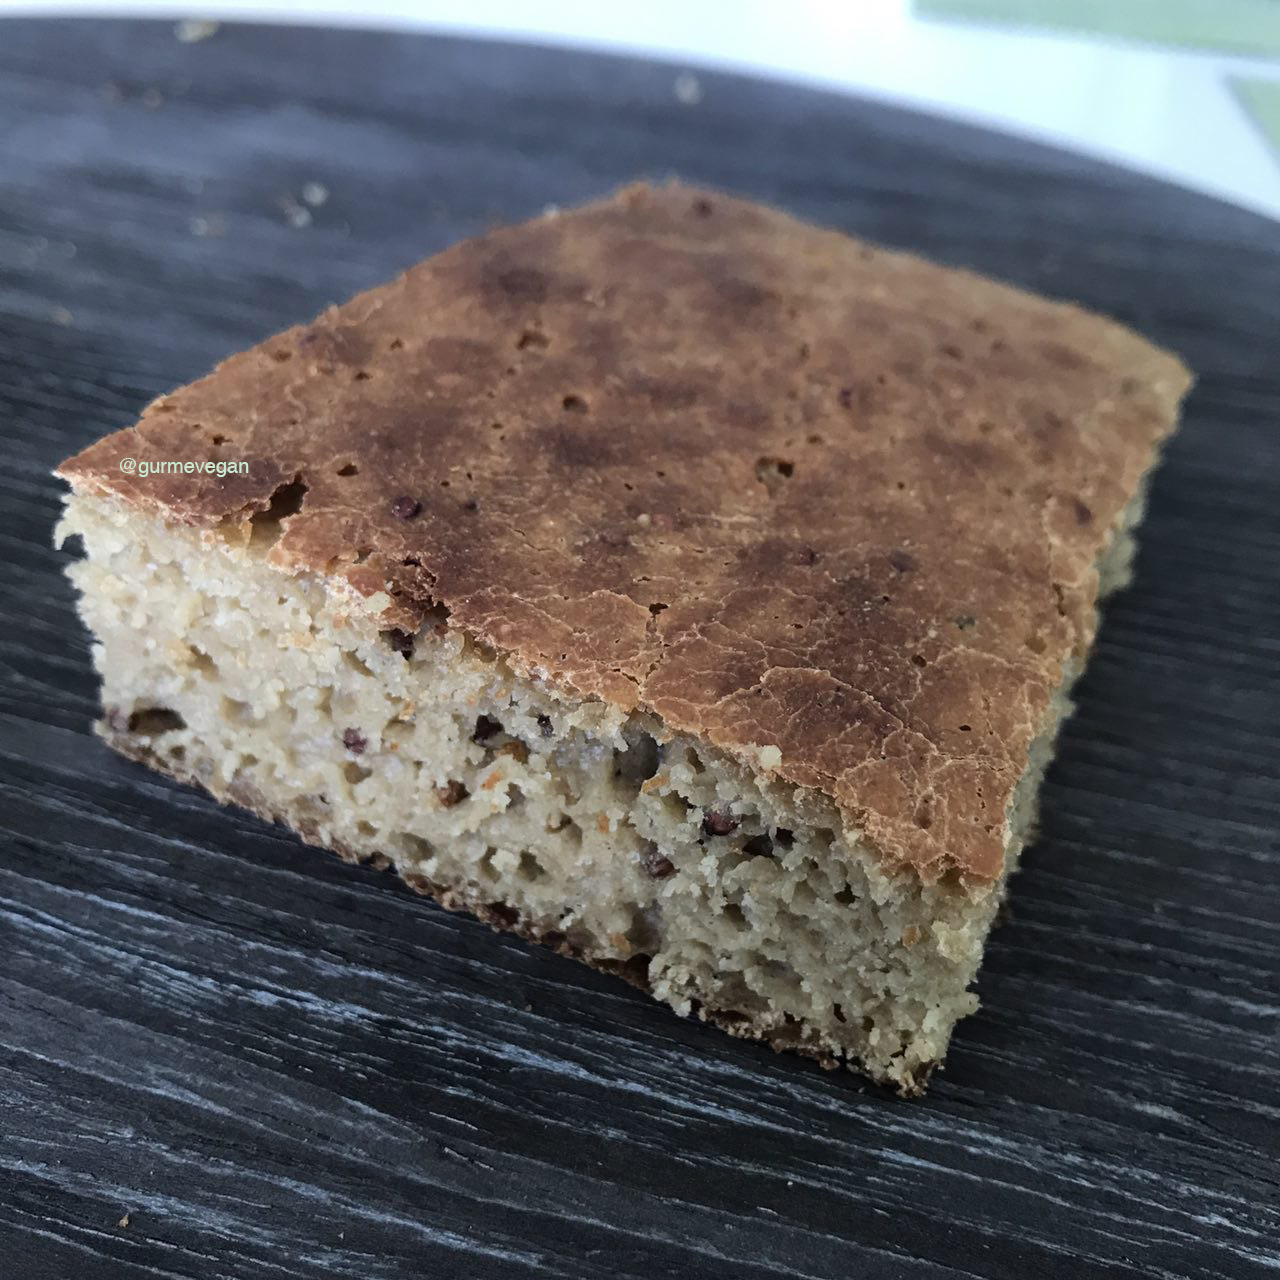
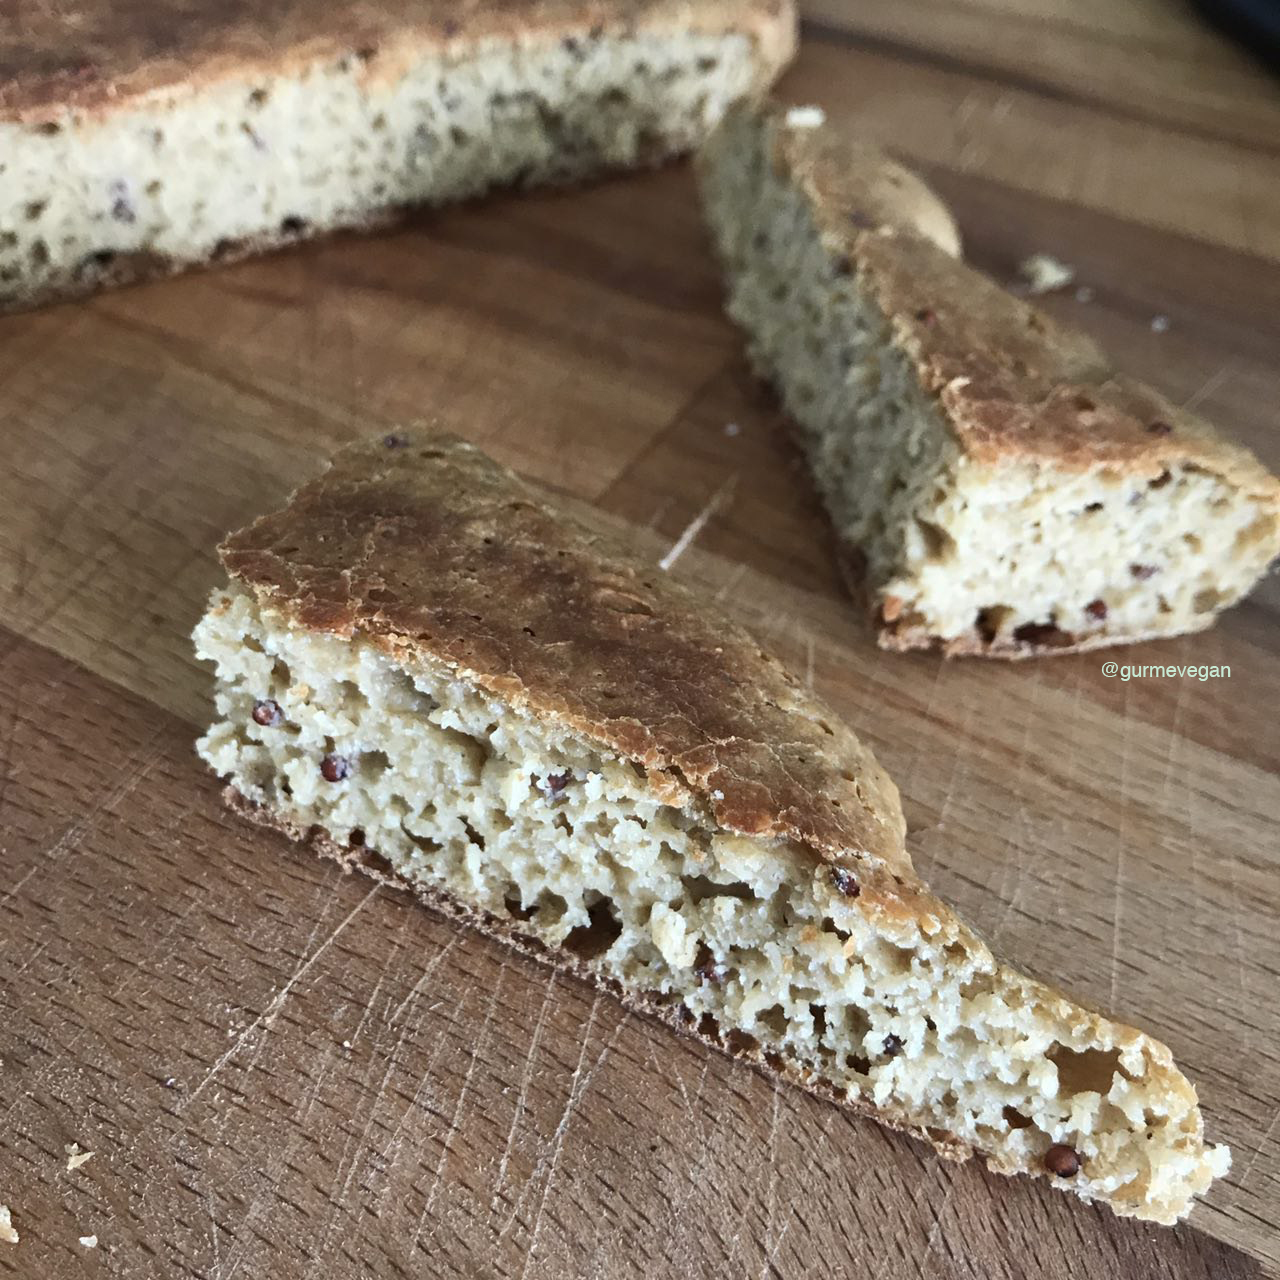
Ingredienser:
200 gr. quinoa måltid
60 gr kvistmjöl
1 kopp vatten
10 gr. snabbjäst,
2 soppsked sojamjölk,
2 msk olivolja,
1 tsk växtbaserad salt,
2 msk kokosnöt socker,
1 msk quinoa frön


Metod:
1. Lös upp jäst i varmt vatten i en stor skål.
2. Häll vatten, olivolja, mjölk, socker, salt och mjöl. Vispa tills slät.
3. Degen ska vara fast tillstånd att spateln blir hård.
4. Täck det med en trasa för att jäsa i 45 minuter.
5. Den blir uppblåst och skumformad inom 1 timme. Lägg sedan till Quinoa frön. Häll blandningen i en brödpanna med oljat papper och forma det med en sked.
6. Låt den andra jäsningen stå i 15-20 minuter, sätt ugnen i 50 grader. Efter den andra jäsningen kommer degen att sprida all brödkanna grundligt.
7. Koka degen i 220 grader tills den är guldbrun. När du får ut det, vänta i 10-15 minuter för att svalna ner. Om brödet är för hårt eller stekt kan du täcka det med en fuktig trasa för att göra det mjukt.
6. Let the second ferment stand for 15-20 minutes, bring the oven to 50 degrees. After the second fermentation, the dough will spread all the bread pan thoroughly.

7. Cook the dough on 220 degree until golden brown. When you get out it, wait for 10-15 minutes to cool down. If the bread is too hard or fried, you can cover it with a damp cloth to make it soft.


Ingredients
150 g gluten free oat flour
150 g buckwheat flour
150 g tapioca or cassava
60 g sprouted chickpea flour
350 ml lukewarm oat milk
70 g kale leaves chopped ( or greens of your choice)
2 tbsp almond butter
1 small ripe banana mashed
3 tbsp psyllium husk powder + 9 tbsp water
1 tsp salt
Toppings
Poppy seeds or sesame of your choice
Instructions
1. Preheat oven to 190°C. Line a baking tray with parchment paper and set aside.
2. In a mixing bowl, mix the psyllium water together. Add almond butter and whisk well.
3. Then add the salt, mashed banana, kale leaves and oat milk. Stir to combine together.
4. In a bowl, mix the oat, buckwheat and cassava well.
5. Transfer the flour mix into wet mixture bowl.
6. Using a wooden spoon, mix everything well.
7. Remove dough from the bowl, transfer to your working surface. Knead and roll into a log with your hands.
8. Divide into 12 buns. Form them into small buns. Dip your hands in warm water to avoid the dough to stick to them.
9. Sprinkle some poppy seeds or sesame. Bake for 45-50 minutes until golden and firm.
10. Let cool before slicing them open. Enjoy with tomatoes, avocados inside or whatever you like.
Calcium is most commonly associated with the formation and metabolism of bone. Over 99 percent of total body calcium is found as calcium hydroxyapatite in bones and teeth, where it provides hard tissue with its strength.
The amount of daily recommended intake of the European Union is 800 mg / day.
It usually varies according to age for calcium intake. Pregnant women need to take high calcium to maintain baby growth and also calcium used in their bones and teeth.
Daily calcium intake should not exceed 1500 mg / day. because 2500 mg / day toxicity (poisoning) symptoms may occur.
Today most vegans try to get enough calcium from salads or tofu. But salad greens and spinach actually aren’t very good calcium sources, and spinach in particular is high in oxalates, which can block the absorption of calcium in food.
Every sort of leafy green contains a substantial amount of calcium. But there’s an important caveat to keep in mind: several popular greens contain substantial amounts of oxalates (oxalic acid).Oxalic acid hinders calcium absorption.
Oxalates won’t cancel out all the calcium your greens contain, but they can prevent you from absorbing most of it. Spinach is naturally high in calcium, but it is also high in oxalic acid. The body is unable to process the calcium it provides.
You may be suffering from severe fatigue due to a high consumption of oxalate foods, if you are following a gluten free diet.
A gluten-free diet is recommended for people with celiac disease, gluten-sensitivity or the skin disorder dermatitis herpetiformis. A gluten-free diet may be helpful for some people with irritable bowel syndrome, the neurological disorder gluten ataxia, type 1 diabetes and HIV-associated enteropathy. But not everyone. There is no one type diet that good for all.
| Carob powder | 2 tbsp | 42 mg |
| Poppy Seeds | 1 tbsp | 126 mg |
| Raw Lentils | 80 g | 140 mg |
| Orange | 150g | 60 mg |
| Rhubarb | 120 g | 103 mg |
| Figs dried | 60 g | 96 mg |
| Collard greens, cooked | 1 cup | 268 mg |
| Turnip greens, cooked | 1 cup | 197 mg |
| Tempeh | 1 cup | 184 mg |
| Kale, cooked | 1 cup | 177 mg |
| Soybeans, cooked | 1 cup | 175 mg |
| Mustard greens, cooked | 1 cup | 165 mg |
| Bok choy, cooked | 1 cup | 158 mg |
| Tahini | 2 tbsp | 128 mg |
| Wakame | 100 g | 150 mg |
| Okra, cooked | 1 cup | 124 mg |
| Almond | 30 g | 75 mg |
| Almonds, whole | 1/4 cup | 94 mg |
| Broccoli, cooked | 1 cup | 62 mg |
Note: Oxalic acid, which is found in spinach, rhubarb, chard, and beet greens binds with the calcium in those foods and reduces its absorption. These foods should not be considered good sources of calcium. Calcium in other green vegetables is well absorbed. Dietary fiber has little effect on calcium absorption.
How to avoid oxalic acid and how to increase your calcium absorbation?
Oxalic acid is easily reduced by steaming, boiling, or wilting the leaves of any of these vegetables for 5 to 6 minutes. Gently squeeze out any remaining water from the vegetables, and continue on with your favorite recipes
Coffee, tea and soft drinks such as soda contain caffeine, which may decrease calcium absorption and contribute to bone loss.
To maximize your absorption of calcium, take no more than 500 mg at a time.
Eating foods that have a lot of salt (sodium) causes your body to lose calcium and can lead to bone loss. Try to limit the amount of processed foods, canned foods and salt added to the foods you eat each day.
References:
https://www.nap.edu/read/13050/chapter/4#36
https://www.ncbi.nlm.nih.gov/pmc/articles/PMC5684325/
https://www.iofbonehealth.org/calcium-calculator
https://nutritiondata.self.com/facts/spices-and-herbs/203/2
https://pubmed.ncbi.nlm.nih.gov/3681480/
http://apjcn.nhri.org.tw/server/apjcn/8/1/64.pdf

Serves 2
Ingredients:
1 cup edamame cooked,
300 gr. cremini mushrooms
1 medium potato
1 cup broccoli
1 cup cherry tomato
2 green & red pepper
2 tablespoon olive oil
1 tablespoon tamari or soy sauce
1/4 teaspoon chili
1/4 teaspoon salt
1 teaspoon sesame
1/2 teaspoon rosemary
1/2 leek
2 tablespoon potato cheese fondue or your favorite sauce
Method:
1. Brush, wash and drain your mushrooms, cut them into small pieces. Set aside.
2. Heat olive oil in a non-stick skillet pan. Wash leek and peppers, cut them into small pieces, add into pan. Sauté until soften.
3. Then add mushrooms , soy sauce, garlic, chilli and sauté well until crispy. Place into your plate or bowl.
4. Sauté broccoli florets in a little olive oil with salt if you like or add them raw into your bowl.
5. Add cooked edamame beans into the bowl.
6.Bring to boil a potato on high heat for 15-20 minutes or until soften. Then cut into cubes, place into a non-stick skillet pan, add a little olive oil and sprinkle rosemary, toss on high heat for about 2-3 minutes. Then transfer into your bowl.
7. Cut tomatoes and add into your bowl.
8. Pour potato cheese fondue or your favourite sauce.
9. Sprinkle sesame and serve!

As many of you know, I am a raw foodist so if I will try a new ingredient, I definitely prefer to make by following the rules of raw food. I recently discovered sorghum (known as jowar in India, usually super millet, milo or sorghum in Europe) grain. While thinking about sprouting, I wanted to do a research beforehand and in the articles I read, I saw that it would definitely not sprout and it would be harmful. I share what I found below.
From Shauna Roberts, Sprouting for Nutrition.
“One grain to never sprout is sorghum also known as “super millet” because of its cyanide (hydrocyanic acid) content. Dry sorghum has very low levels of cyanide but as sorghum soaks its cyanide content increases immensely which could make it hazardous and perhaps even prove to be fatal. The average amount (61.3 mg) of hydrocyanic acid obtained from sprouts grown from 100g of seed exceeds the average fatal dose for an adult human.”
Sources:
https://nanopdf.com/download/sprouting-for-nutrition-the-gabriel-foundation_pdf
http://sfntoday.com/wp-content/uploads/2015/10/Sprouting-damage-in-Grain-Sorghum-2015.pdf
Plant-based & Raw Food Consulting
Here are some works I do:
Guidance of the plant-based & raw cuisine
Developing fully raw & plant-based menu
Raw pastry lessons
Plating & food styling education
Training of kitchen manager & other managers in leadership
Due to my ongoing studies and COVID-19, I do not accept collaborations till November 2020.
If you have any interesting idea or enquiries, please send an email to [email protected] or contact me via form so that we can discuss the details for the future.

Ingredients:
4,5 tbsp coconut sugar,
2 tbsp raw cacao powder,
2 tbsp gluten free cornstarch,
380 ml. homemade unsweetned cashew milk
Chia layer (optional):
2 tbsp chia seeds,
6 tbsp cashew milk
Toppings:
Fresh mint leaves,
Banana slices
Method:
1.In a medium saucepan, whisk together the coconut sugar, cocoa powder and cornstarch. Slowly pour in the cashew milk and whisk to combine.
2. Cook over medium heat, whisking constantly until the pudding begins to bubble. Cook two minutes longer The mixture will be thick but pourable and will set up more while it chills.
3. Take the saucepan off the heat.
( If you use chia, mix chia seeds with cashew milk and let it rest in the fridge for 10 minutes, when it is thick, then pour over into the jars.)
4.Pour the pudding into the jars and cover
5. Refrigerate until well-chilled, 3-4 hours.
6.Serve with sliced bananas and fresh mint leaves.


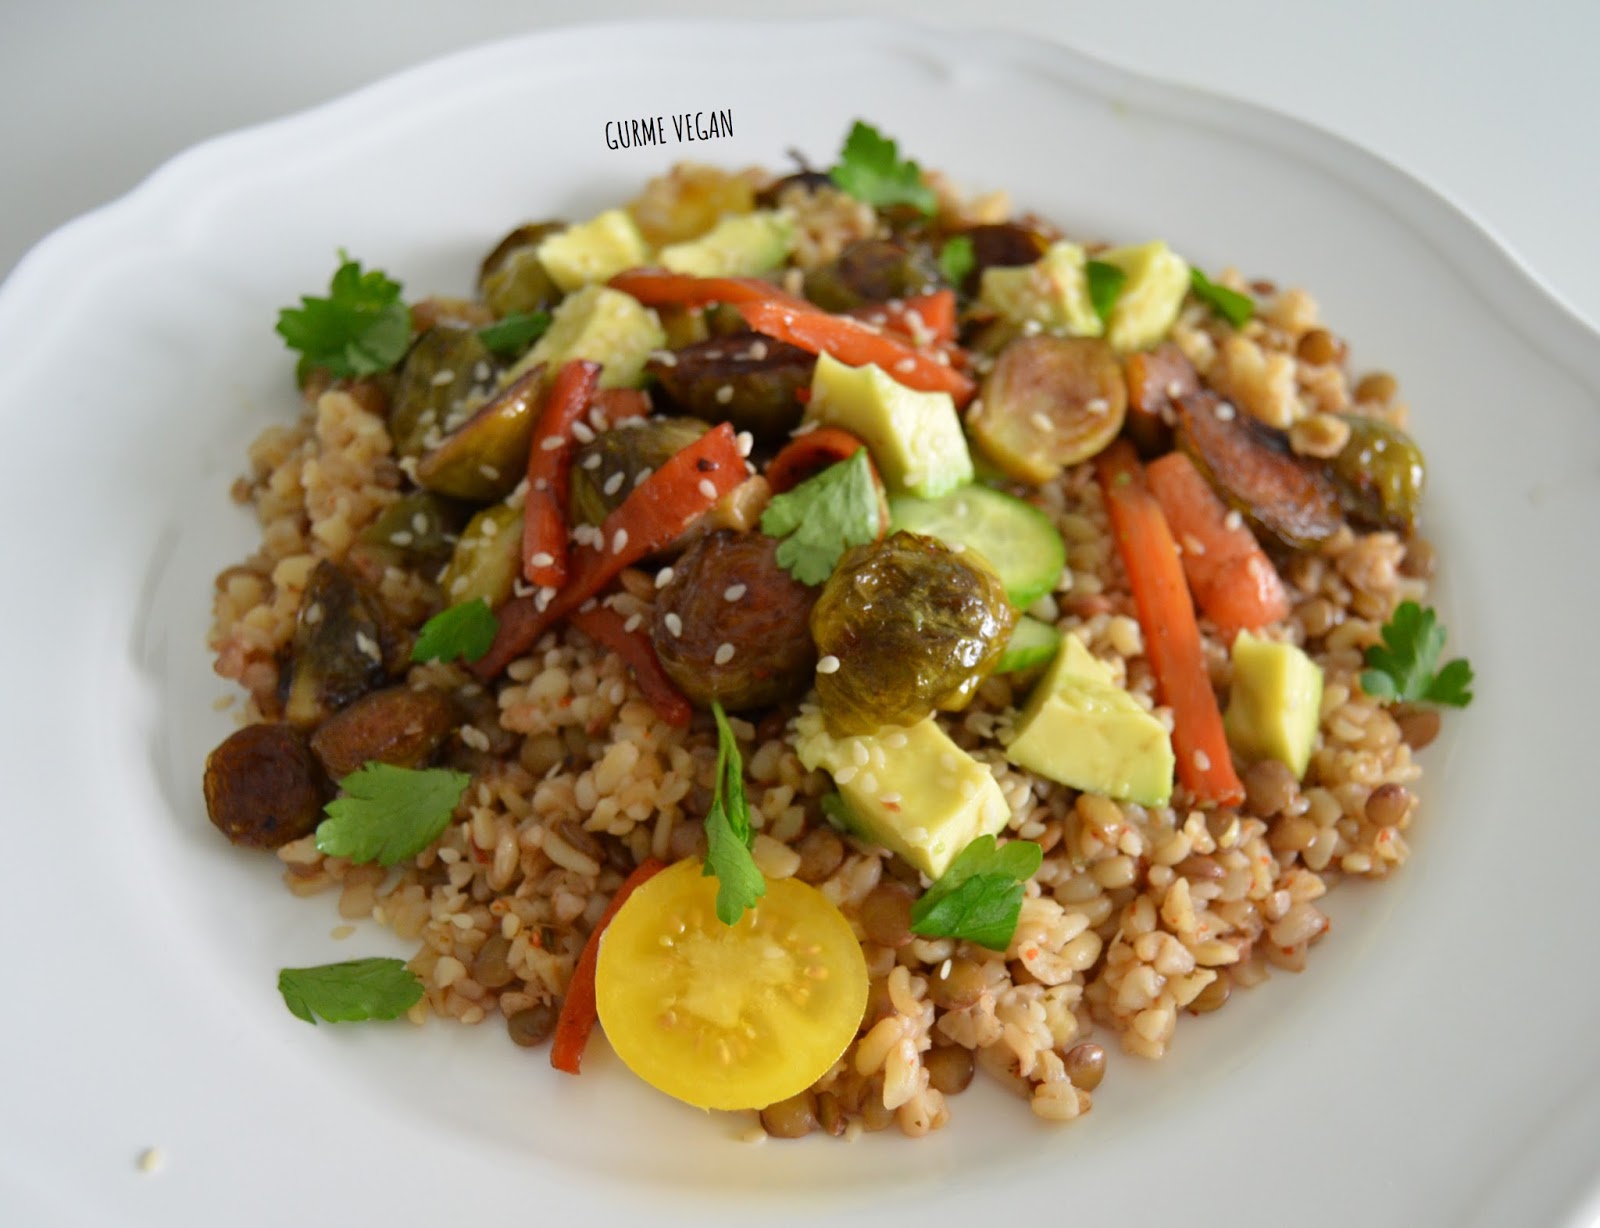
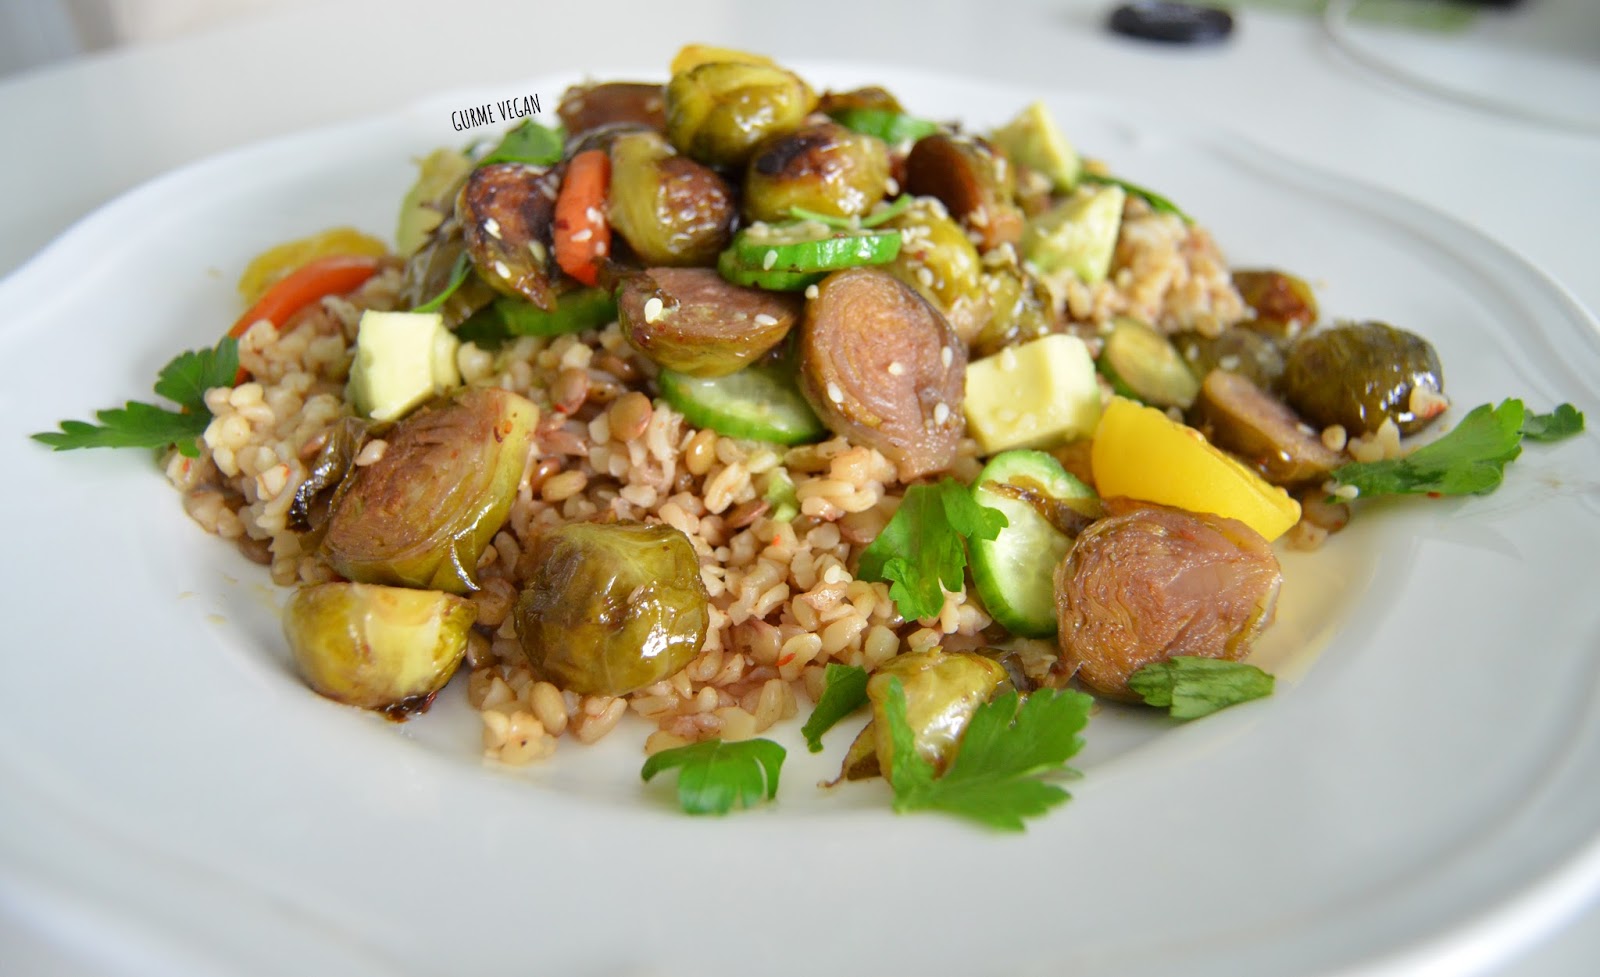
Caramelized carrot & brussel sprouts, mixed fluffy green lentils and bulgur, topped with cucumber, avocado, yellow cherry tomatoes, parsley, sesame seeds, dressed up with avocado sauce coming at you!
Ingredients:
1 medium carrot,
1 medium cucumber,
150 gr. brussel sprouts,
4-5 yellow cherry tomatoes,
1/2 cup green lentil
1/2 cup bulgur,
1 ready-to-eat avocado,
1 tsp sesame seeds,
1/2 tsp chili pepper,
1 lime juice,
A pinch of salt,
2 tbsp olive oil,
4 tbsp water,
2 tbsp pomegranate syrup.

Method:
1. Mix green lentil and bulgur in a bowl, wash and strain. Cover with water in a pot, bring to boil on medium heat for 15-20 minutes.
2. It is done, add 1 tbsp olive oil, chili pepper and 1 tbsp pomegranate syrup, mix for 1-2 minutes. Remove from the heat. Set aside.
3. Cut brussel sprouts in two, and carrots into long small pieces. Place in a pan, add 1 tbsp olive oil, 4 tbsp water, a pinch of salt and 1 tbsp pomegranate syrup. Cover and cook for 5-10 minutes until caramelized well.
4. Divide avocado in two, place half of it in a food processor, add 1 lime juice and a pinch of salt. Mix on high until completely smooth, set aside.
5. Cut into small pieces another half of avocado. Cut cherry tomatoes and cucumber.
6. Place lentil bulgur mix into the plate. Add carrot and brussel sprouts on top.
7. Put avocado, cutted tomatoes and cucumber on top.
8. Spread sesame seeds over avocado pieces.
9. Dress up with avocado sauce if desired. Serve warm or cold.


Ingredients:
3 branch of asparagus,
A medium bowl strawberries,
A handful of walnuts,
1 ready-to-eat avocado,
1 grapefruit juice,
2 tbsp plant milk,
1/2 cup quinoa cooked,
1 tbsp olive oil,
2 tbsp pomegranate syrup,
Fresh mint leaves.

Method:
1. Peel avocado and place in a food processor, add grapefruit juice and plant milk. Mix on high speed until completely smooth mixture. Set aside.
2. Cut strawberries into small pieces and set aside.
3. Wash and cut asparagus in two. In a large pan, saute with olive oil on medium heat 2-3 minutes. Set aside.
4. In a small bowl, mix pre-cooked quinoa and pomegranate syrup.
5. Place quinoa mixture in a plate, add some strawberries and asparagus on top. Pour the avocado sauce, add remaining strawberries and asparagus.
6. Top with walnuts and fresh mint leaves.
7. You can decorate with extra avocado and grapefruit slices if desired.
8. Serve cold.
