


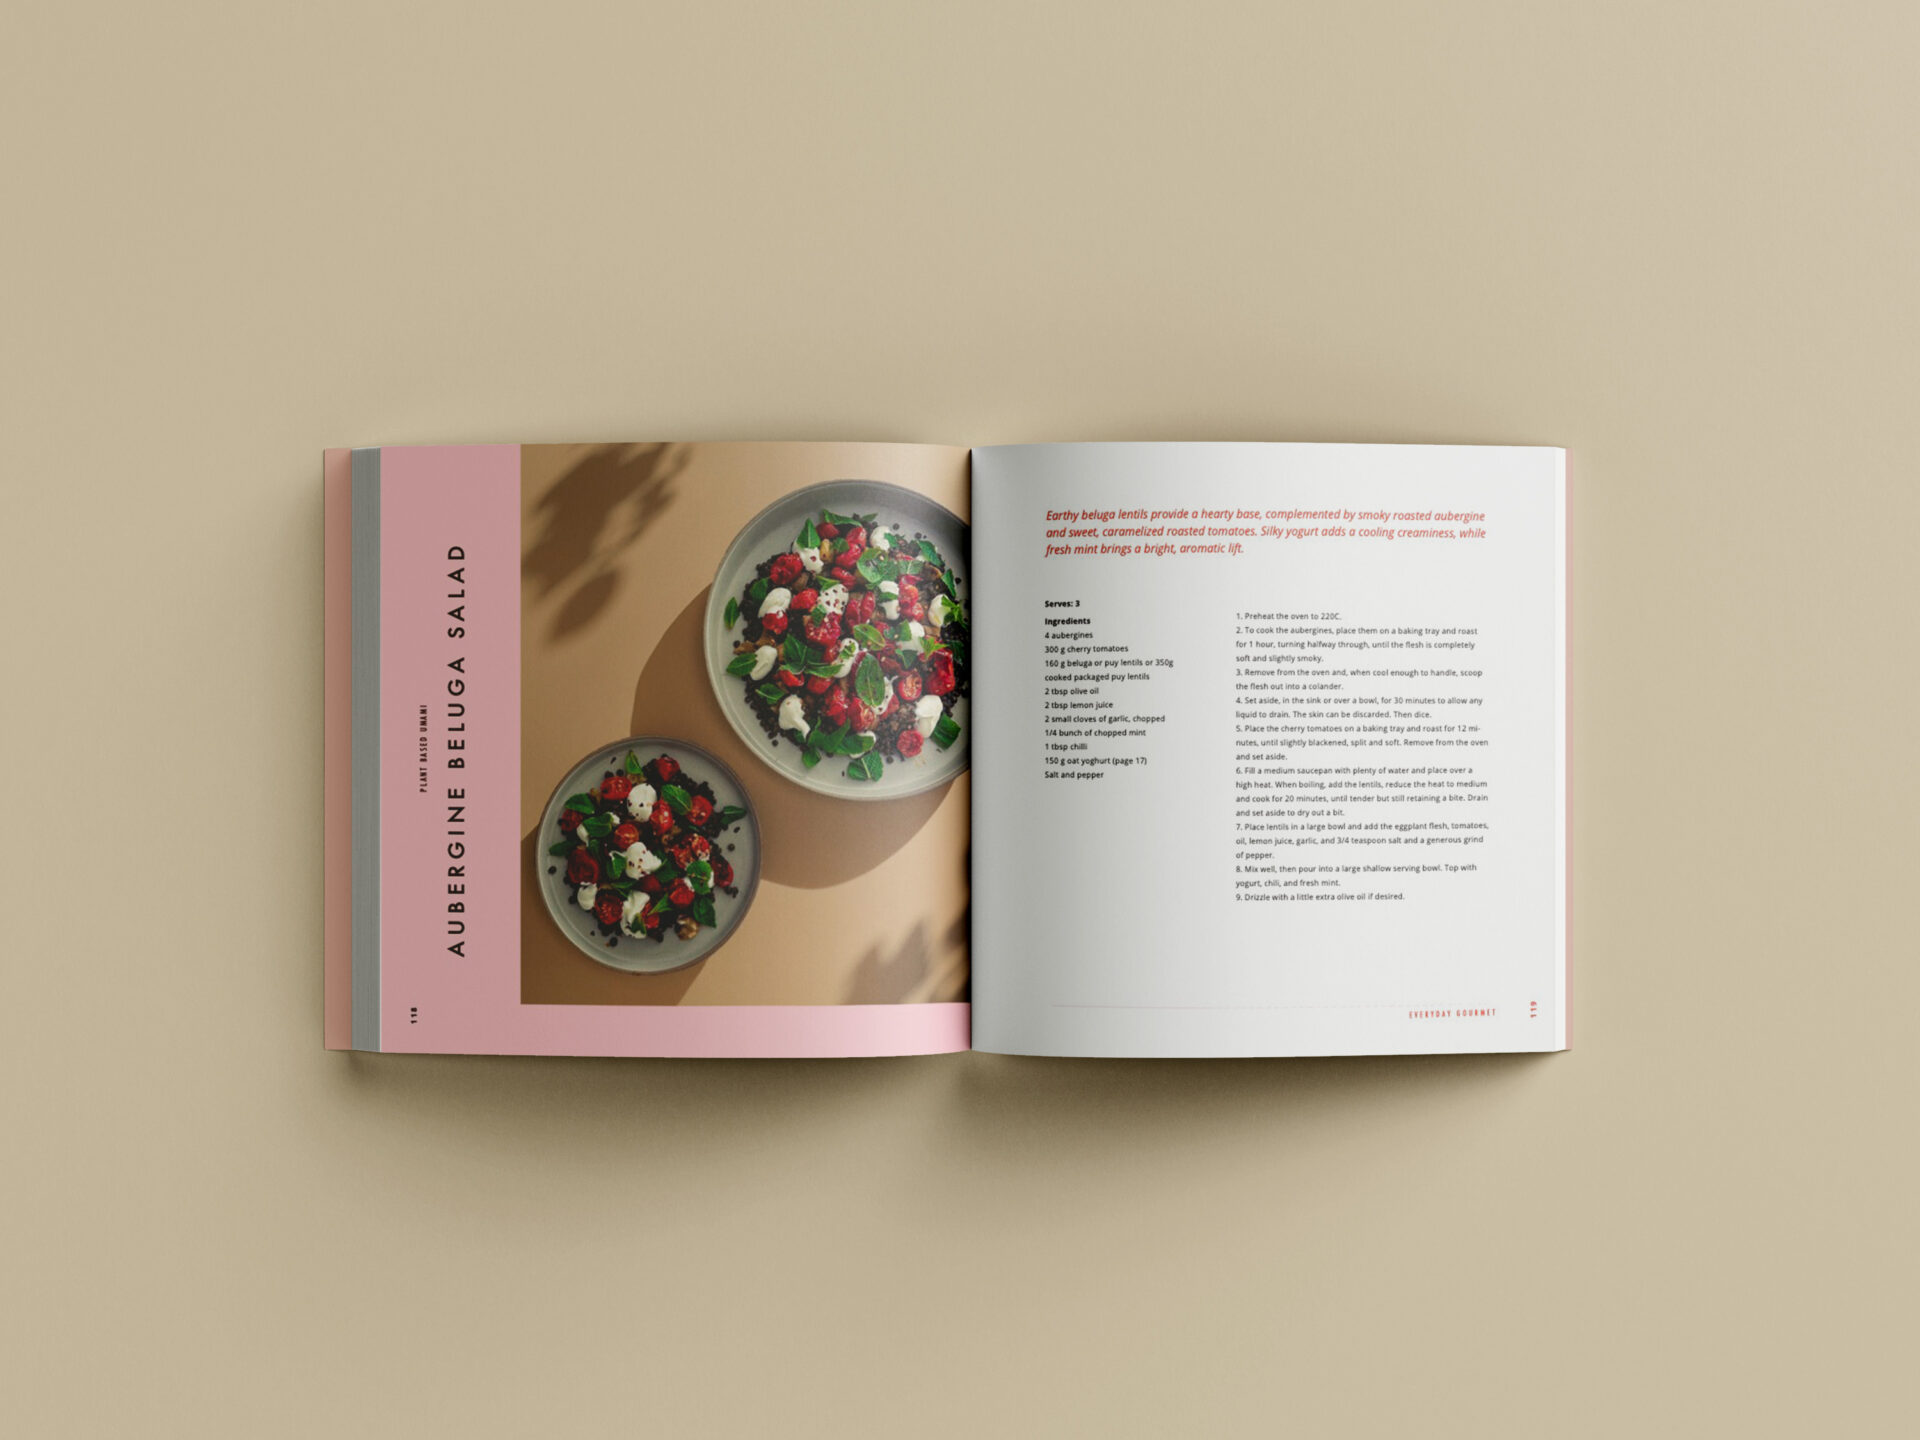
- Add red curry paste, olive oil, onion and garlic to a deep frying pan over high heat and sauté for a minute.
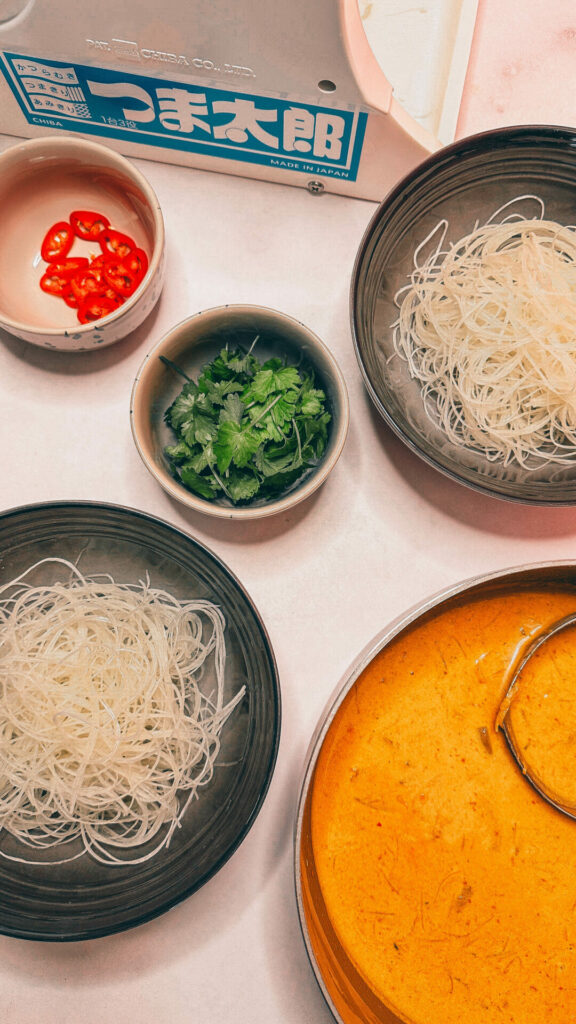
- Remove the outer part of the lemongrass. Chop the lemongrass as finely as you can.
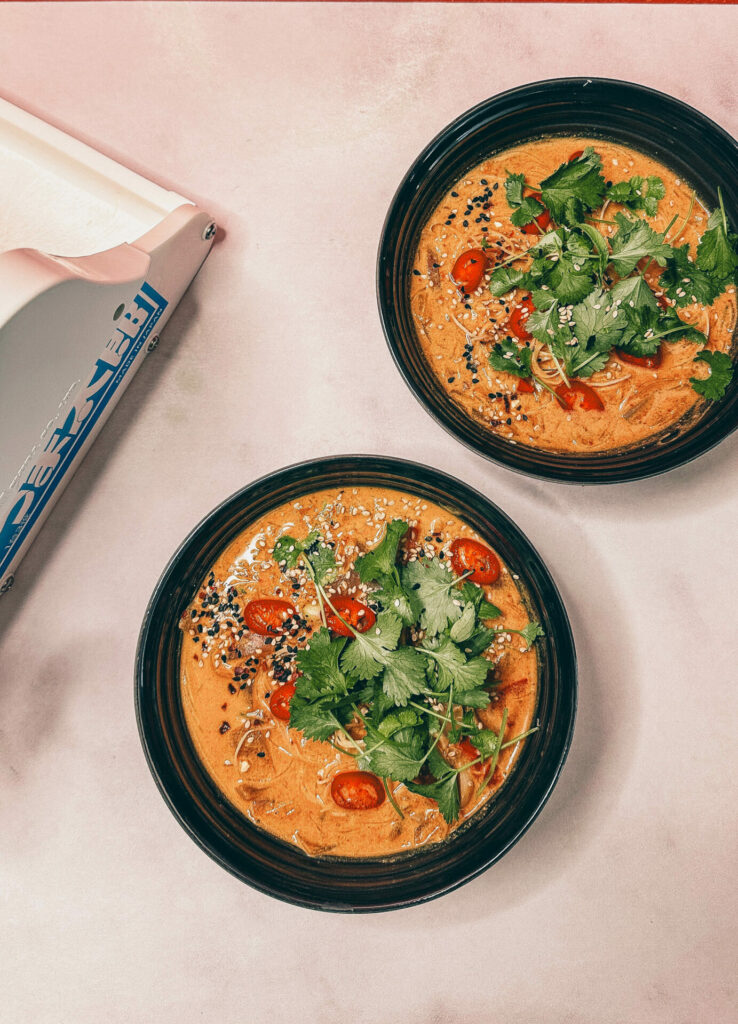
- Pour coconut milk into the wok and add lemongrass, coconut aminos, lime leaves and coconut sugar. Let cook uncovered for 10 minutes.
- Pick the coriander leaves. Chop the coriander stems and chili pepper.
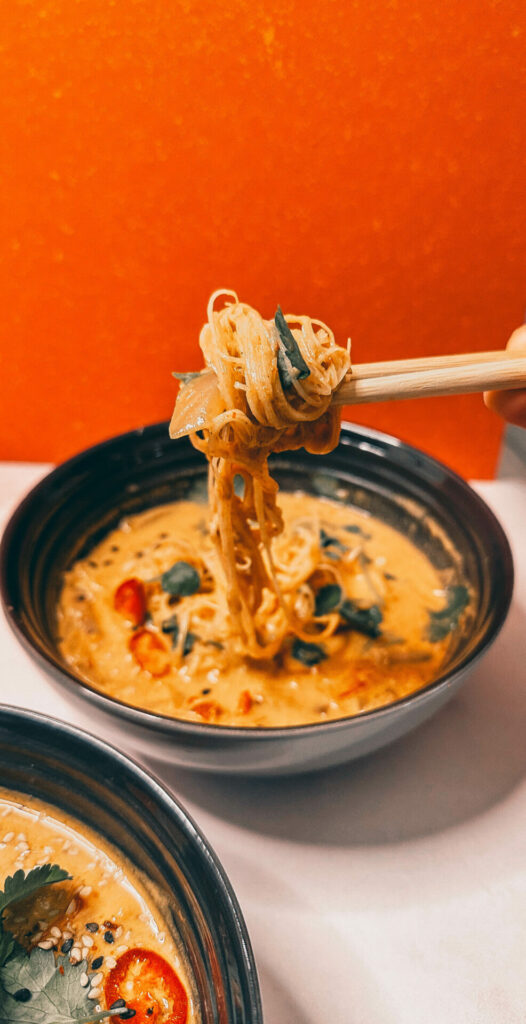
- Remove from the heat and sprinkle with coriander leaves. Serve immediately with freshly cut swede vermicelli, a little sesame and chili pepper if you want a little more heat.
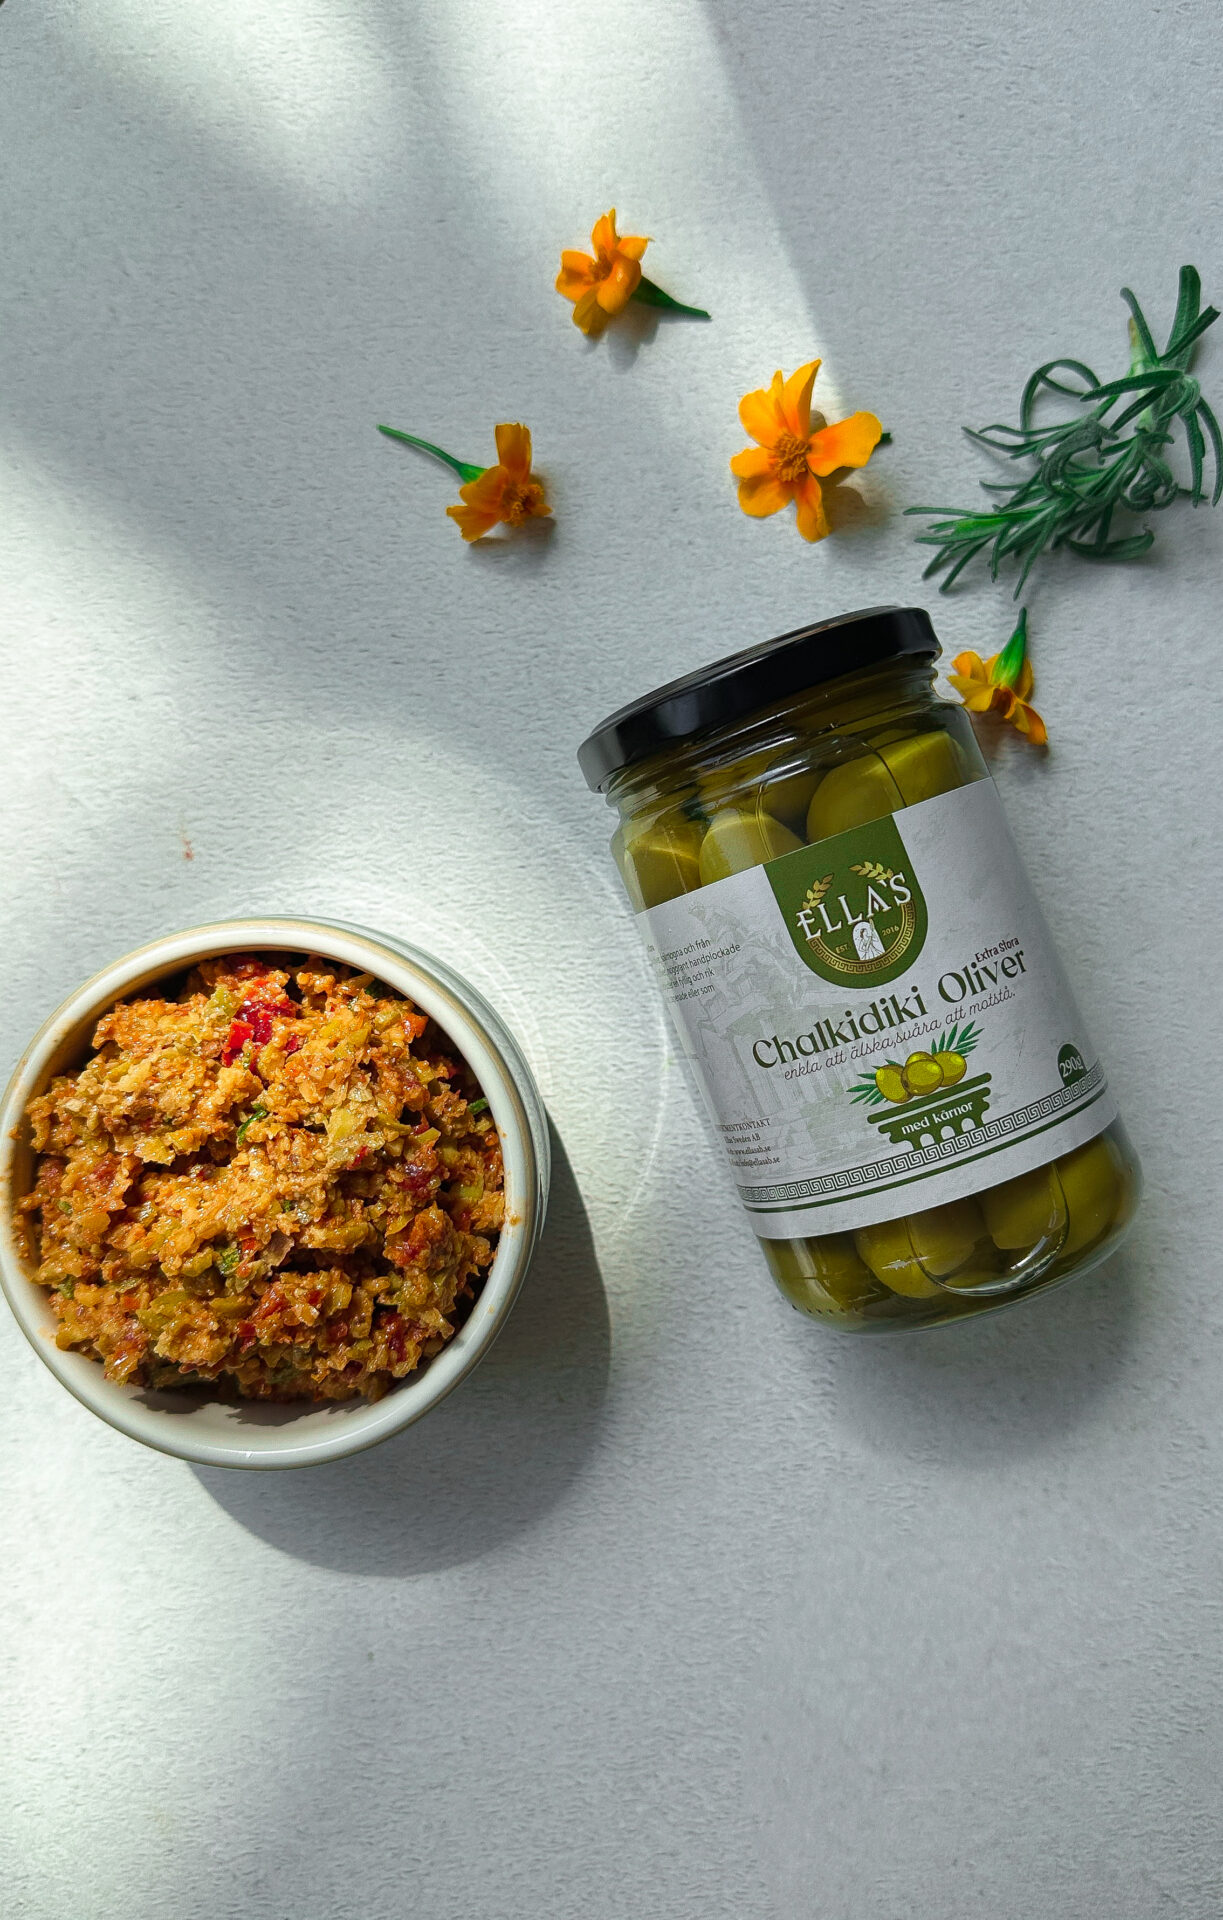
- Place olives, walnuts, sun-dried tomatoes, olive oil, lemon juice and garlic in a small food processor.
- Blend short pulses until the mixture is coarsely chopped but well mixed.
- Add the fresh herbs and blend a few more pulses.
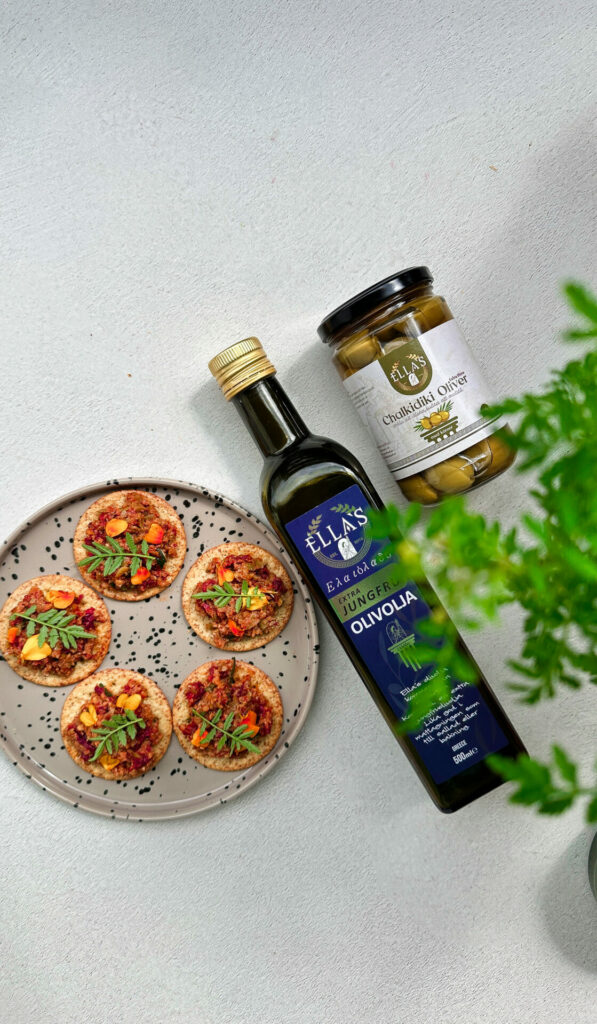
- Serve on bread or crackers, and drizzle a little extra Ellas olive oil over it when serving.
- Lägg oliver, valnötter, soltorkade tomater, olivolja, citronsaft och vitlök i en liten matberedare.
- Mixa korta pulser tills blandningen är grovhackad men väl blandad.
- Tillsätt de färska örterna och mixa några pulser till.
- Servera på bröd eller kex, och ringla gärna över lite extra Ellas olivolja vid servering.
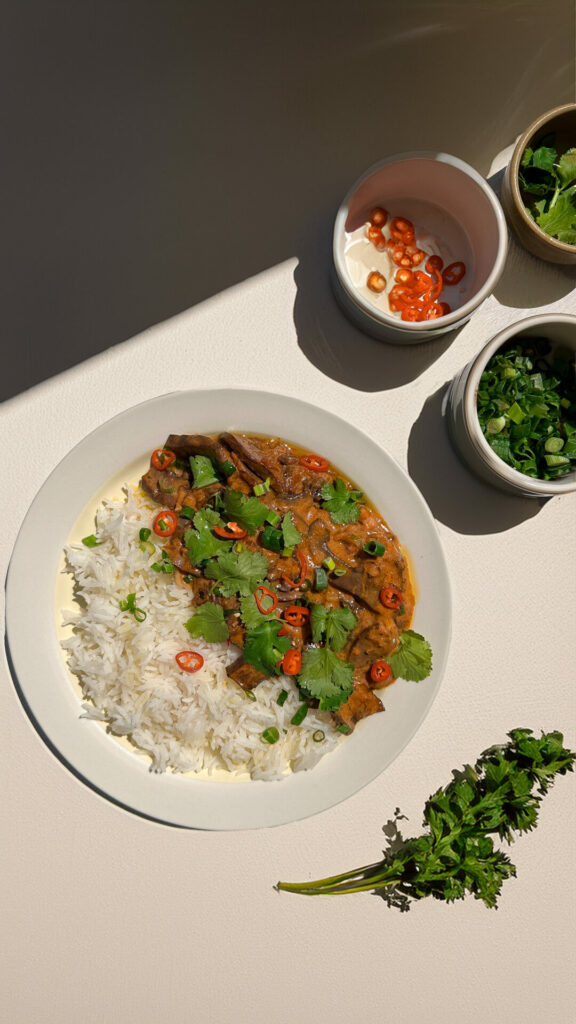
- Cook your Ellas basmati rice according to package directions. I cooked mine in a rice cooker with the suggested amount of water and rice.
- Pat the portobello mushrooms dry with a lightly damp towel (don’t submerge them in water, they’ll get soggy) and slice thinly. Mix all the marinade ingredients in a bowl. Add the mushrooms to the bowl, toss with the sauce, and let sit for 30 minutes. Fry for 5-6 minutes on each side or until golden brown and lightly cooked through.
- Heat the oil in a saucepan and fry the onion over medium heat until soft and golden.
- Stir in the garlic, ginger, and remaining spices and cook for 1-2 minutes until fragrant. Then add the tomato sauce and coconut milk and sautéed mushrooms, continue cooking for another 1-2 minutes.
- Serve with extra virgin olive oil, chili, red onion and coriander along with basmati rice.
*Sponsored post for Ellas
Swedish: - Koka ditt Ellas basmatiris enligt anvisningarna på förpackningen. Jag tillagade mina i en riskokare med den rekommenderade mängden vatten och ris.
- Torka portobellosvamparna torra med en lätt fuktig handduk (sänk dem inte ner i vatten, de blir blöta) och skiva dem tunt. Blanda alla ingredienser till marinaden i en skål. Tillsätt svamparna i skålen, blanda med såsen och låt stå i 30 minuter. Stek i 5-6 minuter på varje sida eller tills de är gyllenbruna och lätt genomstekta.
- Värm oljan i en kastrull och stek löken på medelvärme tills den är mjuk och gyllenbrun.
- Rör i vitlök, ingefära och resterande kryddor och stek i 1-2 minuter tills det doftar. Tillsätt sedan tomatsåsen, kokosmjölken och de sauterade svamparna, fortsätt tillaga i ytterligare 1-2 minuter.
- Servera med extra jungfruolja, chili, rödlök och koriander tillsammans med basmatiris.
- Rim the glass with the tajin with a lime wedge and add ice.
- Blend apple juice, coconut milk, lime juice, maple, mint and jalapeño until smooth
- Pour into glass and top with lime wedge, mint and a slice of jalapeño.
- Cheers to a spicy-sweet treat
(paid collaboration with Råsaft) - Place all of the crust ingredients in a food processor except coconut oil and plant milk. Mix all together. Lastly add the coconut oil and plant milk, mix to combine until dough comes together..
- Place the crust mixture in a 18 cm round cake mould and gently flatten it with your fingers on the bottom of the pan.
- For the cheesecake filling, place all ingredients ( cashews need to be soaked for 4 hours and then strained) in a high-powered blender except coconut oil. A high-powered blender makes the filling creamy and fine (which is my recommendation), but you can also use your food processor. Blend for a minute or two, until thick and creamy.
- Pour your filling on top of the crust. Shake the pan gently to remove any air bubbles. Then, place your pan in the freezer for 1-2 hours until thick enough to remould.
- Decorate your cake with coconut whipping cream, fresh blueberries and onion flowers.
Our raw dessert books you might like:
GOURMET RAW CAKEBOOK
RAW FIKA - Preheat the oven to 210°C.
- Slice the spaghetti squash into 1 1/2 inch thick rings and scoop out the seeds and ribbing. Make sure that you have an extra-sharp knife to cut through the tough squash. Drizzle the inside of the squash with olive oil and sprinkle with salt and pepper.
- Do not waste the seeds, they are super delicious! Clean the seeds under the running water. Dry and spread on a tray. While you are cooking your spaghetti squash you can also roast the seeds in the oven for 10-15 minutes.
- Place the spaghetti squash cut side down on the baking sheet and use a fork to poke holes. Roast for 40-50 minutes or until lightly browned on the outside, fork tender, but still a litte bit firm. The time will vary depending on the size of your squash. I also find that the timing can vary from squash to squash. So it is best to observe after 40 minutes and check with a help of fork if it is soft enough or not. But if you are making it for the first time, keep in mind that it shouldn’t be super soft otherwise will loose its consistency.
- Once time is up, remove from the oven and flip the squash so that it’s cut side up. When cool to the touch, use a fork to scrape and fluff the strands from the sides of the squash.
- Pour the sauces you want, I made marinara, cashew bechamel and basil pesto sauce, sprinkled some hemp parmesan and topped with pickled red onion.
- Author: Nazlı Develi
- Editor: Stella Nilsson
- Design & Photography: Nazlı Develi
- Pages: 231
- Paperback Item Weight: 1.18 pounds
- Hardcover Item Weight: 1.46 pounds
- Paperback Book Dimensions: 8.5 x 0.32 x 8.5 inches
- Hardcover Book Dimensions:8.49 x 0.74 x 11.24 inches
- Language: English
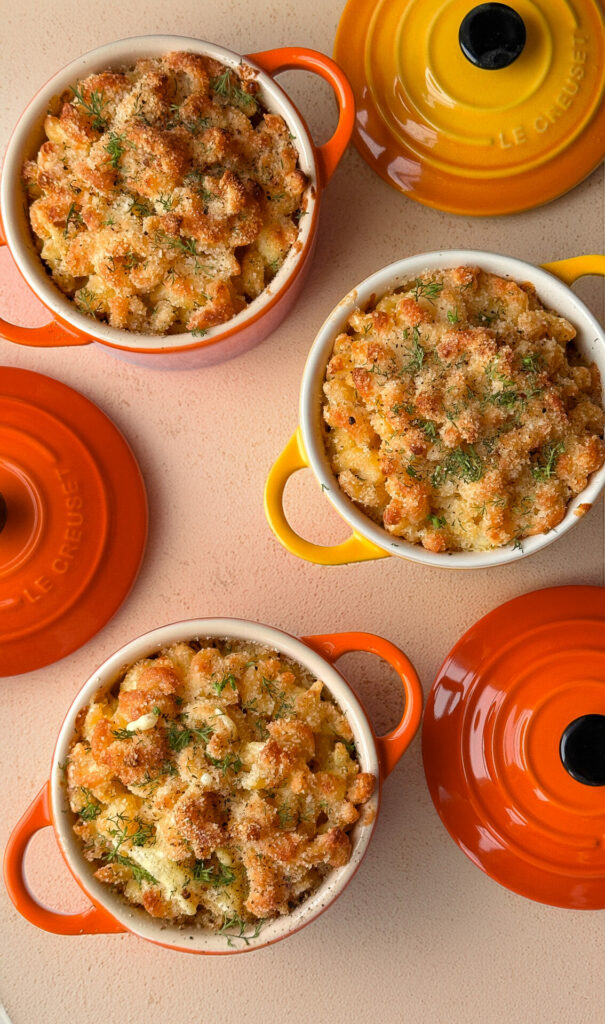
Creamy, rich, and topped with a golden crunch, this vegan mac & cheese is comfort food done right — completely dairy-free and gluten-free.

Ingredients
Pasta & Topping
200 g gluten-free elbow pasta
60 g gluten-free rice panko
Cashew Cheese Sauce
150 g cashews
300 ml water
20 g nutritional yeast (or use 1.5 tbsp chickpea miso)
2 tbsp olive oil
4 cloves garlic, roasted or fried
1/2 tsp salt
To serve
Salt and pepper
Fresh parsley or dill, finely chopped
Instructions
Preheat & Prepare
Preheat the oven to 200°C (400°F). Lightly grease a casserole dish (I used three small Petite Casseroles from Le Creuset, but one medium dish works as well).
Soak the Cashews
Cover the cashews with boiling water and soak for 20 minutes. Drain and discard the soaking water.
Make the Sauce
Add the soaked cashews, fresh water, nutritional yeast, olive oil, garlic, and salt to a high-powered blender. Blend until completely smooth and creamy.
Cook the Pasta
Cook the pasta according to package instructions, but drain it about 5 minutes early so it remains al dente (it will continue cooking in the oven).
Assemble
Add the drained pasta to the prepared casserole dishes and pour over the cashew cheese sauce. Stir well to coat evenly.
Top & Bake
Sprinkle the rice panko evenly over the pasta. Bake uncovered for 10 minutes, then broil for a few minutes until the top is golden and crisp.
Serve
Season with salt and pepper and serve immediately with finely chopped fresh herbs and enjoy!
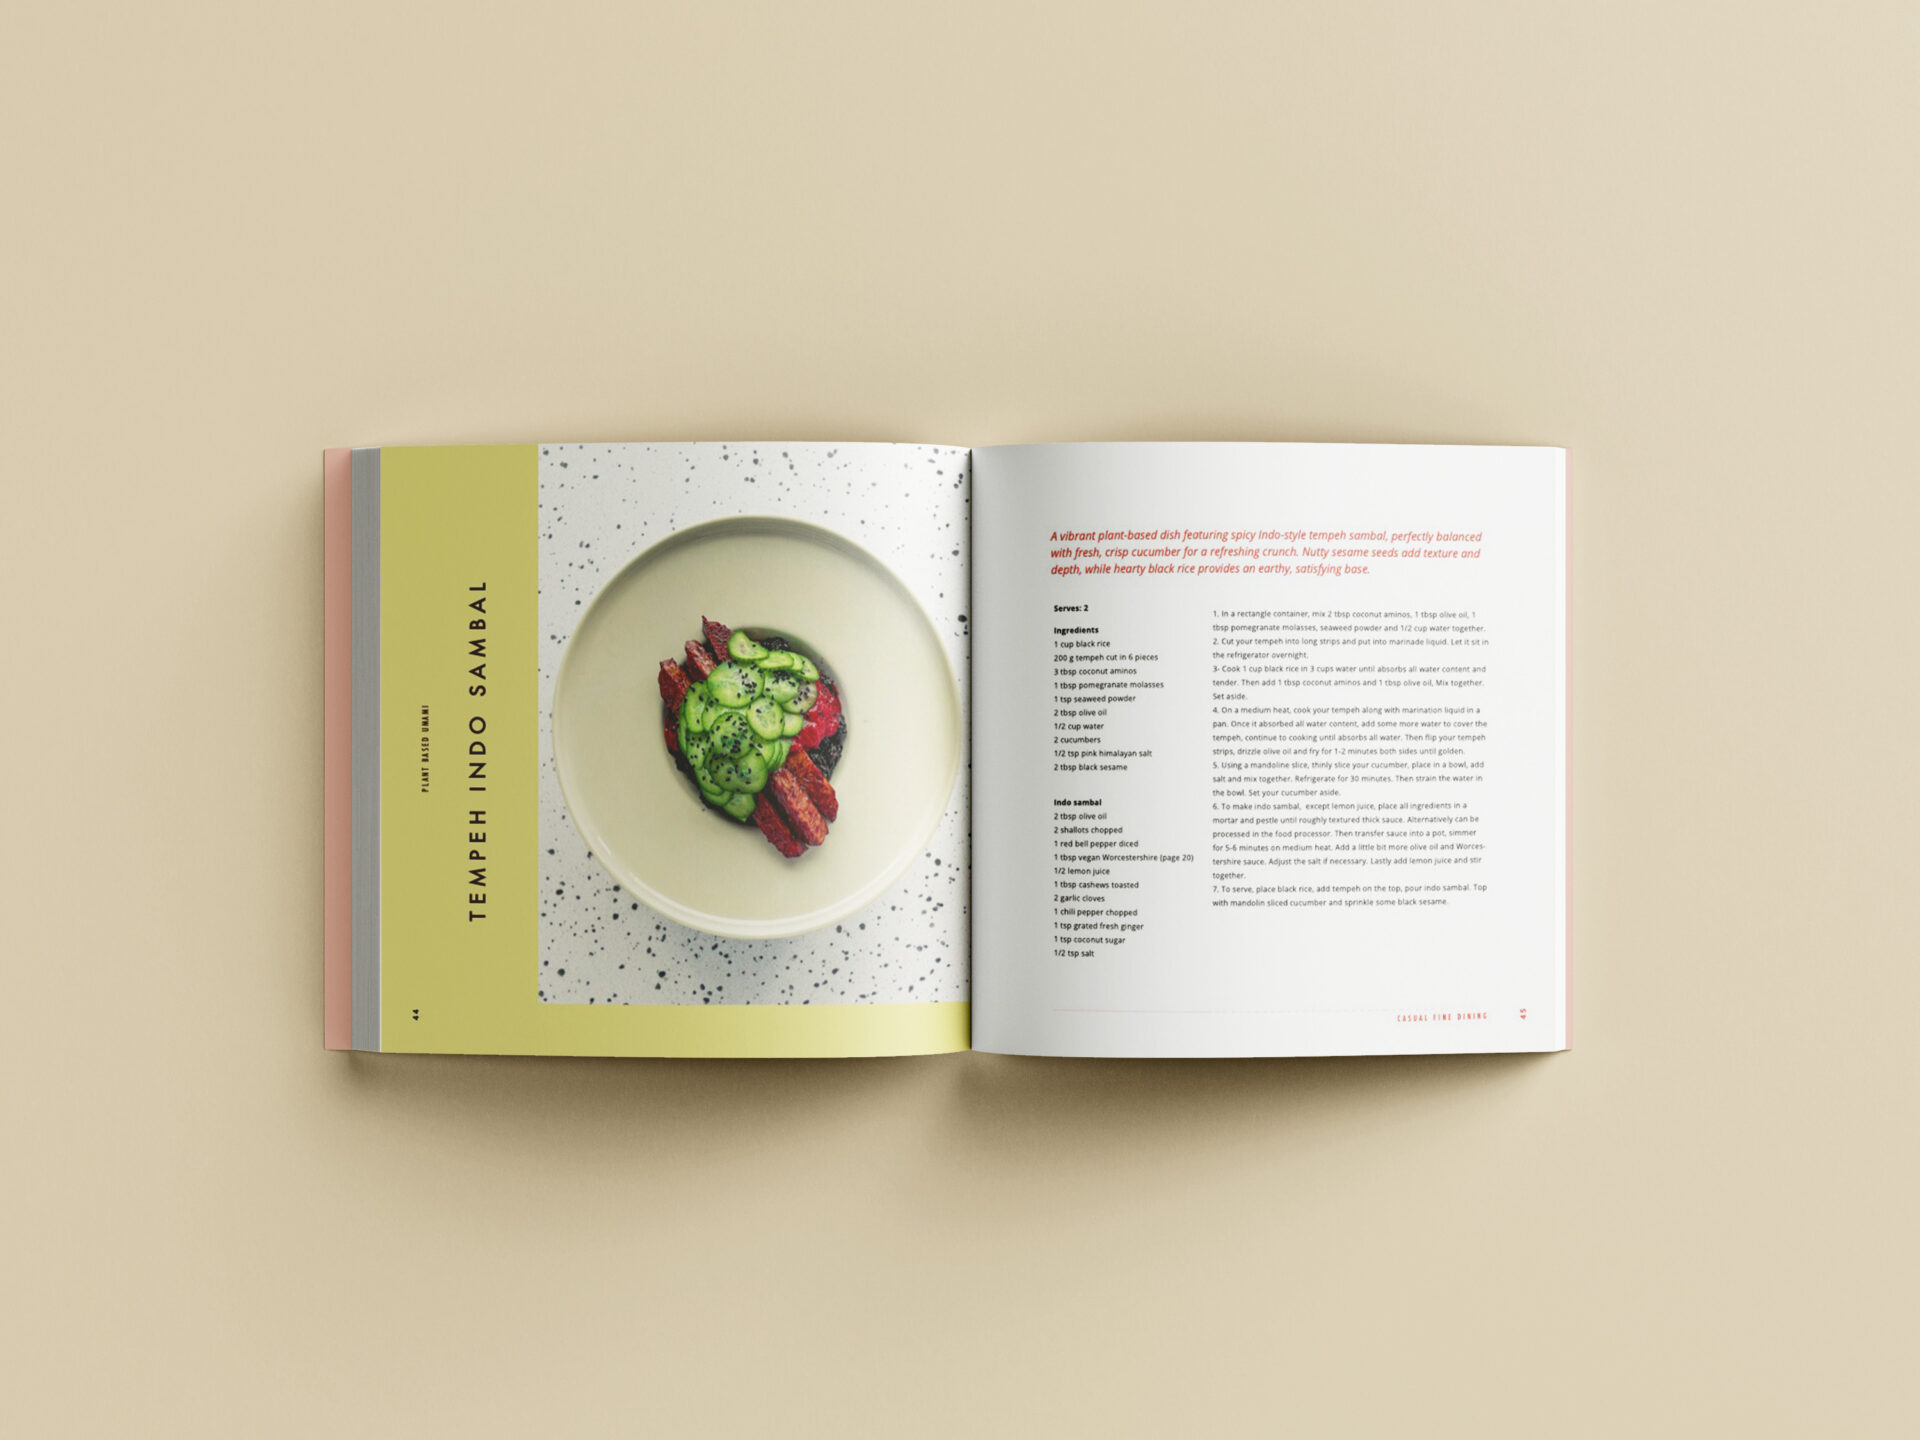
Ingredients
1 large swede
Chiba tsumataro or similar tool to cut the swede into vermicelli noodles
Use chiba tsumataro noodle knives and cut your swede into vermicelli.
You may need to peel the swede well and cut a few slits through tsumataro sheet knives first.
For the curry:
1 large yellow onion, sliced
1 tbsp olive oil
4 cloves garlic, finely chopped
4 tbsp red curry paste
600 ml coconut milk
3 tbsp coconut aminos
1 tbsp coconut sugar
1 lemongrass, finely chopped
3 lime leaves
1 chili pepper, finely chopped
1 lime, squeezed juice
1 pot fresh coriander
1 tbsp sesame
Instructions
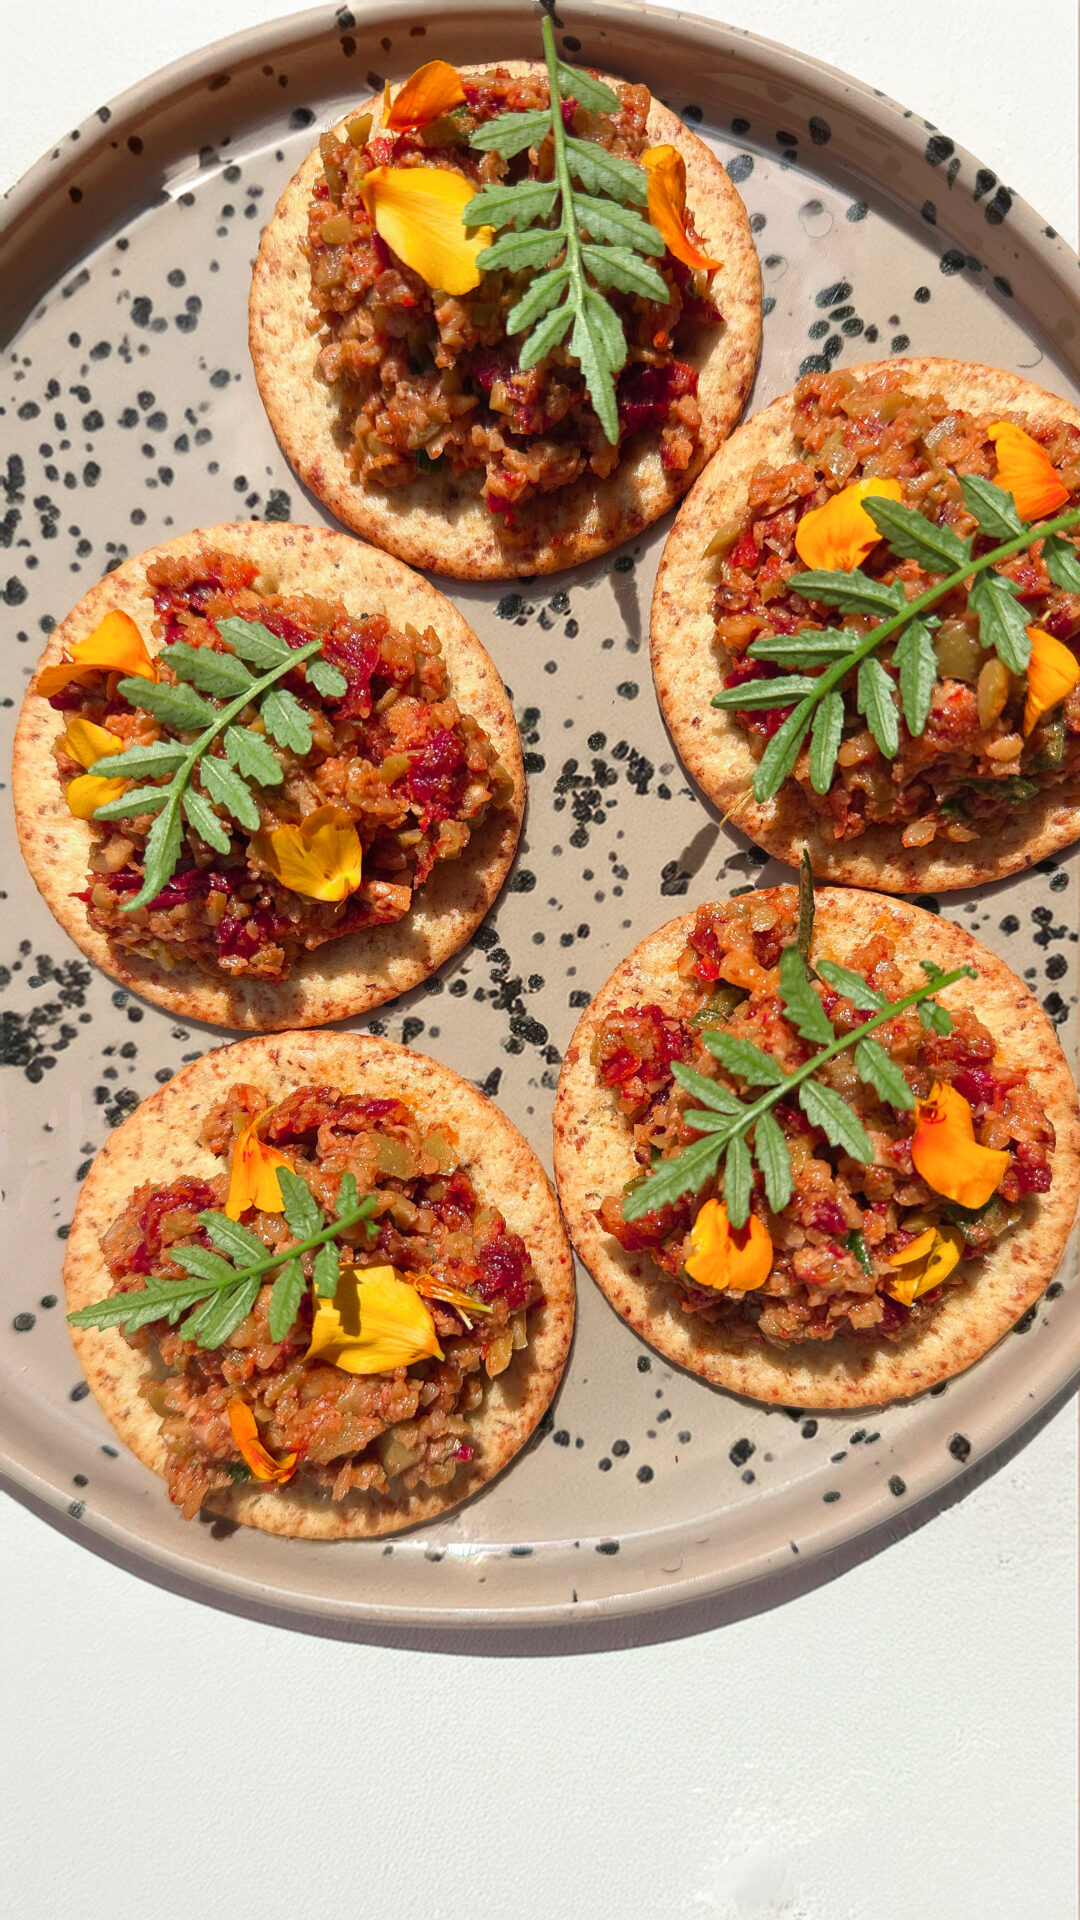
Olive tapenade is a flavorful spread originating in Provence, France—perfect to serve on crackers or a slice of baguette.
This recipe requires only a few pantry items and is quick to throw together—perfect as a last-minute party appetizer or as a flavorful appetizer anytime of the year.
Ingredients:
• Ellas Chalkidiki olives*
• 1 dl Ellas sun-dried tomatoes*
• 3 tbsp Ellas extra virgin olive oil*
• 1 dl walnuts
• ½ tbsp freshly squeezed lemon juice
• 1 clove garlic, finely chopped (or garlic powder)
• ⅓ cup fresh marigold or rosemary
• Salt and pepper to taste
• Extra olive oil if needed
Instructions
*Sponsored post for Ellas
Swedish:
Tapenade med oliver, soltorkade tomater och valnötter
Olivtapenade är ett smakrikt pålägg med ursprung i Provence, Frankrike – perfekt att servera på kex eller en bit baguette.
Det här receptet kräver endast några få skafferivaror och går snabbt att slänga ihop – perfekt som en sista-minuten-förrätt till festen eller som en smakrik aptitretare när som helst under säsongen.
Ingredienser:
• Ellas Chalkidiki-oliver*
• 1 dl Ellas soltorkade tomater*
• 3 msk Ellas extra virgin olivolja*
• 1 dl valnötter
• ½ msk färskpressad citronsaft
• 1 vitlöksklyfta, finhackad (eller vitlökspulver)
• ⅓ kopp färsk tagetes eller rosmarin
• Salt och peppar efter smak
• Extra olivolja vid behov
Gör så här:
*sponsrat innehåll för Ellas
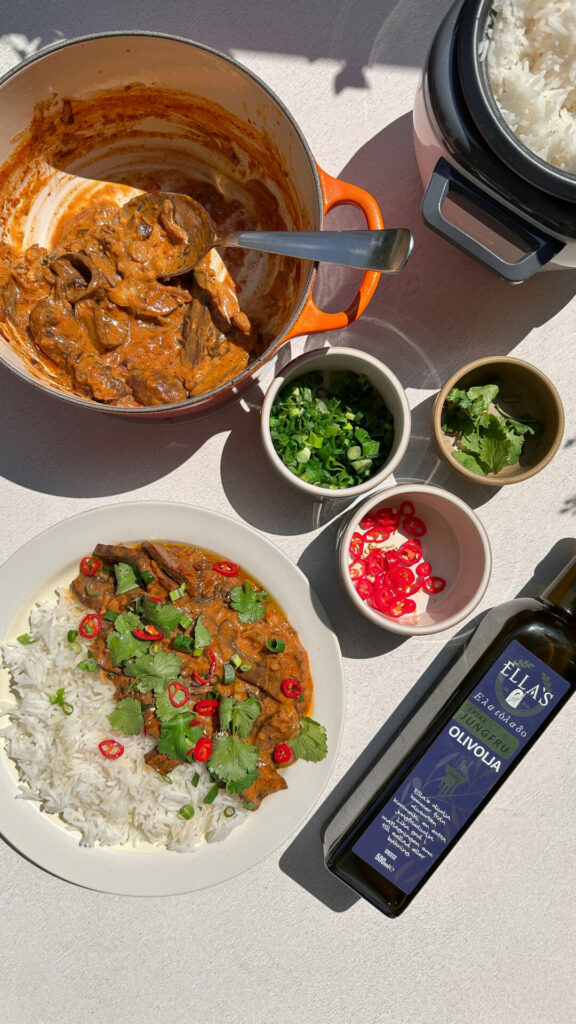
Ingredients
For the rice
4 dl @ellasab.se ´s excellent taste basmati rice*
4 tbsp @ellasab.se ´s Extra Virgin Olive Oil*
6 dl water
Salt to taste (approx. 1.5 tsp)
For the curry
2 tbsp olive oil
1 medium onion, finely chopped
1 tbsp finely chopped garlic
1 tbsp grated fresh ginger
1 tsp ground coriander
1 tsp garam masala
1/2 tsp ground turmeric
2 dl tomato sauce
1.5 dl coconut milk
For the mushrooms & marinade
400 g portebollo
1/2 dl tamari
1 tbsp olive oil
1 tsp agave
Serving
Coriander
Thinly sliced red onion
Thinly sliced chili pepper
Ellas extra virgin olive oil
Instructions
Basmatiris med växtbaserad nordindisk curry
I betalt samarbete med @ellasab.se*
Ingredienser
Till riset
4 dl @ellasab.se:s utsökta basmatiris
4 msk @ellasab.se:s extra jungfruolivolja
6 dl vatten
Salt efter smak (ca 1,5 tsk)
Till curryn
2 msk olivolja
1 medelstor lök, finhackad
1 msk finhackad vitlök
1 msk riven färsk ingefära
1 tsk malen koriander
1 tsk garam masala
1/2 tsk malen gurkmeja
2 dl tomatsås
1,5 dl kokosmjölk
Till svampen och marinaden
400 g portebollo
1/2 dl tamari
1 msk olivolja
1 tsk agave
Tillbehör
Koriander
Tunt skivad rödlök
Tunt skivad chilipeppar
Ellas extra jungfruolivolja
Gör så här:
Time to try our best raw vegan Green Mocktail made with cold-pressed Raw Juice containing heavenly apples, pineapple, ginger, mint and lime.
It’s also a super easy and fun way to enjoy your greens anytime!


Ingredients
4 dl cold pressed juice ( I used Råsaft no 5)
1 + 1/2 dl coconut milk
1/2 dl lime juice
3 tbsp maple syrup
2-4 slices jalapeño
4-5 fresh mint leaves
Decoration:
Ice cubes
Lime wedge
Fresh mint
Sliced jalapeño
Tajin (to make your own, mix 2 tbsp salt, 1 lime zest, 2 tsp cayenne pepper)
Instructions:
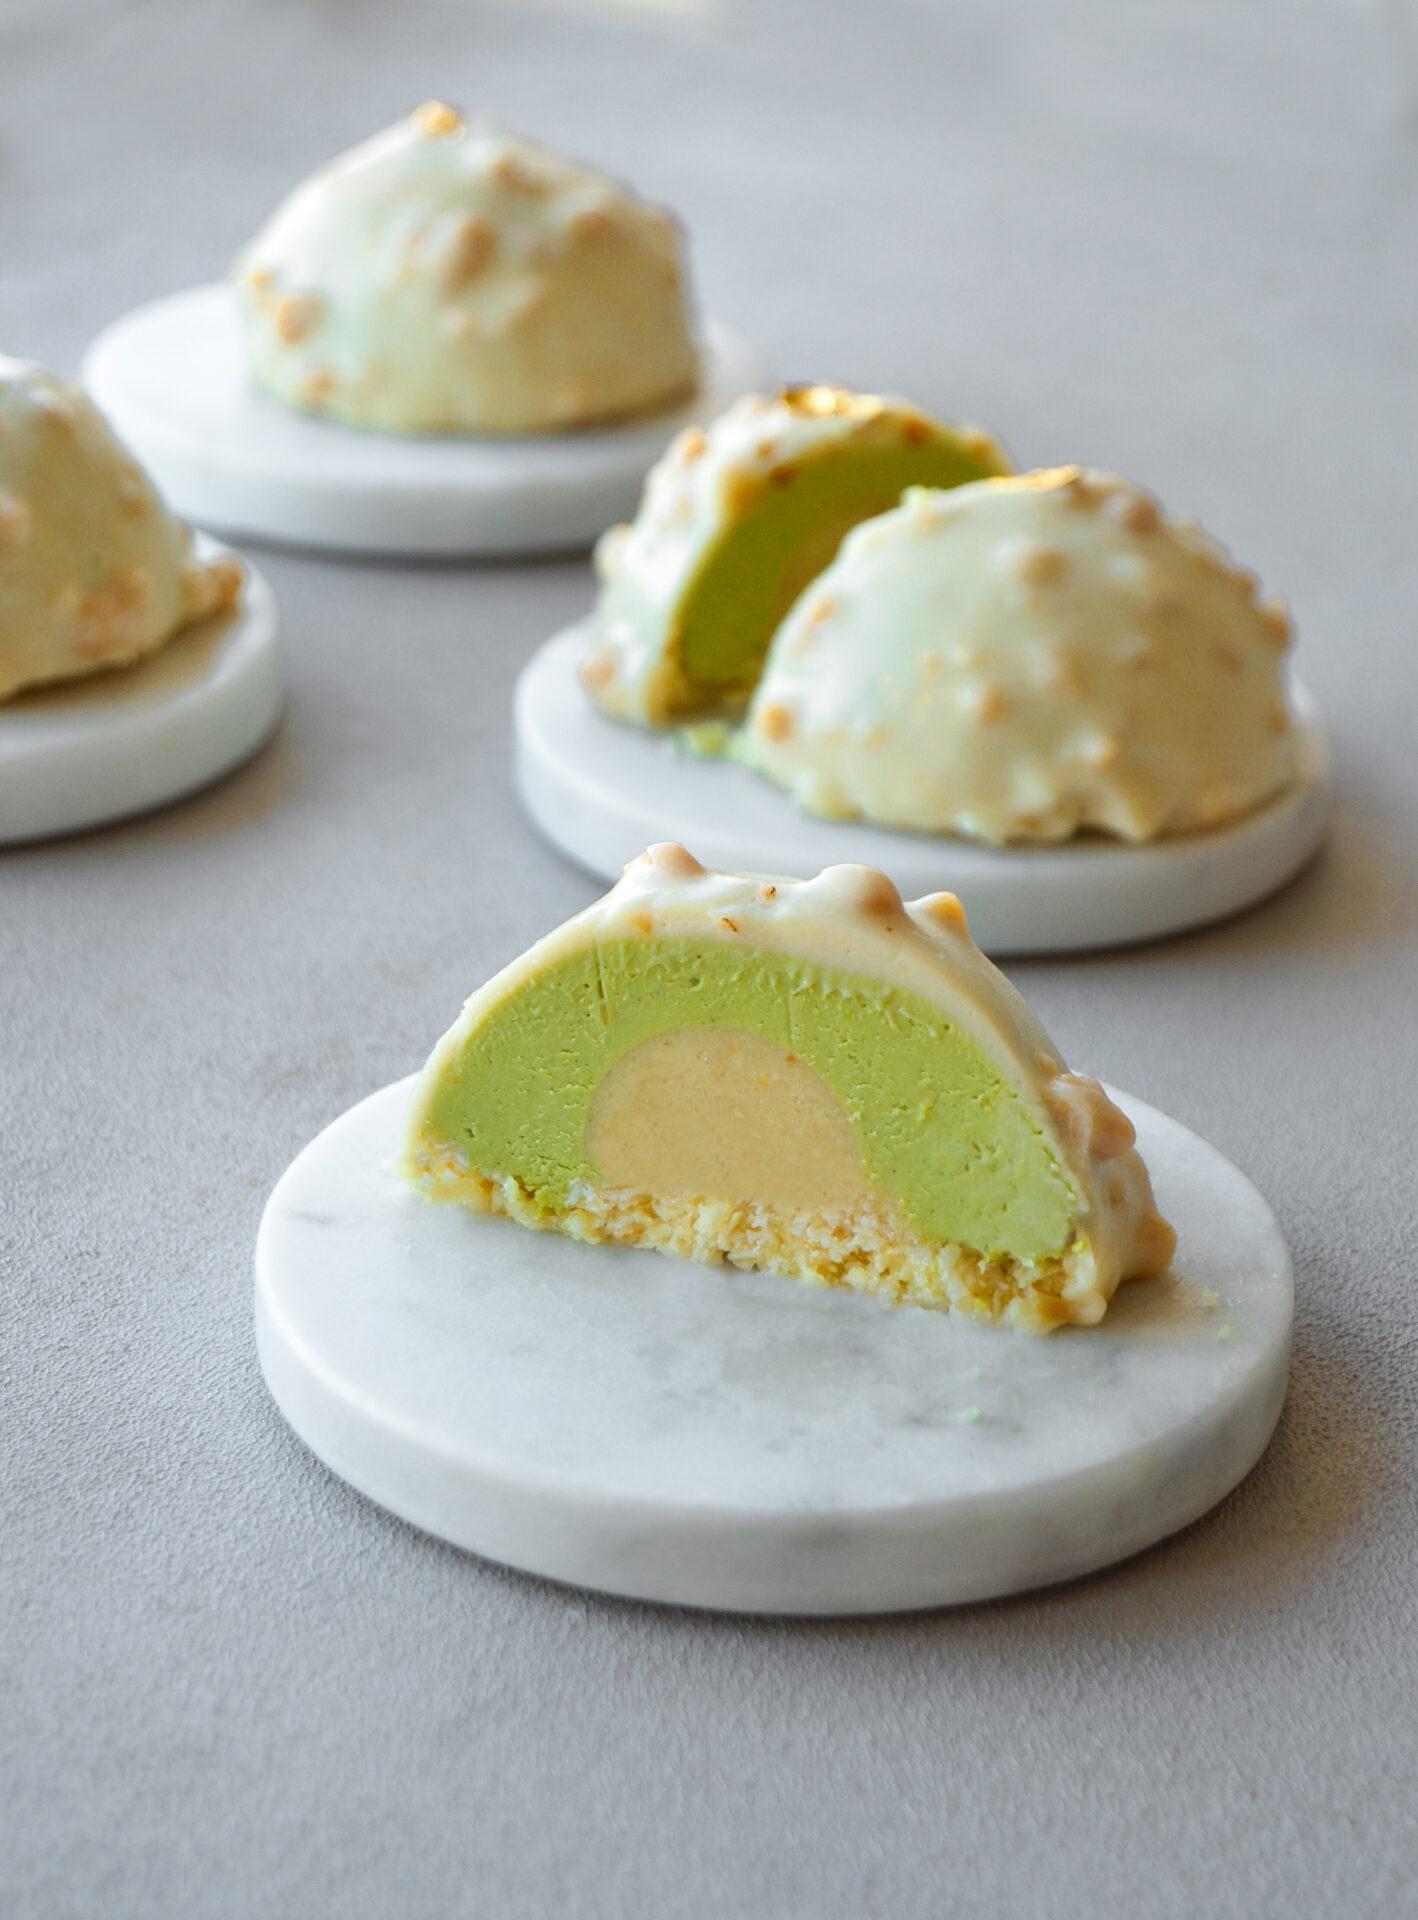
This raw blueberry cheesecake is super simply to make, gluten-free, dairy-free, vegan, paleo…and one of my favorite holiday and special occasion desserts.


Ingredients
For the bottom:
45 g coconut sugar powdered
80 g almond flour
10 g coconut flour
25 g walnuts
15 ml coconut oil
15 ml plant milk
1/4 tsp pink himalayan salt
For the cream:
100 g cashews soaked
70 g coconut cream
40 ml maple syrup
20 ml lemon juice
15 g freeze dried blueberry powder
40 g coconut oil melted
4-5 drops vanilla extract
A pinch of pink himalayan salt
Decoration:
Onion flowers
Fresh blueberries
Coconut whipping cream
Instructions:

Kroppkakor consist of mashed potato, with the addition of flour, rolled into balls, then filled with protein, greens and onion. I share with you a gluten-free vegan version of this delicious classic with a Mediterranean twist.
If lingonberries are not available you can use a small amount of lingonberry jam or currant jam.
Ingredients
425 g yukon gold potatoes
55 g tapioca flour
Filling
1 cup trattkantarell chopped
1 onion finely chopped
4 garlic cloves minced
1 cup kale finely chopped
1 tbsp olive oil
1 tbsp tamari
Salt and pepper to taste
To serve
Lingonberries
Oat yoghurt
Chili oil
Fresh parsley
Blackpepper
Trattkantarell
Instructions
Begin with peeling the potatoes, cut into even sized pieces, then boil in salted water until cooked through. Drain and return to a low heat to steam for a minute or 2 to remove any excess moisture. Pass through a potato ricer, set to one side to cool. Once cool add tapioca and knead.
Add filling ingredients in a pan, fry until cooked well and golden.
Divide the dumpling dough into 8 approximately on a tapioca floured work surface, press the dough into a disc shape. In the centre of each disc place a teaspoon of filling. Gather up the dough and press together to make a ball. Slightly flatten and set to one side. Continue with the remainder.
Heat a little olive oil in a pan and gently fry the mushrooms if using for a couple of minutes. Remove from the pan and set to one side to keep warm.
In a heavy based pan, heat a bit olive oil and carefully fry the both side of the dumplings. Remove from the pan and set aside to keep warm.
Divide the dumplings betwen plates, serve with oat yoghurt chili oil, garnish with the pan fried mushrooms, parsley and lingonberries. Sprinkle blackpepper and serve
If you’re looking for a light alternative to traditional hummus or can’t digest chickpeas, this potatommus is great way as the flavour and texture is so similar to regular hummus. This legume-free hummus comes together in just half an hour and is made with Yukon Gold potatoes the swedish way. Alongside a platter of vibrant crudités or tortilla chips, this super-smooth potatommus is sure to be a hit at your next brunch.


Serves: 2-3
Ingredients
500 g yukon gold potatoes
2 tbsp extra virgin olive oil
1/2 lemon juice
2 garlic cloves minced
3 tbsp tahini
1 tsp pink himalayan salt
For Serving
Tortilla chips to serve
1 tbsp hot red pepper paste
1 tbsp extra virgin olive oil + more as needed
A handful fresh parsley
A handful spring onions
INSTRUCTIONS
1. Pour water into a saucepan to a depth of about 2 inches, add a few pinches of salt, and set over medium-high heat.Meanwhile, peel and chop the potatoes.
2. One the water is boiling, cook potatoes for 10-12 minutes, or until tender when pierced with a fork. Drain the potatoes, rinse them with cold water, and put them in the bowl of a food processor.
3. Add salt and the garlic and pulse a few times. Then add the tahini, lemon juice and process until very smooth. With the processor running, add the olive oil in a steady stream and continue to blend until well combined.
4. Transfer to a bowl. Using a small spoon, spread the hot pepper paste on the potatommus. Drizzle with olive oil and sprinkle with parsley and green onion. Serve at room temperature with fresh vegetables or tortilla chips.
Neapolitan pizza and as many people say and I agree, is the best style of pizza in existence with a thin base, puffy, chewy yet slightly charred with a crispy exterior(known in Italian as the cornicione) as well as simple, high-quality ingredients and toppings. Its unique texture is created by baking the pizza quickly in a wooden-fired hot oven. This baking method of baking also creates the iconic charred/leopard pattern on the crust.


Serves: makes 4 pizzas
For the dough:
1 kg rice flour
15 g pink himalayan salt
850 ml water
3g of fresh yeast or 0.84g of active dry yeast
For the pizza sauce:
1 tbsp tomato paste
1 tbsp olive oil
400 g canned crushed tomatoes
4 tbsp water
6 garlic cloves minced
1 tbsp fresh rosemary finely chopped
1 tsp salt
For the topping:
Thinly sliced cherry tomatoes
Chopped fresh basil
Hempmesan ( blend 1 cup hemp hearts with 1/2 cup nutritional yeast and 1 tsp salt)
Extra virgin olive oil to drizzle
Long java pepper and pink himalayan salt to taste
INSTRUCTIONS:
1. Place the flour ingredients in a bowl expect water. Mix well together. Then add the water and mix well. Let it work for at least 8 minutes.
2. Split the dough into 4 equal size pizza balls using a pizza dough scraper or a knife. And form four pizza balls. I recommend weighting them as well, to check that they are roughly the same weight (around 260-270 g) and after having packed them tightly place them in the fridge for 24 hours.
3. Passed the 24 hours, take and roll out each dough ball by flouring the kitchen surface with rice flour. The final dough must be slightly elastic and easily removed from the surface. If you bake cold pizza dough, stretch in the dough will burn, so leave it at room temperature for at least 2 hours before baking the pizza.
4. Roll out each pizza leaving the edge thicker. The middle of the bases must be less than 0.25cm thick, and the edges about 2.5 cm.
5. In a bowl, mix all pizza sauce ingredients together. Pour the pizza sauce over the pizza.
6. Lay down the sliced cherry tomatoes on your pizza, sprinkle some hempmesan.
7. The dough must be cooked in a wood oven at around 485-500 °C for between 60 to 90 seconds. When you bake pizza at this temperature, the crust will raise up and create the tall, airy crust edge that you associate with Neapolitan pizza.
8. Sprinkle some herbs of your choice, drizzle some olive oil and season with long java or blackpepper.
Notes & Tips:
– Do not add anything else other than written in the ingredient list of the dough. Sugar, oil, and other ingredients in pizza dough will make the crust burn faster, and should therefore be avoided when you bake pizza in a wood-fired oven.
– Do not skip 24 hours sitting period.
– You can make the dough with gluten-free white rice flour, as an alternative Caputo gluten-free flour which is a high-quality Tipo 00 flour also works well.
– You can either use fresh or dried yeast. Fresh yeast tends to give you a little better flavor, but it doesn’t make that much of a difference. You can also use sour dough if desired.
– If you add too many toppings, or too much sauce and cheese, it will take longer to bake the pizza. And you’ll end up with a soggy, underbaked pizza.
In Sweden, February is the month for celebrating Semla – A cardamom flavored Swedish bun. It is also known as Fettisdagen” (Fat Tuesday) in February/March. But Semlor (plural for semla in Swedish) are starting to pop up in the bakeries at the beginning of January.
There is also porridge version of this fat bun called Semmelgröt. It is a warming breakfast dish with a flavour of cardamom served with warm almond milk, whipped coconut cream, almond butter and chopped or sliced almonds on the top. Semmelgröt is truly wonderful for cold winter days to bring some comfort to your way.

serves 1
Ingredients
1/2 cup rolled oats
1 1/2 cup water or almond milk
1 tbsp maple syrup
2 tsp dried raisins
1 tsp ground cardamom
1/4 tsp pink Himalayan salt
For Serving
1/4 cup warm almond milk
1/4 cup coconut cream
2-3 tbsp almond butter
2 tbsp toasted sliced almonds
Instructions
1. Place the oats, cardamom, raisins and salt to the pot. Add the water or plant based milk (oat, pea or almond milk recommended) of your choice.
2. Cook the oats until they are soften enough and the texture has thickened. Stir occasionally during the cooking process.
3. Meanwhile heat the almond milk for the topping in a separate bowl on low heat.
4. In a pan, on low-medium heat toast your almonds, keep your eye on them since they are tend to burn easily.
5. Transfer your porridge to a plate or bowl. Add the almond butter and the whipped coconut cream. Sprinkle some toasted almonds on top.
6. Pour the warm almond milk over the porridge, dust some extra cardamom if you like. Serve immediately.
On Shrove Tuesday, known as Fat Tuesday (‘Fettisdagen’) in Sweden and semlor (plural for semla) is hugely common all around the country. To eat it like local, start with the lid. Use it to scoop up some of the gooey contents. Go on with the rest of the bun.
Those who follow me know how much I love raw semla, but I don’t like the classic bread-like version. This year I wanted to try something different and made gluten-free version with healthy flours. For me, it was better than the classic as we did not eat the doughy middle part of the semla and use its crispy edges as a way to hold the almond paste cream together.
Since I shared it on Instagram, many of you asked for the recipe, I am sharing it below for those who want to try it.
In classic version it is filled with almond paste and topped with whipped coconut cream, I also added rosehip marmalade as an elevated kick.


Serves: 6 buns
INGREDIENTS
Dry Ingredients
10 g instant yeast
120 g almond flour
80 g buckwheat flour
18 g tapioca flour
1 tbsp (8g) psyllium husk powder (some psyllium powders might be lighter on the weight, in this case consider as gram.)
1 tsp ground cardamom
A pinch of pink himalayan salt
Wet Ingredients
190 ml almond or oat milk
35 g coconut oil melted
55 g agave (or coconut nectar, maple, any other liquid sweetener you prefer)
Almond Filling
55g (4 pcs) date paste (make puree in the food processor or cut with a sharp knife into small pieces, then mash with the fork)
100 g almond butter
1 tbsp (15 ml) agave (you can also use maple or coconut nectar. Coconut nectar is my favourite sweetener but since it is not easy to find every country, I simply recommend agave. You can also use other sweetener such as concentrated apple water)
1 tbsp (15 ml) almond oil ( this ingredient is optional and only recommended if you almond butter is not runny enough.)
1/4 tsp pink Himalayan salt + a pinch
Filling 2 (optional)
1 cup rosehip marmalade (or any fruit marmalade you prefer) – (You can use read-to-use one or to make it, simply cook on the stove with the sweetener. For 1 cup fruits use 1/2 cup agave or coconut sugar)
Cream
1 can full fat coconut cream whipped ( use only thick part on the top)
INSTRUCTIONS
1. In a bowl, mix all dry ingredients expect yeast, and set aside.
2. Place the yeast in a bowl. Heat almond milk at 37 C in a saucepan. Pour the almond milk over the yeast and stir until it dissolves. Then add the wet ingredients and stir.
3. Add the dry ingredients to the bun and mix together to form a dough.
4. Let the dough rest for approx. 30 minutes. The most important thing is to allow ample time for the buns to rise. Since you will probably be making these in a cooler February kitchen (on the semla week in Sweden), leave plenty of time for the buns to rise. Keep in mind that they will rise but won’t double since gluten-free.
5. Set the oven to 180 C.
6. Divide the dough into 6 pieces. As the dough is quite sticky, it is easiest to roll the buns by first dipping each piece of dough in a little buckwheat flour. Using your palm, press each ball of dough against the table and roll in circles until the bun is smooth and shiny, as if you are massaging it. Cup your hand around the bun without too much pressure and swirl it around in a circling motion to shape it into a round ball.
7. Cover with a tea towel and leave to rise for 30 minutes.
8. Bake in the middle of the oven for approx. 16-20 minutes. The classic semla which contains require only 10-12 minutes baking time but the gluten-free version is a bit different. They will start to bake after 15 minutes. Then keep your eye on the dough and after 15 minutes with a help of chopstick check if they are cooked inside. I find mine dough well cooked around 18-19 minutes. But it may change depending on the oven you have. Also keep in mind that since it is gluten-free you may feel a little bit wetness in the middle of dough but at the end of cooking time, this is totally ok. You will also scoop out the middle parts.
9. Allow the buns to cool down for 20-30 minutes.
10. Cut off the tops and cut into triangle with a sharp knife.
11. Using a teaspoon, remove the holes of the dough. Do not waste the middle parts, you can bake them in the oven and turn into gluten-free bread crumbs to use later.
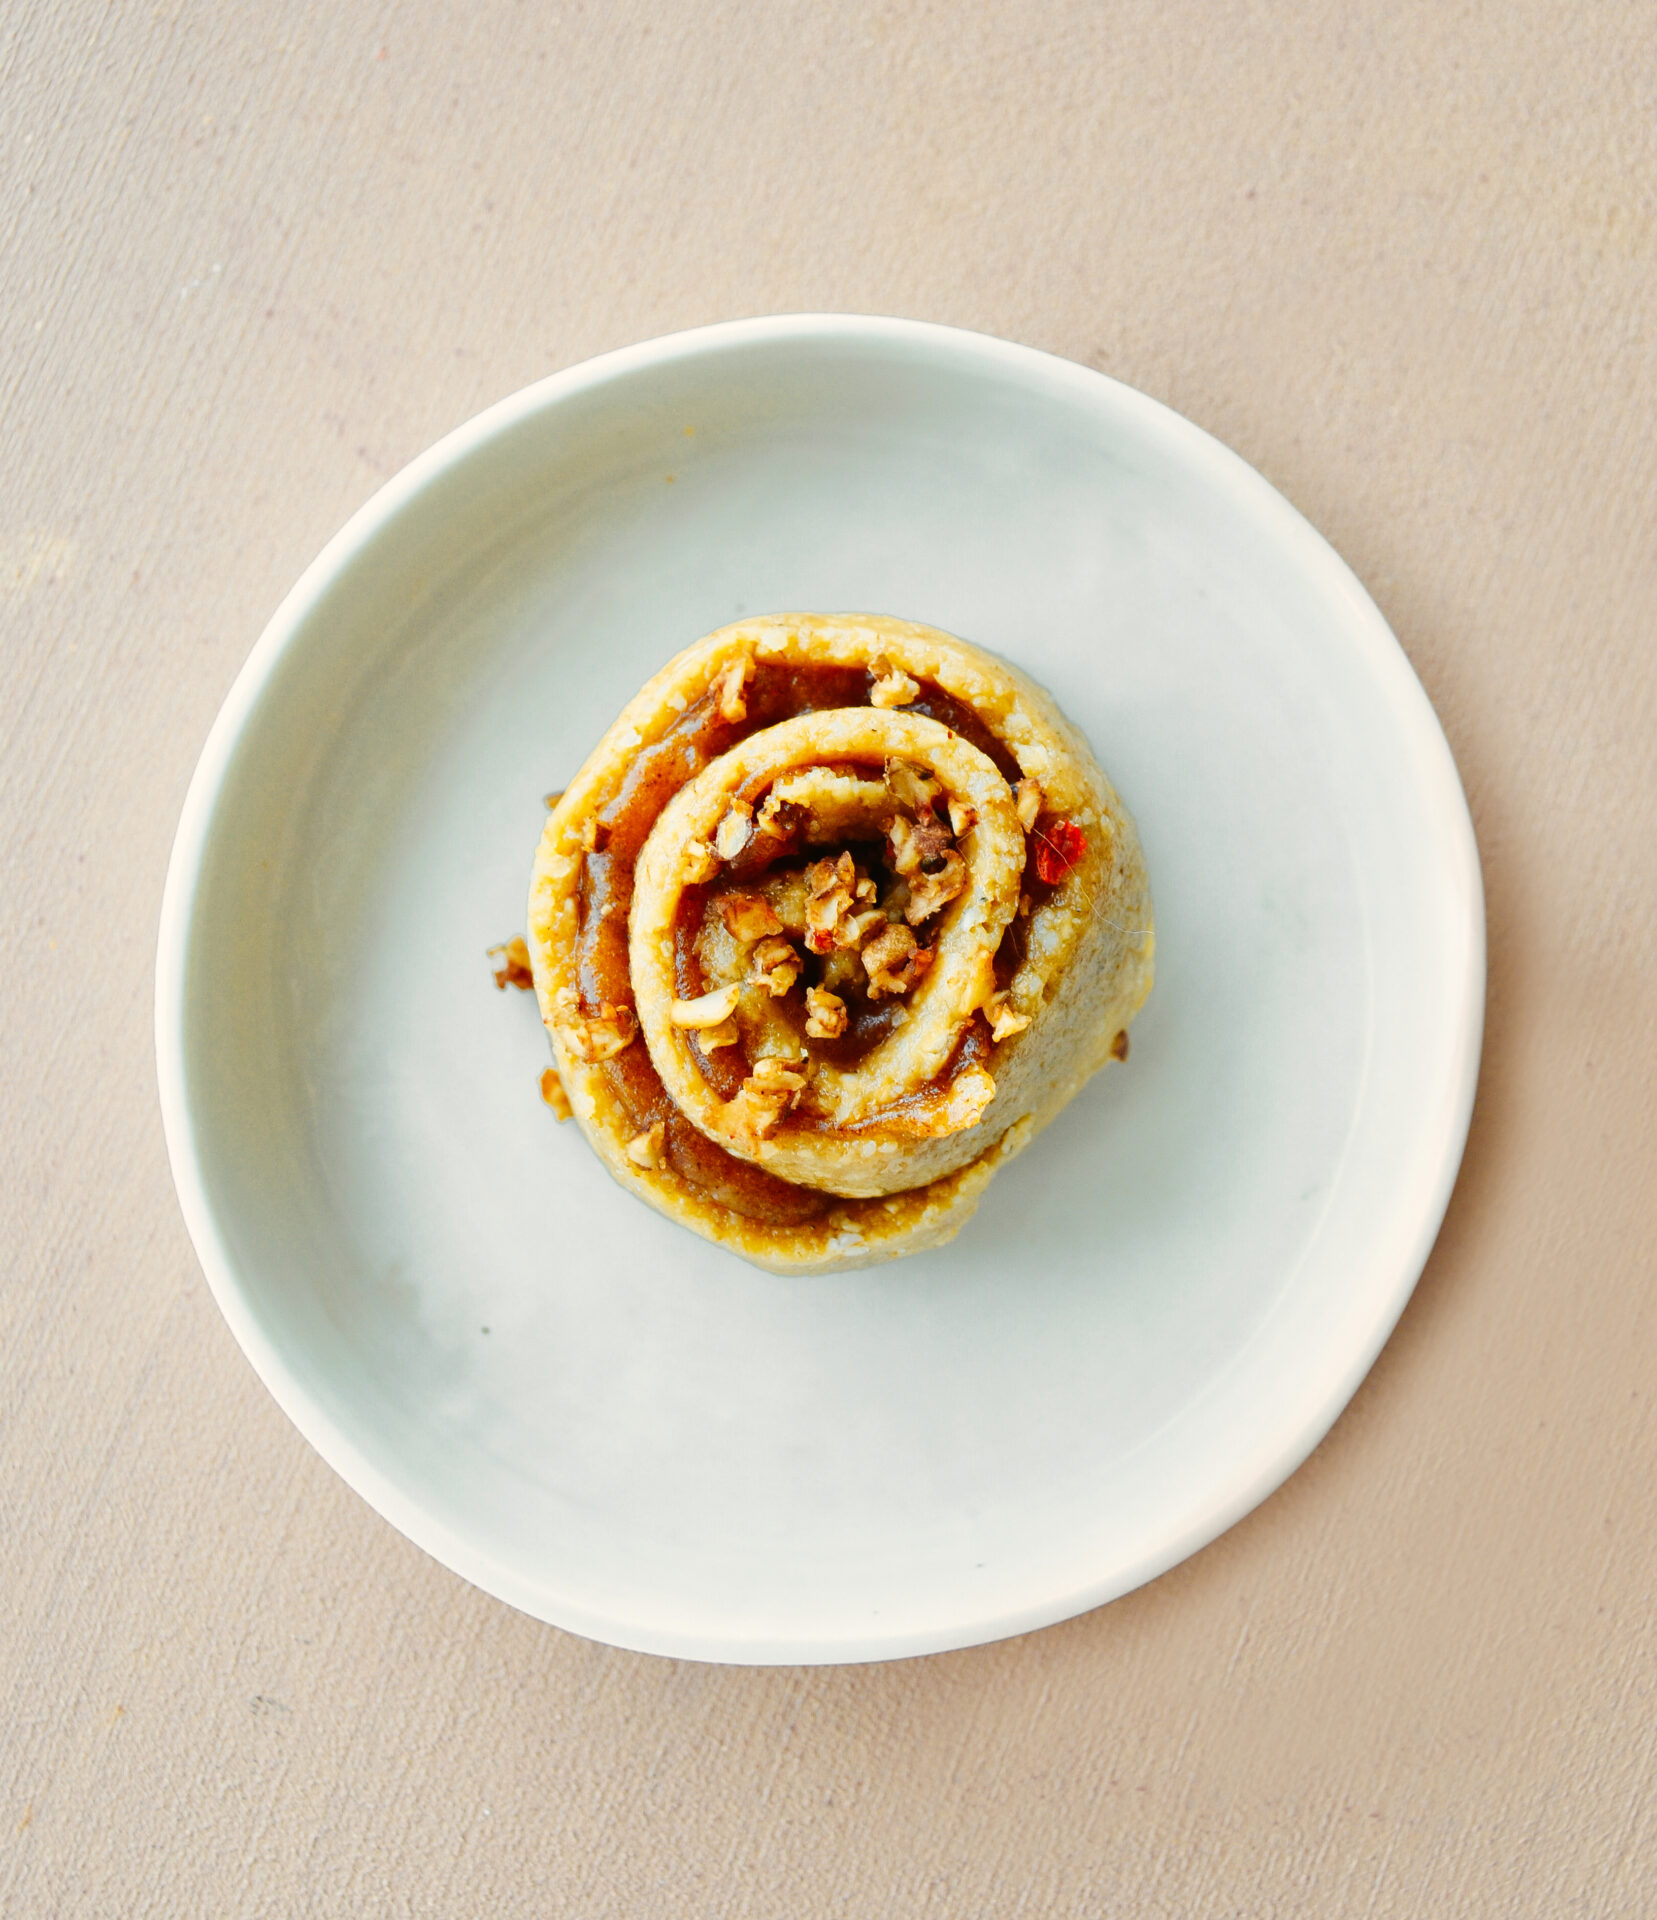
12. In a bowl mix almond filling ingredients. Spread 1 tablespoon almond paste in the hole of semla. Continue with 1 tbsp reship marmalade on the top if you are going to add jam layer as well.
13. Transfer thick fat part of coconut cream in a pastry bag with classic star tip or wilton 2D nozzle as I did . Pipe the cream on the top.
14. Finally put the lid on the top of cream. Using a small tea strainer or duster if you have, dust some finely ground coconut milk powder or coconut flour. Since I don’t use confectionery sugar, I prefer that way. Feel free to use which way suits you the best. Enjoy!

Spaghetti squash is also known as vegetable marrow or noodle squash – A nutritious winter vegetable that offers lots of fibre, rich in beta-carotene and folate. Vitamin C and vitamin B6 are also important vitamins found in spaghetti squash. Due to its low calorie content and high fiber content, it may aid weight loss and digestive health. Regular spaghetti contains on average about 200 calories and 42 grams of carbohydrates per serving (60g). However, spaghetti squash contains only 70 calories and around 17 carbohydrates per serving. A serving of spaghetti squash is about 120 g, and one spaghetti squash serves 4-5 people depending on size.
Tip for making the perfect spaghetti squash: Cut them into rings! When you cut the squash into rings, as opposed to just slicing it down the middle, you work with the strands, not against them, since the spaghetti squash strands run horizontally, in a circle, inside of the squash. When you follow this method you will never get soggy squash anymore, just make sure you don’t cook longer than needed.
The exact cooking time will vary depending on the heat of your oven and the size of your squash.

HOW TO?


A comforting hearty pasta dish, one of the best ways to use beetroots and perfect for cold winter days.

Ingredients
200 g pasta of your choice ( I use brown rice rigatoni)
250 g beetroot
200 ml plant based milk (almond or oat milk recommended)
1 large onion
30 ml vodka (skip this if you don’t use alcohol)
1/4 cup hemp hearts (cashews also work)
2 tbsp nutritional yeast (optional)
2 tsp pink Himalayan salt
1/2 tsp black pepper
1/4 cup olive oil ( or use water if you are into oil-free)
1/2 lemon juice
2 tbsp toasted pine nuts
1/4 cup chopped scallions
4 garlic cloves sliced and toasted
1 cup broccoli crown roasted
Plant based yoghurt to serve
INSTRUCTIONS
Preheat oven to 200 degrees. Peel and wash your beets and onion. Roughly cut in chunks. Place the beets and onion into a pyrex, pour vodka and 1 tbsp olive oil over the beets and let roast in the oven for 20 minutes.
Place roasted beets, hemp hearts, plant based milk, green onion, lemon juice, nutritional yeast, pepper and salt in a food processor, mix on high until get completely smooth mixture.
Transfer mixture in a large pan, add another tbsp olive oil, stir on medium heat for 5-6 minutes.
Add your pasta into the sauce. Toss well until all pasta coated with the sauce.
Serve with roasted broccoli, pine nuts, garlic and plant based yoghurt.
If you love this recipe, you might be interested in my healthy comfort food recipe book called FOOD WE LOVE.

Stuffed leeks are a great way to use up the entire vegetable, including the often-discarded green tops.
In this recipe, the leeks are stuffed with rice, inner parts and tops of leeks and pea mince as a vegan meat alternative (mushroom leftovers also can be used), served with tomato sauce, and yoghurt. This dish can be served as a main course or side dish. If you’re craving for some comfort food in these winter days, it will definitely please you and your friends.

Try my recipe below:
Ingredients
1 kg leeks outer large parts for stuffing (chop inner parts and use in filling mixture)
1/2 cup brown rice
1 1/4 cup water
2 tbsp pea mince (mushrooms can be used as an alternative)
1 tbsp soy sauce (use tamari for gluten-free and coconut aminos for soy-free)
1/2 carrot diced
1 red pepper diced
1 onion finely chopped
4 garlic cloves minced
2 tbsp olive oil (use water or beet juice for oil-free)
1 tbsp fresh rosemary finely chopped
1 tsp salt
For the Sauce
3 tbsp tomato paste
1 tbsp hot red pepper paste
3 garlic cloves minced
1/3 cup water
3 tbsp olive oil
1 tsp salt
1 tbsp fresh rosemary chopped
For Serving
1 cup cashew yoghurt
A handful of parsley leaves chopped
A handful of scallions chopped
INSTRUCTIONS
1. Preheat the oven to 180°C.
2. In a pot, combine all the filling ingredients.
3. Trim the bottom of the leeks, make a lengthwise slit to the center, and separate them into leaf-like layers. Place in a large pot, add 1 lt hot water, let it sit for 10-12 minutes, then strain and set aside. Chop the green tops and inner parts of leeks, set aside.
4. Wash and rinse your rice. In a pan, add minced garlic, chopped inner parts of leeks, rosemary, onion, diced carrot, peppers and olive oil, cook until golden, then add pea mince and rice mix together. Lastly add salt, soy sauce, tomato paste and water, cover the lid, cook until the mixture absorbs all water content. Your mixture will be semi-cooked as you will continue to baking process in the oven.
5. Place a spoonful of the filling at one end of each leek, fold it into a triangular shape, and continue folding along the length of the leek until it resembles a pastry.
6. Arrange the triangles in a baking dish.
7. Mix all the sauce ingredients and pour them over the triangles. Cover with damp parchment paper and foil then bake for an hour and 10-12 minutes.
8. Remove the cover and bake uncovered for an additional 15-20 minutes.
9. You can also arrange the leeks in a flat pot, add an extra cup of water to the sauce, and simmer n low heat until they become tender.
If you love this recipe, you might be interested in my healthy comfort food recipe book called FOOD WE LOVE.
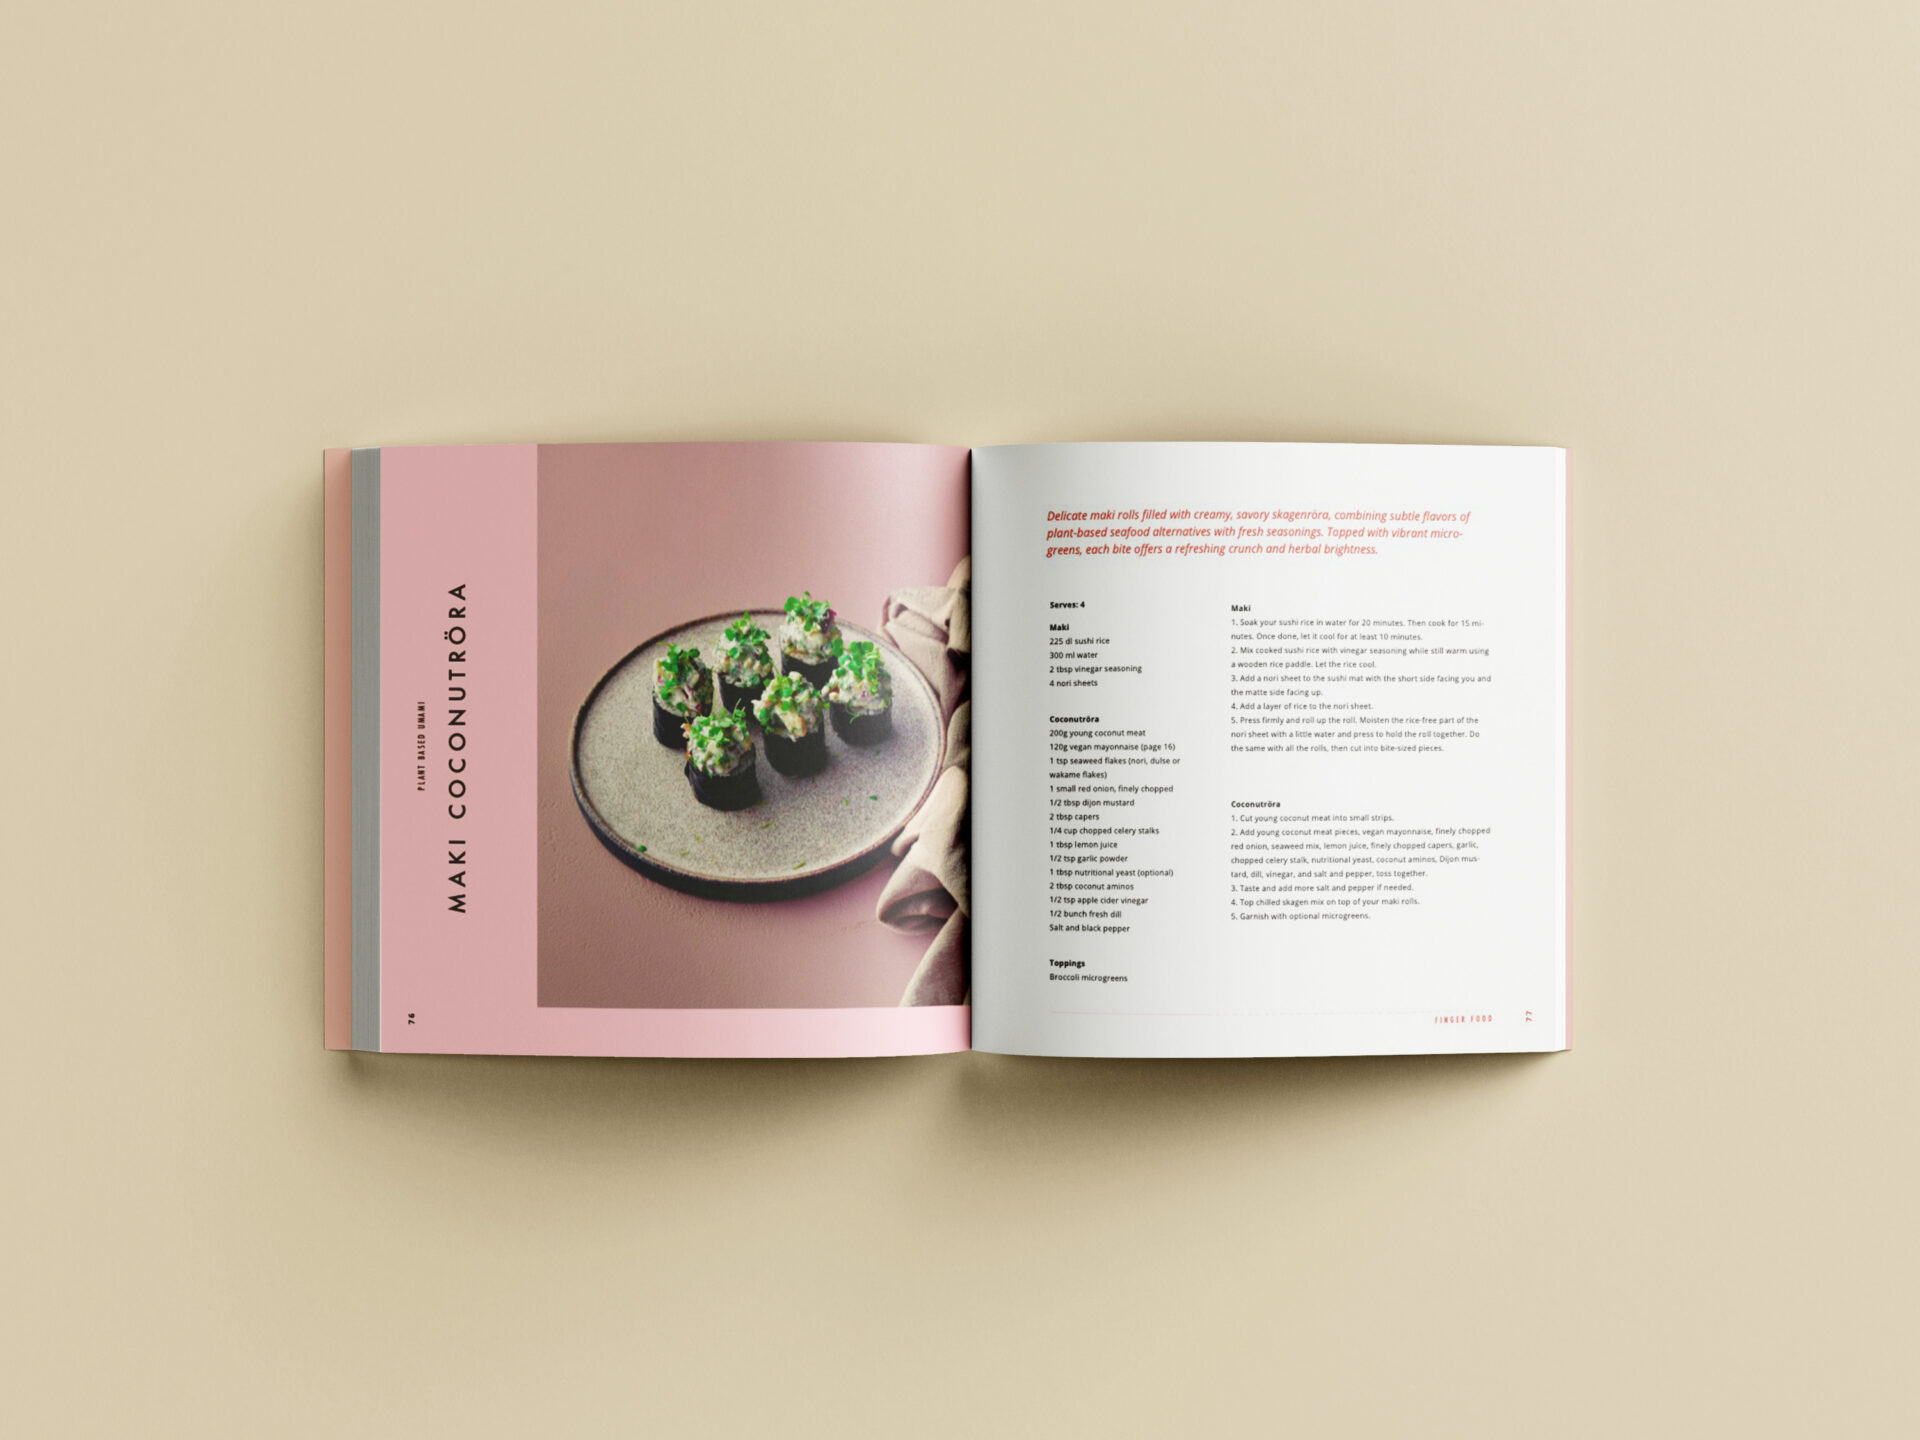
Maki is the Japanese term for sushi rolls, it only has only one filling at a time.
Here I’m sharing one of my favorite maki recipes with korean kimchi resulting in its unique tangy and pungent taste.
Kimchi has a very spicy, tangy, and pungent flavor with a combination of umami, saltiness, and a hint of natural sweetness. It is made using salted fermented napa cabbage, carrot and radish.
Since this make is flavoured with avocado cream, you don’t need have to use soy sauce or wasabi.
This maki is soy-free, also perfect for those who don’t prefer to eat white rice.
makes 6 maki ( 36 rolls )
INGREDIENTS
250 g black rice
700 ml water ( may vary depending on the type of your black rice, check package instructions before cooking)
6 nori sheets
200 g vegan kimchi
1 large avocado
1/2 lemon juice
3 garlic cloves minced
1 tsp salt
4 limequat for topping
INSTRUCTIONS
1. To cook black rice, add water, and rinsed black rice into a pot. Over medium-high heat, bring the water to a boil. Add the salt, reduce heat, cover, and cook for about 30 minutes until the rice is tender and and all water is absorbed.
Turn off the heat and let it stand covered for about 5 to 10 minutes, then fluff with a fork. Do not skip this step since unlike the regular sushi rice, black rice isn’t naturally sticky.
2. Drain your kimchi to remove as much water as possible as this will help you to roll the kimchi so that everything holds together. Set aside some carrot slices from the kimchi, for decoration.
3. Peel your avocado, discard the seed, transfer avocado meat into a food processor, add lemon juice, minced garlic and salt. Blend until creamy. Transfer cream into a piping bag, set aside.
4. Once your rice has cooled down, place a nori sheet shiny side down on a sushi mat. Using a rice spoon, spreading the rice thinly and evenly on the nori sheet, leaving about 1 inch (2.5 cm) of space at the top. Be sure that the rice also covers the sides. You can also use maki tool to make filling easier. Then arrange some kimchi. With your thumbs lifting the lower side of the mat, and your other fingers pressing the filling gently so they stay in place, roll up so the bottom side is just above the filling. Press the sushi mat with your fingers to tighten them. Continue rolling and pressing with the sushi mat. To seal the roll, moisten the top edge of the nori sheet with water using your finger. Repeat rolling the sushi with the remaining ingredients. Cut each sushi roll in half, then cut each half into two again, and repeat until you have about 6-8 pieces of sushi from each roll.
5. Top with avocado cream, fermented carrot strips from the kimchi and limequat.
Best when consumed in the same day, can be kept in the fridge up to 3 days.


INGREDIENTS
200g spaghetti of your choice (serving 2)
40 g fresh basil
1 dl raw cashews
3 tbsp elgranbotanico olive oil
3 tbsp nutritional yeast (optional)
4-5 garlic cloves
1/2 lemon juice
1 dl water
1 tsp salt
1/2 dl pine nuts toasted
INSTRUCTIONS
Combine basil, garlic, cashews, nutritional yeast, salt and lemon juice in a blender. Add olive oil in a slow stream until emulsified. Transfer to the pot. Add some water and thin on a low heat. Then cook un medium heat until bubbled while stirring constantly. Toss with your cooked spaghetti. Add toasted pine nuts and fresh basil. Enjoy!


One of my most loved creations from 2023 Raw collection. The balsamic vinegar adds a nice tangy dimension to sweet beets, and creates a complementary flavor with chocolate.
INGREDIENTS
120 g dried raisins soaked
100 g raw chopped beetroot
40 ml balsamic vinegar
20 g raw cacao powder
55 g desiccated coconut
90 g almond flour
20 g cold press coconut oil melted from Pureness
4-5 drops reishi extract from Pureness
1/4 tsp pink himalayan salt from Rivsalt + more as needed ( taste before shaping, to add more dimension add a little bit more salt if you need)
For dipping
150 g melted raw chocolate from Wermlands
Freeze dried lingonberry powder to sprinkle, from Mother Earth brand, Glimja
INSTRUCTIONS
1. Place balsamic and beets in a food processor. Blend together until beet is chopped into very small pieces (rice-like).
2. Then add soaked raisins and continue to blend until you get a smooth paste.
3. Add the cacao powder, desiccated coconut, almond flour, pink Himalayan salt, reishi and melted coconut oil. Blend together.
4. Transfer dough to a bowl, sit in the freezer for 30 minutes.
5. Once time is up, and the dough is thickened enough, roll the dough into small balls in desired size with your hands. Freeze for 10-15 minutes while you are melting the chocolate.
6. Melt the raw chocolate using bain marie, let it cool at room temperature for 10 minutes.
7. Remove the balls from the freezer. Dip each one in melted chocolate. Let it cool on a parchment paper.
8. Sprinkle some fd lingonberries on top.
9. Place in the refrigerator for 15-20 minutes before serving.

If you loved this recipe you might be interested in our raw books: “RAW FIKA“, “GOURMET RAW CAKEBOOK” and “MAD ABOUT RAW.” For more, visit our SHOP.
Do you know that our first raw book called “GOURMET RAW” that first published in 2019, now has its expanded and new edition with 140 recipes? We want it to be accessible to all, so the kindle edition is now only 9.99 USD !

RAW FIKA IS OUT NOW, ORDER HERE!
Celebrating the little moments of life with sweet breaks, “Raw Fika” – a modern healthy dessert book a delicious compendium of nearly 50 recipes, designed by Chef Nazli Develi, is served throughout the year in Sweden.
This collection of seasonal raw recipes includes classics such as
Kanelbulle (Cinnamon Bun)
Semla (Fat Tuesday Bun)
Princesstårta (Princess Cake)
Kladdkaka (Sticky Brownie Cake)
Lussekatter (Lucia Buns)
Blåbärstårta (Blueberry Cake)
Jordgubbstårta (Strawberry Midsummer Cake)
Gräddbulle (Cream Buns)
Pepparkaksbollar (Gingerbread Balls)
Hallongrottor (Raspberry Caves)
Dammsugare (Swedish Vacuum Cleaner)
Rulltårta (Roll cake)
Singoalla (Chocolate Shortbread Biscuits with Jam)
Schakrutor (Chessboard Cookies)
Chokladsnittar (Diagonal Cut Chocolate cookies)
Some of sju sorters småkakor (Seven Types of Seven Cookies)
Smulpaj (Apple Crumble Pie)
Morotskaka (Swedish Carrot Cake)
and more…
But also modern, more casual sweets such as Kitkats, Coconut Bacon Brownies, Mango Chocolate Tart, Black Forest Cake, Heliodor Truffles with Solar Plexus Crumb, Matcha Yuzu Cake, Emerald Pandan Cake, Golden Milk Cake, Raspberry Valentines Day Cake, Cherry Buckwheat Crunchy Slices, Oat Tiramisu, Classic Tiramsu Cake, Tosca Coins and more.
The book starts with a “Swedish Pastry Calender” to help you catching up everything through the year, continues with detailed knowledge about raw fika ingredients and make-ahead pastry staples. And you find almost 50 brand-new fika recipes with photos.
For traditional desserts, there are also different take-ons and flavour ideas. For example 3 ways of Swedish Vacuum Cleaner: traditional green, bounty, citron and 3 ways of Semla: chokladbollsemla with avocado frosting, almond raspberry jam version, chocolate version. You will also find re-interpreted and refined desserts with a touch of the big wide world.
With the emphasis always on simplicity, but also quality, seasonal ingredients, these fika recipes are pure joy to share and enjoy with those you love.


Design : Studio Aurora
Photography: Nazlı Develi
Editor: Stella Nilsson
Pages: 135
Paperback Item Weight: 12.3 ounces
Book Dimensions: 8.5 x 0.32 x 8.5 inches
Language: English
Published in February 2023, Copyright All Rights Reserved


Get your copy via our sales channels:


AKADEMIBOKHANDELN SWEDEN

Serves: This recipe makes 6 cm 4 pieces cookie
Time: 10 minutes preparation + 10 hrs dehydration
INGREDIENTS
1 tsp chia seeds + 2 tbsp water
1/2 cup sprouted oat flour (Groddat Havremjöl from Da Carla, can be purchased from body store if you are in Sweden. Otherwise check options in your country or Amazon store. You can also sprout whole oats then dehydrate and grind into fine flour.)
2 tbsp raw cacao
1/2 tbsp raw coconut sugar
2 tbsp maple syrup ( or agave, coconut nectar)
2 tbsp unroasted hazelnut butter
1 tsp extra virgin olive oil
1/4 tsp licorice salt (from Saltverk Iceland, can be purchased from RawLiving UK . this salt adds another layer of dimension to the overall taste experience. So don’t skip but if you can’t do, just use pink himalayan salt)
1/4 tsp baking powder
2 tbsp chopped raw chocolate (Wermlands Raw Choklad or make your own.)
INSTRUCTIONS
1. In a mixing bowl, mix chia seeds and water. Keep stirring for the first minute or so to prevent the chia seeds from clumping together. Then set asid for 5 minutes.
3. Then add the rest of ingredients in the chia seed mixture. Stir well to combine.
4. Fold in the chopped chocolate.
5. Transfer the dough onto a baking tray lined parchment paper. Lightly wet your hands with a little bit olive oil and shape the dough into small cookies. ( 6 cm X 4 pieces ) The cookie won’t spread, so shape it the way you want the end result to look like.
6. Dehydrate for 8-10 hours (or overnight) until fully dried both sides of the cookies in the Excalibur dehydrator.
7. It can be stored in the airtight container or jar up to 2 months. Once opened the jar, consume immediately for the best taste.

This Raw Chocolate Cookie recipe is from our “Mad About Raw: Exclusively Designed Raw Food Recipes” (Expanded Second Edition) Cookbook.
If you loved this recipe, you might be interested in our “ Mad About Raw” Cookbook.


Ingredients
90 g white quinoa uncooked
130 g water
1/4 tsp salt
Instructions
1. Soak the quinoa in a bowl for at least 3-4 hours to remove its phytic acid and bitter taste.
2. Once soaked, rinse and strain, transfer to your blender along with the water and salt.
3. Blend for 40-50 seconds at a high speed blender or until the batter is smooth. The batter will not be too thick, it is just more liquid like a crepe batter.
4. Transfer the batter into a large bowl and let it sit for 10-12 minutes to thicken.
5. Warm a non-stick pan over medium heat and spray a little bit of olive oil all over the pan.
6. Pour 1/4 cup of batter into the center of the pan and using the back of a spoon.
7. Cook for 2 minutes on one side, then flip and cook on the other side.
8. Repeat the process for the rest. Make sure you spray the pan with olive oil for each crepe.
Storage: up to 2 days in an airtight container.
This recipes makes 5 x 20 cm crepes. Double the ingredients for big batch.
Serve with pulled oyster mushrooms, tomatoes, green onions, parsley and hemp hearts or with your favorite filling.
If you loved this recipe, you might be interested in our “FOOD WE LOVE: Feel-Good Wholesome Plant Based Recipes from Scratch”.
Bibimbap – A korean iconic dish which tastes so unique with authentic flavours even though it seems like a kind of buddha bowl.
In Korean, the word bibim means “mixed” and bap means “rice”, so bibimbap literally translates to “mixed rice”.
It is a warm bowl of mixed rice topped with various individually prepared seasoned raw and cooked vegetables, a protein of choice, and served with korean hot red pepper sauce called “gochujang.”
As the bibimbap mainly consists of rice and vegetables, it can be easily veganized no matter what Korean restaurant you go to. Just ask for tofu or mushrooms instead egg and meat.
I learned this delicious dish and more about Korean temple food during my visit to Seoul this year. There were so many variations of bibimbap I tasted and loved, the recipe I’m sharing is just one my favorite ways to eat it and close to original version.


Ingredients
1 cup brown rice or mixed rice of your choice
200 g oyster mushrooms
200 g pulled young jackfruit
2 tbsp olive oil
1 tbsp tamari or coconut aminos
1 tbsp gochujang + more for serving
1/4 cup pickled daikon (see below)
1/4 cup kimchi
5-6 shishito peppers
1/4 cup bean sprouts
100 g spinach
1 shallot
3 garlic cloves minced
1 julienne sliced carrot
2 toasted nori sheets
Pickled daikon
70 g daikon julienne sliced
50 ml rice vinegar
50 ml water
1 tsp pink himalayan salt + more as needed
1 + 1/2 tbsp coconut sugar
1/2 tsp gochugaru korean red pepper powder
Instructions
1. Preheat oven to 200°C with fan. Clean mushrooms with a damp paper towel. Using your hands, pull the mushrooms roughly into pieces. Set on a parchment paper-lined baking sheet.
2. Strain the excess water of canned jack fruit, repeat the process for jackfruit as well.
3. Drizzle with 1 tbsp of the oil, 1 tbsp tamari and korean hot pepper paste. Toss around to evenly coat the mushrooms and jack, then bake for 20 minutes, or until mushrooms and jack are a bit crispy and brown on the edges.
4. To make pickled daikon, julienne slice the daikon and place in a jar.
Bring rice vinegar, water, coconut sugar and salt to a gentle boil.
Pour the hot pickling liquid over the daikon. The pickles can be eaten straight away, but they are worth making a day in advance as their flavour develops with time you sit them. Store in an airtight jar in the fridge. They can be stored up to 4-5 weeks.
5. Heat up 1 tsp of oil in a medium non-stick pan. Throw in the shishito peppers and fry them by pressing down with a lid of pot from time to time until they are nicely browned on all sides. Season with salt and set aside.
6. Throw in the spinach and chopped onions and a splash of water. Cook on a low heat, stirring from time to time, until the spinach wilts and most of the excess water cooks out. . Add some minced garlic and stir well. Season with salt and pepper. Set aside.
7. Throw the julienne sliced carrots, 1 tsp olive oil and a pinch salt, fry on medium-high heat for 1-2 minutes. Set aside. Repeat the process for bean sprouts or you can serve them raw if desired.
8. Using a sharp knife, thinly slice toasted nori sheets. Set aside.
9. Divide all the veggies, kimchi, pickled daikon, thinly sliced nori sheets, oven baked pulled mushrooms and jackfruit between two bowls. Sprinkle with asian sesame seeds and top with extra gochujang about 1 teaspoon. Enjoy!
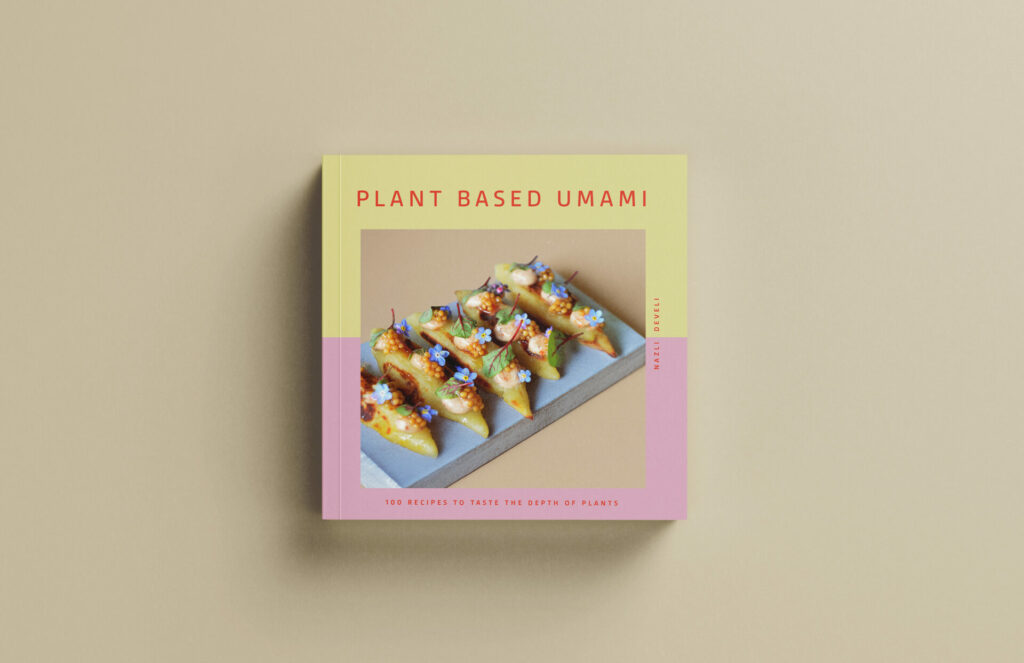
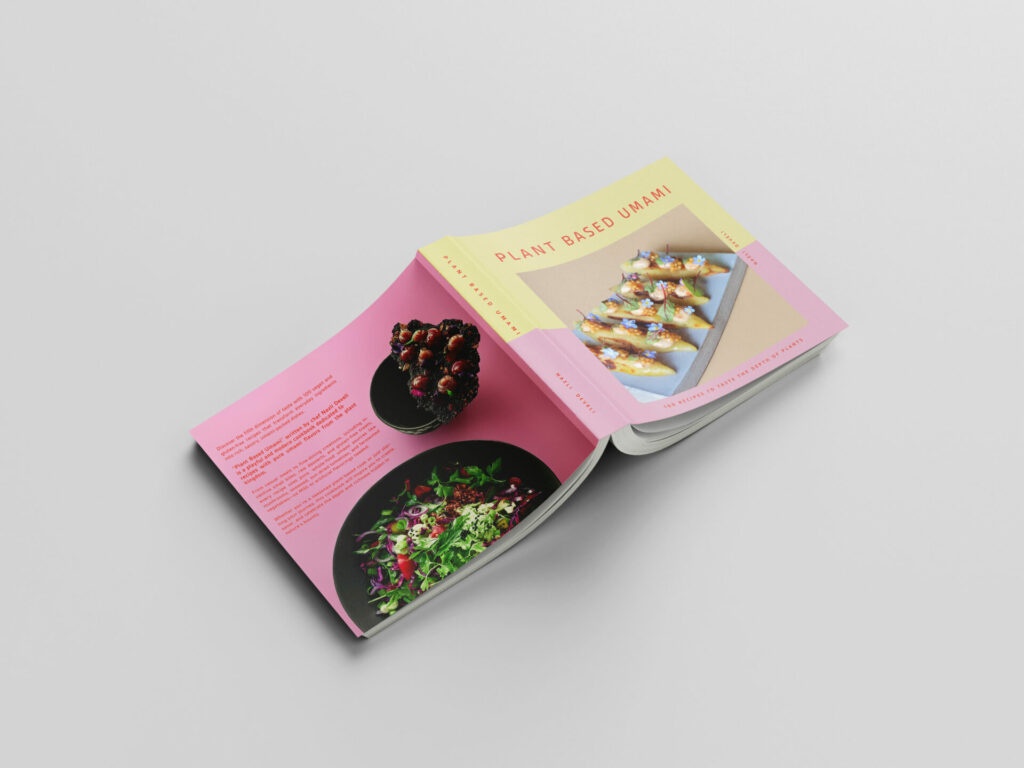
PLANT BASED UMAMI IS OUT NOW, ORDER HERE!
Step into the world of bold, savory flavors with 100 vegan, gluten-free recipes designed to delight your taste buds and elevate everyday cooking. This cookbook explores the fifth dimension of taste—umami—showing how pure umami sources such as mushrooms, seaweed, sun-dried tomatoes, herbs and other plant-based ingredients can transform simple dishes into memorable, deeply flavorful meals.
Inside, you’ll find a mix of casual comfort foods, elegant small bites, raw desserts, and gluten-free dessert creations, all crafted to showcase the richness and complexity of plant-powered cooking. Each recipe is designed to be approachable yet sophisticated, perfect for both professionals and home cooks who love experimenting with flavors and textures.
Whether you’re cooking for yourself, friends, or special occasions, Plant-Based Umami invites you to play with ingredients, explore new flavor combinations, and enjoy the art of plant-based cooking in a joyful and inspired way.
Get your copy via our sales channels:
A rich, hearty meat free vegan chilli recipe packed with flavour. The perfect comfort food to keep you warm during winter nights. This chilli con carne has all the taste and kick of a classic chilli con carne, but with fewer calories and less saturated fat. What’s not to love?

Ingredients
70 g pea mince
40 g puy lentils
2 tbsp olive oil
1/2 carrot
1 onion
4 garlic cloves
1 fresh chili
1 tsp oregano
1 tsp red pepper
1 tsp ground coriander
1 tsp cacao (optional)
1 tbsp tomato paste
1 tbsp soy sauce
1/2 tsp salt
To serve
1 cup guacamole (see below)
1 cup cashew yoghurt (see below)
1 cup cooked rice
A bunch of fresh coriander (or parsley)
1 cup nachos
For guacamole
1 large avocado
1/2 lime juice
1 tomato cubed
1 jalapeno diced
1/2 tsp salt
2 garlic cloves minced
For cashew yoghurt
90 g cashews soaked
60 g coconut cream
30 ml lemon juice
Water as needed
1 tsp salt
INSTRUCTIONS
To make guacamole, slice the avocados in half, remove the pit, and scoop into a mixing bowl. Mash the avocado with a fork and make it as chunky or smooth as you’d like. Add the remaining ingredients and stir together. Give it a taste test and add a pinch more salt or lime juice if needed. Set aside.
To make quick cashew yoghurt, place soaked and rinsed cashews along with all cashew yoghurt ingredients in a blender, blend on high speed, let it sit in the fridge at least 2 hours before using.
Pre-heat the oil in a large frying pan and cook the onion for 5-6 minutes or until beginning to soften. Add the red pepper and continue to cook for a further 5 minutes. Add the chillies, garlic and spices and cook for a further 2 minutes stirring continuously.
Stir in the tomato puree and soy sauce and bring to a gentle simmer for 8 minutes stirring occasionally. Stir in the pea mince and cooked puy lentils and cacao if using. Cook over a gentle heat for a further 10 minutes and season to taste.
Stir in the chopped coriander (or parsley if you don’t like coriander) and serve with rice, guacamole, cashew yoghurt, jacket potatoes or with nachos for a delicious dinner.

Ingredients
200g pasta of your choice
2 cups cavolo nero chopped pan fried
2 cups pan fried wild chanterelles
1 cup oat cooking cream
1 tbsp miso paste
2 tbsp olive oil
Blackpepper and salt to taste
Hempmesan (nutritional yeast, garlic powder, salt, hemp heart mixture)
Instructions
Cook pasta according to package instructions.
In a large pot, add cooking cream, miso paste and olive oil, cook until bubbled. In a separate pan, fry the cavolo nero with a little olive oil and salt. Remove them from the pan. Repeat the process for the mushrooms as well.
Then transfer mushrooms and cavolo nero into the pan. Add the cooked pasta. Toss well with the sauce. Sprinkle some hempmesan. Adjust the salt and pepper. Enjoy.